
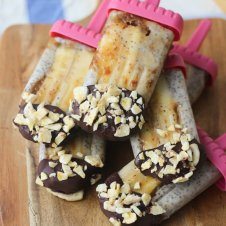
Healthy Strawberry Lemonade Homemade Pop-tarts that are the perfect good-for-you treat when you need a little pick me up.

My mom was what I call a real-world mom. We weren’t raised on house churned grass-fed butter, or organic free-range ducks from our backyard. Nope. We were a busy family. We were always on the run to some activity, class or job, so most of our meals were usually in the car. I would be lying if I said that these homemade pop-tarts weren’t a morning staple and that “blue” was the breakfast flavour of choice. Today, not a whole lot has changed.
Table of contents
Why This Recipe Works
Okay, so I am a dietitian and I prefer my pop-tarts from a bakery, not a box, and served at the dining room table (usually) after dinner as dessert, but I still have a serious nostalgic love for the things. I can’t believe I don’t have a homemade pop-tart recipe on my blog, so I figured this was the time to do it. I love this recipe because it’s
- Packed with more fiber than traditional pop tarts (~3 grams per serving)
- Customizable — perfect for picky eaters
- A great way to get kids involved in the kitchen!
- Completely vegan!
Key Ingredients
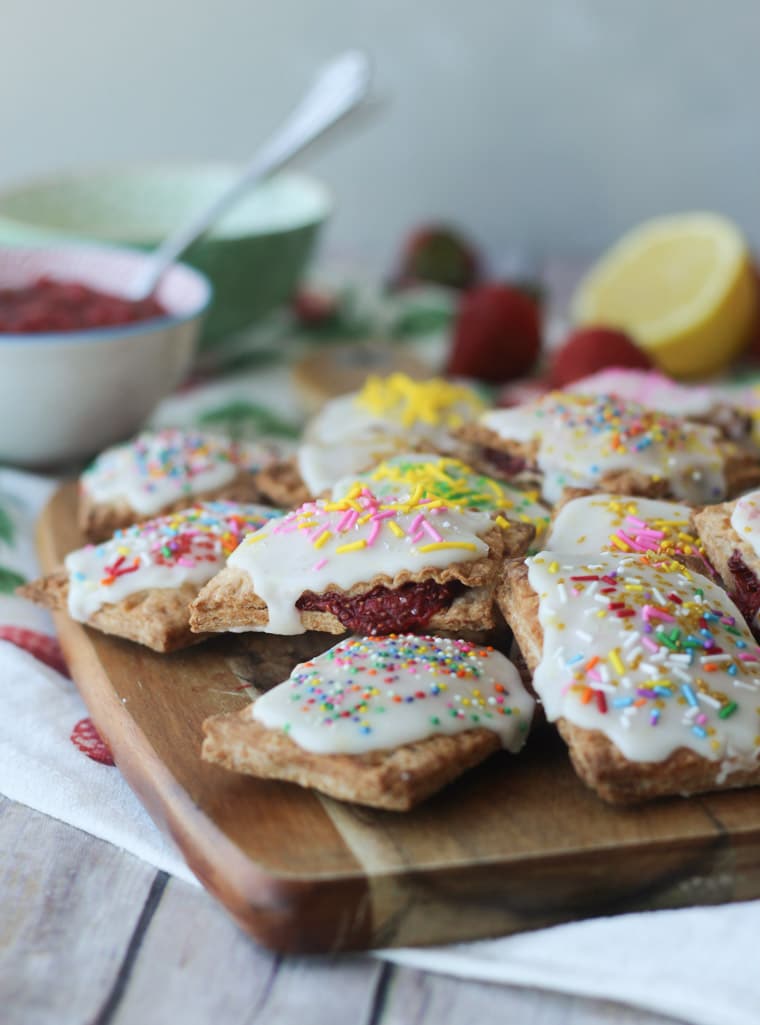
Strawberries & Cherries – These are needed to make the delicious filling for our homemade pop-tarts. Strawberries and Cherries are packed with antioxidants and naturally add some sweetness to reduce added sugar content.
Chia Seeds – Chia seeds add extra fiber and are packed with healthy omega-3 fatty acids which ups the nutrient density of these homemade pop-tarts.
Wheat Pastry Flour – To ensure that these homemade pop-tarts turn out perfect, make sure you you purchase wheat PASTRY flour, not regular wheat flour! It may throw the texture off.
How to Make This Recipe
Chia Jam:
Step 1: In a saucepot, heat the cherries and strawberries until they start to bubble and get syrupy. Once super soft, mash them with a potato masher until the mixture is jammy, loose, and with some visible little bits of fruit in it.
Step 2: Add in the lemon juice and maple syrup, and taste. Adjust the lemon and maple syrup depending on the sweetness of your fruit.
Step 3: Take the mixture off of the heat, transfer it to a container and add in the chia seeds. Allow the mixture to set for at least 20 minutes, or until it thickens up. You’ll have lots of extra jam so you can use it on toast or on oatmeal throughout the week.
Pop-tarts:
Step 1: In a large bowl, mix flours, salt and sugar. Cut in the cold coconut oil with a pastry cutter or fork until you see tiny pea-shaped pieces in the dough.
Step 2: Drizzle in the vanilla and one tablespoon at a table, add in the ice cold water. It should be moist enough that you can form it into a ball without it flaking away, but not sticky.
Step 3: Cut the dough in half and lightly flour your surface and rolling pin. Roll out the dough to just a few millimeters thick then cut into 5 cm by 7 cm rectangles. Place the rectangles on a baking sheet lined with a silpat or parchment paper.
Step 4: Place one heaping teaspoon of jam onto half of the dough rectangles in the centre. Then wet your finger and moisten all around the perimeter (around the jam). Top with another rectangle, and using your fork, crimp the edges to seal. Poke three sets of three holes into the top of the pop tart with your fork. Continue with remaining pop-tarts. Place the baking sheet in the fridge to set for 20 minutes.
Step 5: Heat the Philips Airfryer to 400 F. Add four pop-tarts to the fryer basket and set the timer for 10 minutes. Remove and repeat with the remaining pop-tarts until they’re all cooked. Allow to cool for about 20 minutes.
Lemon Glaze:
Step 1: In a bowl, mix together the powdered sugar, lemon juice, lemon zest, coconut oil and vanilla extract.
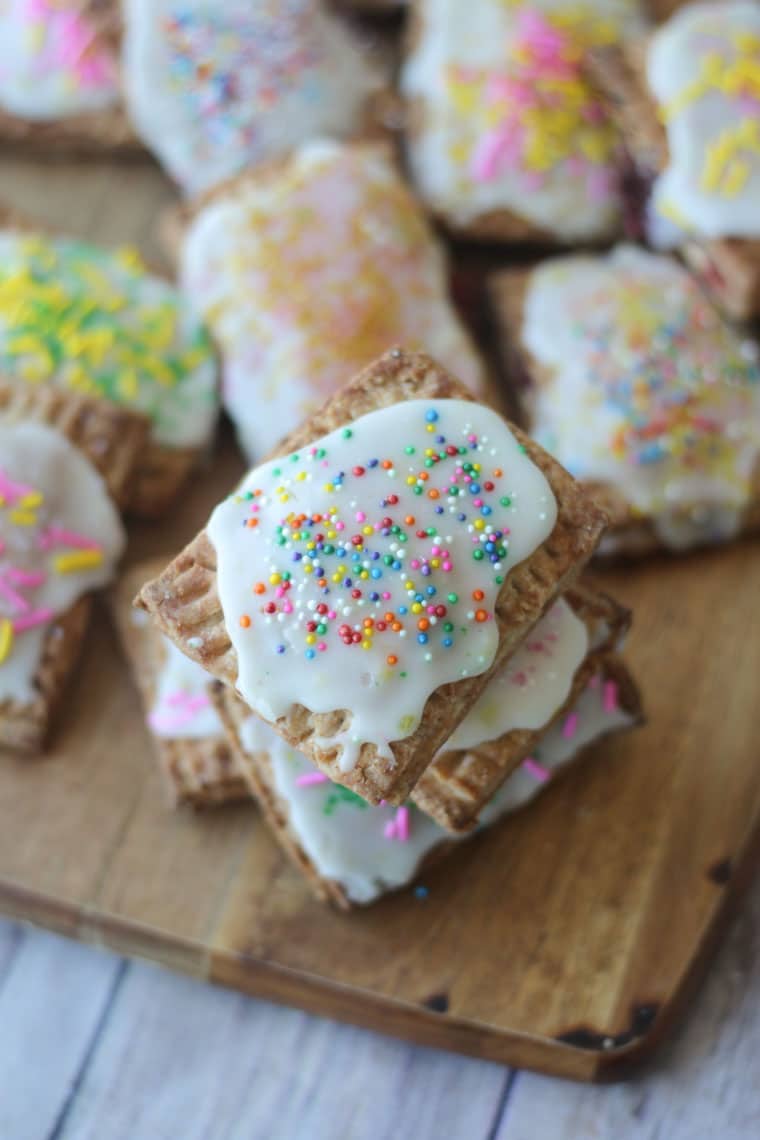
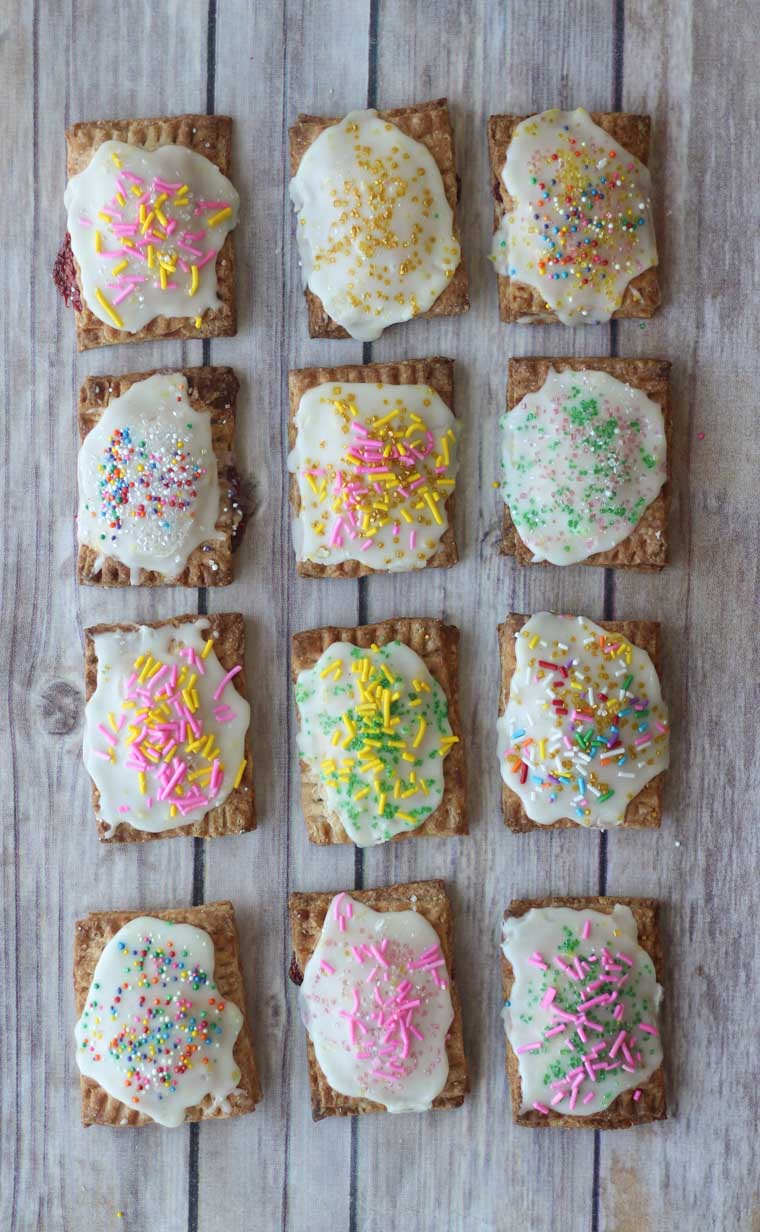
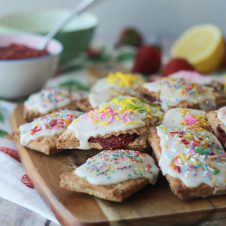
Step 2: Spread about a teaspoon of the icing on each of the homemade pop-tarts and decorate with your favourite sprinkles and sugars. Allow the icing to set and enjoy!
Expert Tips
Looking for the perfect air fryer for these homemade pop-tarts? I personally use this Philips Airfryer. If you haven’t used this amazing appliance yet, it essentially uses a unique TurboStar technology to get air circulation to each corner of the basket so you get perfectly fried food without the fat. Seriously, I don’t even add any oil to the basket and they cook 50% more evenly than other Airfryers while getting crispy and golden brown just like the butter-loaded pastries I ate as a kid. It’s also crazy fast (just 10 minutes to cook- you don’t even have to preheat!) and really easy to clean because it’s super non-stick and dishwasher safe.
Recipe FAQs
Yes! You can easily keep these in the fridge or freezer then pop in the air fryer to heat up for a quick breakfast!
Of course! Whatever you pack on there, these homemade Pop-tarts are the perfect sweet treat to bring you back to the ease of your childhood without the preservatives or crazy fat.
For these homemade pop-tarts, I like to cut into small, cute, mini pop-tarts for those times I just need a little quick fix, but hey, if you want to go for the classic momma-size, you do you.
More Recipes You Might Like
Love delicious breakfast recipes like these homemade pop-tarts? Check out some of my favorite recipes below!
- BREAKFAST BREAD PUDDING MUFFINS WITH BERRIES
- CHOCOLATE PROTEIN PANCAKES WITH CHERRIES
- CHURRO FRENCH TOAST
- CHOCOLATE CHERRY COBBLER OVERNIGHT OATS
Now tell me, what are your favourite childhood treats? What did you have for breakfast as a child that you miss? Have you tried making these homemade Pop-tarts? Leave me a comment below with your thoughts!
Strawberry Lemonade Homemade Pop-Tarts
Ingredients
Strawberry Chia Jam:
- 1 1/2 cups sliced strawberries fresh or frozen
- 1 1/2 cups pitted dark cherries
- 2 tbsp lemon juice or to taste
- 2 tsp maple syrup or to taste
- 3 tbsp chia seeds
Pop-tarts:
- 1 cup whole wheat pastry flour
- 1 cup all purpose flour
- ¼ tsp salt
- 2 tbsp light brown sugar
- 2/3 cup very cold coconut oil
- ½ tsp vanilla extract
- ½ cup (or so) ice cold water
Lemon Glaze:
- 1 1/4 cup powdered sugar
- 2 tbsp lemon juice
- zest of 1 lemon
- 1 tsp melted coconut oil
- ¼ tsp vanilla extract
- Colourful sprinkles to decorate
Instructions
Chia Jam:
- In a saucepot, heat the cherries and strawberries until they start to bubble and get syrupy. Once super soft, mash them with a potato masher until the mixture is jammy, loose, and with some visible little bits of fruit in it.
- Add in the lemon juice and maple syrup, and taste. Adjust the lemon and maple syrup depending on the sweetness of your fruit.
- Take the mixture off of the heat, transfer it to a container and add in the chia seeds. Allow the mixture to set for at least 20 minutes, or until it thickens up. You’ll have lots of extra jam so you can use it on toast or on oatmeal throughout the week.
Pop-tarts:
- In a large bowl, mix flours, salt and sugar. Cut in the cold coconut oil with a pastry cutter or fork until you see tiny pea-shaped pieces in the dough.
- Drizzle in the vanilla and one tablespoon at a table, add in the ice cold water. It should be moist enough that you can form it into a ball without it flaking away, but not sticky.
- Cut the dough in half and lightly flour your surface and rolling pin. Roll out the dough to just a few millimeters thick then cut into 5 cm by 7 cm rectangles. Place the rectangles on a baking sheet lined with a silpat or parchment paper.
- Place one heaping teaspoon of jam onto half of the dough rectangles in the centre. Then wet your finger and moisten all around the perimeter (around the jam). Top with another rectangle, and using your fork, crimp the edges to seal. Poke three sets of three holes into the top of the pop tart with your fork. Continue with remaining pop-tarts. Place the baking sheet in the fridge to set for 20 minutes.
- Heat the Philips Airfryer to 400 F. Add four pop-tarts to the fryer basket and set the timer for 10 minutes. Remove and repeat with the remaining pop-tarts until they’re all cooked. Allow to cool for about 20 minutes.
Lemon Glaze:
- In a bowl, mix together the powdered sugar, lemon juice, lemon zest, coconut oil and vanilla extract.
- Spread about a teaspoon of the icing on each of the pop-tarts and decorate with your favourite sprinkles and sugars. Allow the icing to set and enjoy!
Nutrition
Updated on March 12th, 2023
Abbey Sharp is a Registered Dietitian (RD), regulated by the Ontario College of Dietitians. She is a mom, YouTuber, Blogger, award winning cookbook author, media coach specializing in food and nutrition influencers, and a frequent contributor to national publications like Healthline and on national broadcast TV shows.


sidesist says
These pop tarts look absolutely adorable and fun to make! I’m going to have my kids and their friends all come over to make them. Thanks for the recipe!
Abbey Sharp says
That sounds fun! Enjoy!
Juan says
wow… so where do I start
I am trying to “be a good vegan” and incorporating plant based days of my week whenever possible. I am a blind musician living with my younger, ruthless brother who just dies for meat, junk food and I believe he might have some kind of overeating impulse which I hope will be for just a few years at most. This means that getting some help when cooking is not really possible most of the time (unless I sort of beg or put some tantalizing favor or whatever in exchange) and i cook by myself and have been learning a lot, especially since plant based cooking does tend to be slightly more elaborate. I have indispensable tools in the kitchen, many adaptive ones and then.. a no frills, small simple air fryer (black and decker one). I have watched several of your videos for the past few days and just love all of your content. I was googling for air fryer ideas and other things to get here in Bogotá Colombia which were vegan without much hassle to prepare and found a gem! a store that makes and has deliveries of many naturally ready, packaged vegan foods without many of the additives and bad stuff processed foods have, less than 10 minutes away from my home, which means I also can convince my brother to take me and pick up the order! and then THIS… well substantiated, amazing, no frills recipe… I would bet that if people cover their eyes to mimic my blindness they will be able to just make this in no time. It is literally, symbolically and in every sense, the icing on THE CAKE.
I really like this because I grew up in the U.s. and pop tarts are just something my brother and I miss a lot. Oh sure we used to buy the kellogs junk from pricesmart in here, but I always wanted to try making them by myself or at home. From all of your content and this blog, and especially the very creative ideas found in this recipe, the love with which you live, teach and do things… truly manifests and comes across. Sorry for the long comment but its just a way to show my appreciation and love back for everything that such a bright and amazing soul like you does for all of us in this earth! 😁😁
Krista Donna says
These are as delicious as they look – and I love the ingredients on this childhood favourite! I would recommend doing the jam ahead of time to cut down some of the prep time. The recipe was easy to follow! For me the most time consuming part was cutting the dough and assembling them (I got out a ruler to make them all the same size) lol. Cook time in the air fryer was very quick and makes them delicious. I would try this again but maybe try baking them instead!
Lauren says
I’ve been making a ton of vegan poptarts lately and this recipe is so delicious! 10/10 recommend.
Abbey Sharp says
So glad! Thanks Lauren 🙂
Leslie says
This might be your best recipe yet! Super fun, creative, and a must try for all!
Abbey Sharp says
Aw thanks love
Amy Gorin says
Wow, these look great! love the color!
Abbey Sharp says
Thanks Amy!
Vegan Lover says
Hi, your recipe calls for cherries but they are not listed in the ingredients. How many and what kind of cherries? Thanks, can’t wait to try this!
Abbey Sharp says
So sorry! Fixed the recipe. 1 1/2 cups of pitted dark cherries and 1 1/2 cups of strawberries. Enjoy!
Beverly Saffmond says
Yes,
Had this for eight months now so its time to give a review of it. Its far more useful than I ever thought. It took me a bit to adjust to it and learn how to make some things with it. Looking back I hesitated too much. This thing is just great for many things. I have quit using my deep fryer. I use far less oil in cooking than I did. I find as I adjust to how it works I find new things to do with it. It is a breeze to set up and clean up. It saves us time in the kitchen while making very tasty meals. I love doing chicken and pork in it. They are simple to use. Just select the temperature you want, set the time allowing a couple of minutes for warm up. When its heated up and ready put in the basket of food and go about your business. During the cooking cycle you will want to check it, stir stuff up a bit to make it cook evenly and may want to check your items with a thermometer depending on what you are cooking. You will soon adapt to it and learn what works best. I like that the outside of the unit does not get “hot” when running. Warm a bit, sure, but certainly not hot. I can put my hand on it while cooking. The hot air circulates with the internal fan and does a great job of cooking the food without burning it. It does not spew oil and odors all over the kitchen either, a real plus! I like to take chicken or pork, cut it into bite sized cubes, marinate it in my favorite sauce than toss it in. You can make some wonderful stir fried meals like this quickly and easily. I will cube up some pork loin, add some mushrooms, onion, garlic, whatever, toss it around in my favorite Asian sauce then put it all in the basket together for 15 minutes or so. Serve it over some rice and what a lovely meal. Clean up is a snap . I put some detergent in the basket, add some water, splash it around for a minute and let it sit while I clean up the dishes. By the time I am done with those its ready for a quick brush and rinse in the sink. The non-stick surface come spotlessly clean with very little effort. Others have written its praises and I have to agree with them, this thing is worth every penny it costs. Its cuts down on work load and adds to the quality of your dishes. Its inspired me to try some new items as it cooks so well. Its easy to use and clean and cooks quickly. Love it…
Thank you very much
Abbey Sharp says
Thanks so much for sharing your review! I loved using it as well
Beverly K. Saffmond says
LOVE this! We have used this everyday since it came in! Wings, zucchini chips, low carb wraps brushed with olive oil and cut for homemade tortilla chips, I could go on!! I highly recommend this!
Abbey Sharp says
So much you can do with it! Thanks love
Emma says
What temp and time would you recommend baking them in a regular oven for?
Abbey Sharp says
Hmm I would guess 350F and 10-15 minutes. Keep an eye on it and it should be done when the edges are golden brown. We didn’t test them in an oven, so just be sure to watch them carefully.