• Skip to main content

Abbey's Kitchen

Healthy Recipes, Nutrition Myth Busting, Healthy Eating Tips

  • Books
    • HCC™
    • The Mindful Glow Cookbook
    • Recipe eBooks
      • Family
      • Hypothyroidism
      • BLW
      • Vegan Week 1
      • Vegan Week 2
      • Vegan Week 3
      • Keto
      • Gluten Free Week 1
      • Gluten Free Week 2
      • Fitness
      • Paleo
  • Blog
    • Nutrition
    • Recipes
    • Motherhood
    • Life
  • Explore
    • Neue Theory™
    • Bite Back With Abbey Sharp
      • Apple Music
      • Spotify
      • Amazon Music
    • YouTube
  • Abbey
    • About
    • Coaching
    • Contact

Abbey Sharp

Last Updated December 7, 2014. Published December 7, 2014 By Abbey Sharp 2 Comments

Spicy Pumpkin Quesadillas with Avocado & Black Beans | Leftover Pumpkin Puree

What to do with that leftover  pumpkin puree? Try making this delicious pumpkin quesadilla of course!

Pumpkin_Quesadillas_6_of_9.jpg

The other week I shared a recipe for Pumpkin Pasta that I made using up the remnants of my pumpkin puree. This week, I wanted to give you another tasty vegetarian option that would be healthy, super speedy and really well received with the fam.

Seriously, I made “extra” to put aside as a healthy snack or lunch for my man, and guess what? He just plowed through those puppies at dinner.

Pumpkin_Quesadillas_2_of_9.jpg

For those of you who can only think of pumpkin within the context of pie, get ready to be introduced to a whole new experience.

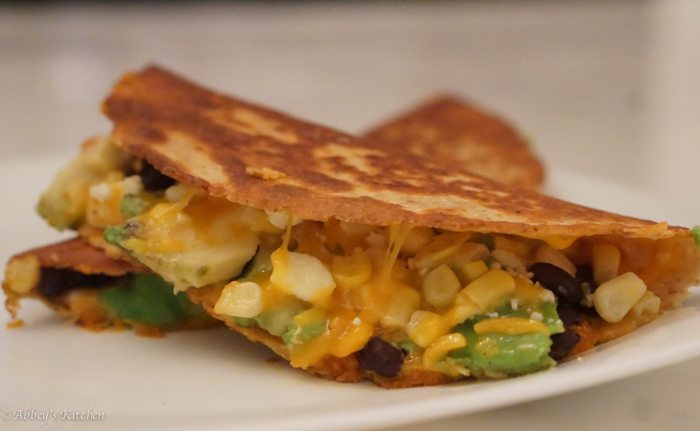
Introducing the Pumpkin Quesadilla

Pumpkin_Quesadillas_3_of_9.jpg

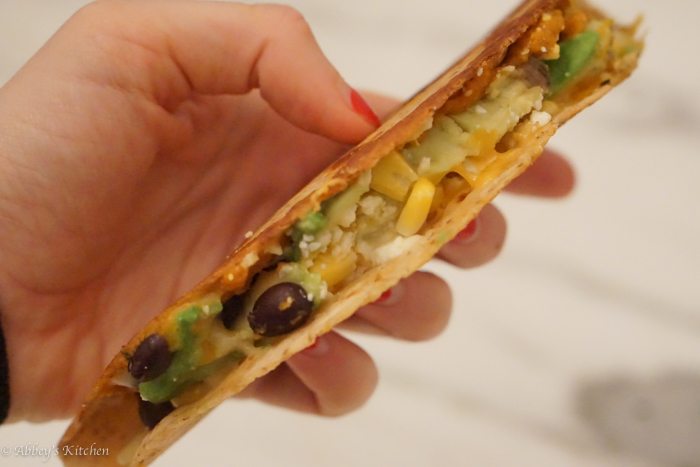
The pumpkin in this pumpkin quesadilla here takes on a completely different flavour profile when accompanied by the spicy jalapeno and sprightly lime.

Pumpkin_Quesadillas_4_of_9.jpg

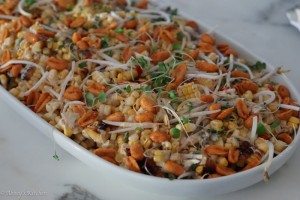
I also love the pop of sweetness from the corn and the creamy avocado on top.

Pumpkin_Quesadillas_5_of_9.jpg

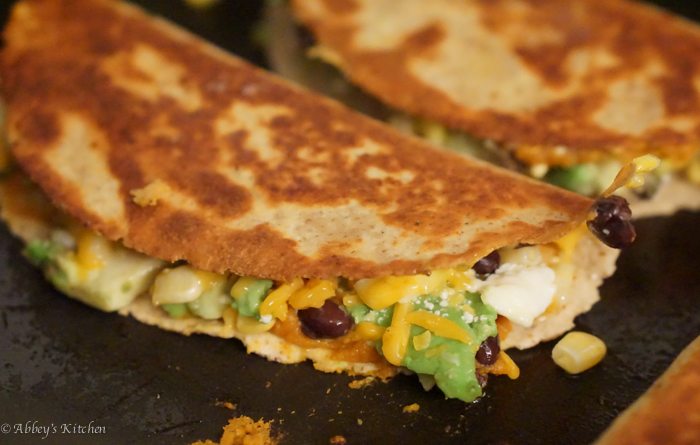
Feel free to add in whatever you’re family likes to this pumpkin quesadilla- you could do some chicken, shrimp, pork or steak if you felt like beefing it up a bit, and could play around with the cheese as well.

Pumpkin_Quesadillas_7_of_9.jpg

What do you like to do with extra pumpkin puree? Have you tried making a pumpkin quesadilla?

Pumpkin_Quesadillas_8_of_9.jpg
Print Recipe
5 from 1 vote

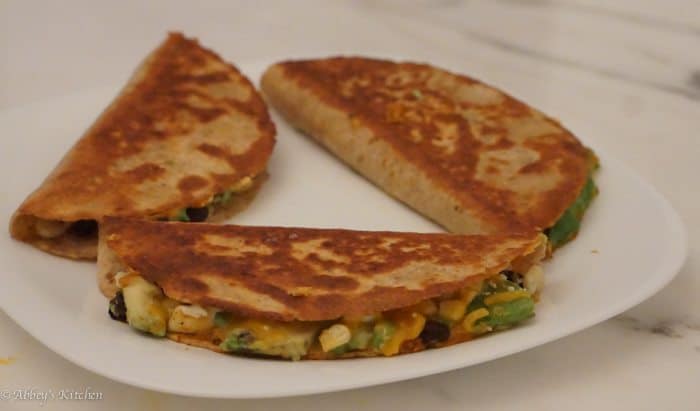
Spicy Pumpkin, Black Bean and Avocado Quesadillas for Leftover Pumpkin Puree

What to do with that leftover  pumpkin puree? Try making this delicious pumpkin quesadilla of course!
Prep Time10 minutes mins
Cook Time5 minutes mins
Total Time15 minutes mins
Course: Dinner
Cuisine: Mexican
Servings: 4 people
Calories: 410kcal
Author: Abbey Sharp

Ingredients

  • 2 cups pumpkin puree
  • 1 jalapeno seeded and roughly chopped
  • 1/4 tsp cumin
  • 1/4 tsp cinnamon
  • Juice of 1/2 lime
  • Salt and pepper to taste
  • 8 small corn or whole grain flour tortillas
  • 1 can black beans rinsed and drained
  • 1 avocado sliced
  • 1/2 cup frozen corn thawed
  • 4 oz Monterey jack cheese
  • 4 oz queso cojita cheese
  • 1 cup cilantro
  • 2 tbsp olive oil

Instructions

  • Preheat oven to 200 F.
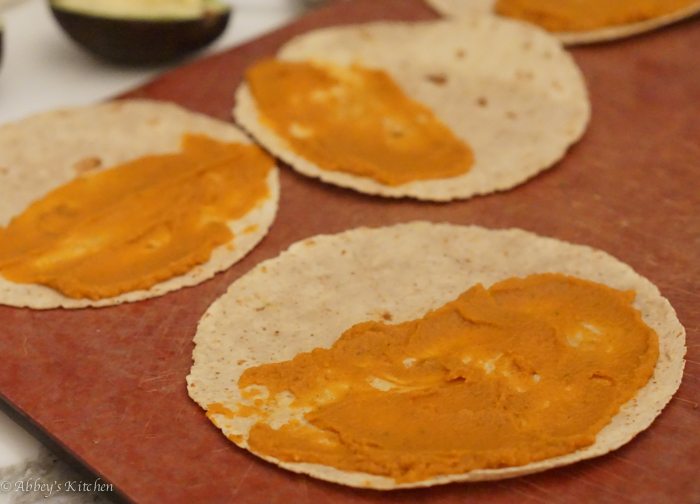
  • Puree the pumpkin, jalapeno, cumin, cinnamon, lime juice, salt and pepper until smooth.
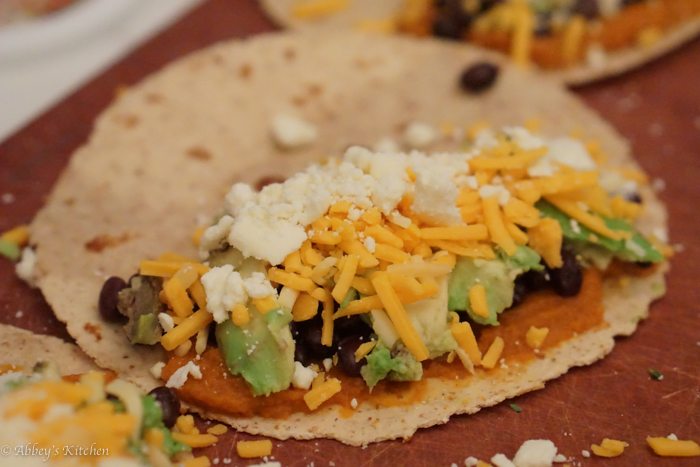
  • Smear half of the tortillas with the pumpkin mixture. Top with black beans, avocado, corn, cilantro and the two cheeses. Fold the other half over to seal together.
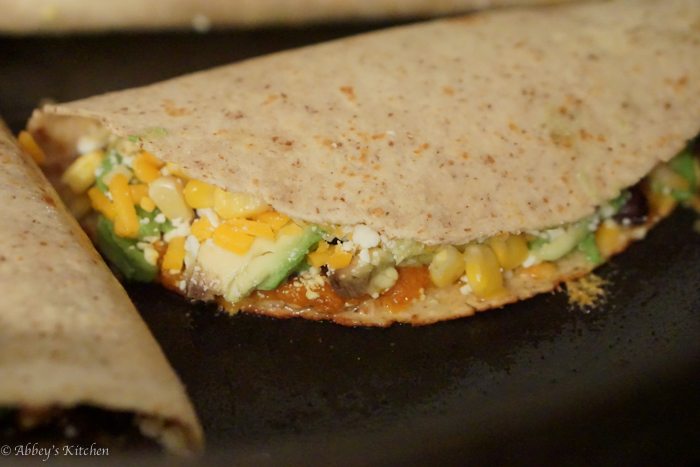
  • Preheat a large nonstick skillet with a teaspoon or two of oil over medium high heat. Add a few folded quesadillas to the pan and cook until golden brown, about 3-4 minutes. Flip over and cook on the other side until golden brown. Transfer to a baking tray in the warmed oven while you repeat with remaining quesadillas.

Nutrition

Calories: 410kcal

Abbey Sharp

Abbey Sharp is a Registered Dietitian (RD), regulated by the Ontario College of Dietitians. She is a mom, YouTuber, Blogger, award winning cookbook author, media coach specializing in food and nutrition influencers, and a frequent contributor to national publications like Healthline and on national broadcast TV shows.

www.abbeyskitchen.com/about-abbey/

Last Updated November 30, 2014. Published November 30, 2014 By Abbey Sharp 1 Comment

Mediterranean Barley Salad with Cucumber, Roasted Peppers and Feta

I’m a busy girl who likes to eat well, so one technique I use that saves me from going out for lunch every day is to prepare a healthy side dish at dinner that packs enough nutrition to be turned into a next-day main.  This beautiful Mediterranean Barley Salad totally fits the bill. I love the crunchy cucumbers, with the sweet smoky peppers, salty feta, nutty chewy barley and the crisp toasty sliced almonds.

barley_feta_cucumber_bell_pepper_salad_1_of_4.jpg

I usually make a double batch of this Mediterranean Barley Salad and save the leftovers for the next day. Then I boost up the protein with a bit of grilled meat, a hard boiled egg, or some canned chickpeas. Seriously, it couldn’t be simpler and it beats the hell out of anything at the workplace café. Expect to get a few snarky stares from your co-workers as they fork-down their greasy take-out. Weekday win!

Mediterranean Barley Salad – Easy Work Lunch

Barley is so hearty and packs a lot of fibre, so it will keep you feeling fuller throughout the day. I also love the salty punch of the feta and the crunchy bits of cucumber in this delicious Mediterranean barley salad.

What’s your favourite dinner to bring to lunch? Have you tried making this Mediterranean barley salad?

barley_feta_cucumber_bell_pepper_salad_3_of_4.jpg
I share a one week healthy fitness meal plan for women who work out to meet their new years resolutions.
Print Recipe
4.34 from 6 votes

Mediterranean Almond Barley Salad with Cucumber, Roasted Peppers and Feta

This beautiful Mediterranean Barley Salad totally fits the bill. I love the crunchy cucumbers, with the sweet smoky peppers, salty feta, nutty chewy barley and the crisp toasty sliced almonds.
Prep Time10 minutes mins
Cook Time55 minutes mins
Total Time1 hour hr 5 minutes mins
Course: Salad
Cuisine: Mediterranean
Servings: 4 people
Calories: 340kcal
Author: Abbey Sharp

Ingredients

  • 1 cup barley
  • 1/4 cup sliced almonds
  • 3 mini cucumbers diced
  • 1/2 cup roasted red peppers diced
  • 1/4 tsp dried oregano
  • 3 tbsp crumbled feta
  • Zest of 1/2 lemon
  • Juice of 1/4 lemon
  • 1 tbsp olive oil
  • Salt and pepper to taste

Instructions

  • Bring the barley to a boil in 2 1/2 cups of water. Reduce heat to simmer and cook, covered, for about 40-50 minutes. Let stand for 5 minutes. Set aside to cool.
  • Meanwhile, toast the almonds in a small dry pan over medium heat until fragrant and lightly golden, about 3-4 minutes.
  • In a bowl, mix the cooked and cooled barley, cucumbers, red pepper, oregano, feta, lemon juice, zest, olive oil, and almonds. Season with salt and pepper, to taste. Enjoy!

Nutrition

Calories: 340kcal

Abbey Sharp

Abbey Sharp is a Registered Dietitian (RD), regulated by the Ontario College of Dietitians. She is a mom, YouTuber, Blogger, award winning cookbook author, media coach specializing in food and nutrition influencers, and a frequent contributor to national publications like Healthline and on national broadcast TV shows.

www.abbeyskitchen.com/about-abbey/

Last Updated November 18, 2014. Published November 18, 2014 By Abbey Sharp 9 Comments

Slow Cooker Lamb Shanks with Mushrooms and Rosemary

This recipe for slow cooker lamb shanks is sure to warm your heart, belly and soul and is a cinch to pull off in your slow cooker.

There are a lot of things I dislike about Canadian winters. Here’s a short list: snow on the road, snow on the sidewalk, snow on my driveway, rain-snow (the worst), being scared to drive, being too cold to go on weekend walks, blistering wind on my skin, dry skin, dry hair, dry nails, watering eyes ruining freshly done make-up, wind ruining hair, putting on and taking off multiple layers just to run next-door, shorter days (why is it always dark!?), feeling like never leaving the house etc. etc. etc. There’s a lot I don’t like about winter. But what I do like about winter is its characteristic warm homey food that warms the body and soul.

crockpot_Braised_lamb_shanks__2_of_8.jpg

Last week, I knew I was going to have a busy day. I was in back to back meetings since lunch, and had a dance class right before dinner needed to get on the table. That meant it was going to be a slow cooker night.

crockpot_Braised_lamb_shanks__3_of_8.jpg

Slow cooker cooking is particularly pleasurable during those wintery months because it perfumes the whole house with yummy smells which means my man comes home and says, “it smells so good in here!” Best-thing-to-hear-ever.

crockpot_Braised_lamb_shanks__4_of_8.jpg

This is a classic recipe for slow cooker lamb shanks that totally frees up my oven and gets dinner on the table fast.

crockpot_Braised_lamb_shanks__8_of_8.jpg

You can use other herbs and spices in these Slow Cooker Lamb Shanks depending on your preference, but I love the big aromatic flavour of rosemary with lamb and red wine. I served this up with a side of cauliflower and celeriac puree, but polenta would be a nice accompaniment too.

crockpot_Braised_lamb_shanks__7_of_8.jpg

What comfort food recipes would you like to see me create to satisfy your soul this winter? Have you tried making slow cooker lamb shanks before?

crockpot_Braised_lamb_shanks__6_of_8.jpg
Print Recipe
3.86 from 7 votes

Crockpot Braised Lamb Shanks with Mushrooms and Rosemary

This recipe for slow cooker lamb shanks is sure to warm your heart, belly and soul and is a sinch to pull off in your slow cooker.
Prep Time10 minutes mins
Cook Time6 hours hrs
Total Time6 hours hrs 10 minutes mins
Course: Dinner
Cuisine: American
Servings: 4 people
Calories: 326kcal
Author: Abbey Sharp

Ingredients

  • 1/2 tbsp olive oil
  • 4 lamb shanks trimmed of most of the visible fat
  • 2 carrots peeled and diced
  • 3 stalks of celery diced
  • 1/2 onion diced
  • 500 g cremini mushrooms stems removed
  • 2 cloves garlic sliced
  • 3/4 cup red wine
  • 3/4 cup reduced fat beef stock
  • 2 tbsp grainy mustard
  • 1 bay leaf
  • 1 1/2 tbsp rosemary minced
  • Rind of 1/2 large or 1 small orange (not zested, just removed in a strip)
  • 1 tbsp balsamic vinegar

Instructions

  • Preheat the oil in a large nonstick skillet over medium high heat. Season the lamb shanks with salt and pepper, and brown on all sides.
  • Remove the lamb shanks and put them in the crockpot.
  • Return the pan to the heat and add the carrots, celery and onion. Saute for 5-7 minutes. Add in the mushrooms and garlic and stir for another minute.
  • Deglaze with wine and scrape up any of the bits on the pan. Transfer everything to the crockpot. Add the beef stock, mustard, bay leaf, rosemary, and orange rind. Cook on high for 6 hours.
  • Before serving, stir in the vinegar and season with a pinch each of salt and pepper. Skim off any visible fat from the surface of the sauce and discard. Serve on mashed root vegetables or polenta with some of the cooked veg and sauce.

Nutrition

Calories: 326kcal | Carbohydrates: 14g | Protein: 44g | Fat: 7g | Saturated Fat: 2g | Cholesterol: 127mg | Sodium: 370mg | Potassium: 1266mg | Fiber: 2g | Sugar: 5g | Vitamin A: 5132IU | Vitamin C: 4mg | Calcium: 76mg | Iron: 5mg
Abbey Sharp

Abbey Sharp is a Registered Dietitian (RD), regulated by the Ontario College of Dietitians. She is a mom, YouTuber, Blogger, award winning cookbook author, media coach specializing in food and nutrition influencers, and a frequent contributor to national publications like Healthline and on national broadcast TV shows.

www.abbeyskitchen.com/about-abbey/

Last Updated October 4, 2021. Published November 14, 2014 By Abbey Sharp 39 Comments

Healthy Holiday Rice Stuffing with Fruit & Nuts

DISCLAIMER: This post was developed in sponsored partnership with Minute Rice, however, as always, all opinions are genuine.

This healthy holiday rice stuffing recipe is packed with fruit and nuts and is perfect for entertaining at a holiday dinner.

Rich curries, hearty stews, and fragrant stir-fries all have one thing in common- they’d all do well on top of a bed of rice to sop up all their flavour. But when you slave over a slow-cooking curry all day, the last thing you want to do is babysit a fussy pot of rice. And that’s where Minute Rice comes in. This stuff is going to be your best friend when it comes to getting an impressive dinner on the table STAT.  While I usually opt for the whole grain brown rice for everyday dinners and lunches, they’ve just released their new line of aromatic varieties- Basmati and Jasmine. These babies are perfect for all of your Asian, Middle Eastern and Indian inspired meals.

The Basmati (aka. the “prince of rice”) in this rice stuffing is a long grain rice from the Himalayas with a nutty aromatic flavour, while the Jasmine rice is indigenous to Thailand and perfumes the entire house with the fragrance of jasmine flowers. Heaven.

Usually, both of these varieties take about 20 minutes to cook, but this new Minute Rice cuts that time in half! Anything that can get a healthy homemade meal on the table faster means it will get a healthy homemade meal on the table more often- and that’s good news to me. Especially if we’re talking about rice stuffing, one of my all time favourite holiday dishes.

Trade Bread Stuffing for Rice Stuffing

Now, with the holiday season sneaking up, I thought I would share one of Minute Rice’s latest recipes – a Fruit and Nut Basmati Rice Stuffing. Yum! This is perfect if you have a family member with celiac or gluten intolerance because rice (unlike the bread in traditional stuffing) is naturally gluten free.

Even more good news is that I’m giving away a massive supply of Minute Rice (36 BOXES! YES, THIRTY-SIX) to one crazy lucky (and hungry) Abbey’s Kitchen reader. This is super exciting. To enter, you must:

  1. Follow me on twitter.
  2. Like my facebook page.
  3. Tweet about the contest.
  4. Subscribe to my website below or on the right hand side.
  5. Subscribe to my youtube page (I’ll be expanding this soon!!)
  6. Leave a comment below on your favourite recipe using rice.
  7. Leave a comment on any other Abbey’s Kitchen blog post.

Didn’t win but still need to get your exotic rice fix? Check out this coupon here for Minute Rice savings!

Fruit_and_Nut_Basmati_Rice_Stuffing.jpg
Print Recipe
5 from 1 vote

Fruit and Nut Basmati Rice Stuffing

This healthy holiday rice stuffing recipe is packed with fruit and nuts and is perfect for entertaining at a holiday dinner.
Prep Time10 minutes mins
Cook Time30 minutes mins
Total Time40 minutes mins
Course: Side Dish
Cuisine: American
Servings: 4
Calories: 285kcal
Author: Abbey Sharp

Ingredients

  • 2 g pouches Minute Rice Basmati Rice 125 each
  • 1/4 cup butter 60 mL
  • 3/4 tsp salt 3 mL
  • 1/4 tsp pepper 1 mL
  • 1 large onion chopped
  • 1 large carrot chopped
  • 2 ribs celery chopped
  • 1 apple peeled and chopped
  • 2 cloves garlic minced
  • 1 tsp dried thyme 5 mL
  • 1/4 tsp ground cinnamon 1 mL
  • 1/4 tsp ground ginger 1 mL
  • 1/4 cup dried cranberries 60 mL
  • 1/4 cup dried chopped apricots 60 mL
  • 2 cups vegetable broth 500 mL
  • 1/2 cup chopped toasted almonds 125 mL
  • 1/4 cup chopped fresh parsley 60 mL

Instructions

  • Remove rice from pre-portioned pouch; set aside. Melt butter in a large, nonstick skillet set over medium-high heat.
  • Add onion, carrot, celery, apple, garlic, thyme, cinnamon and ginger. Cook, stirring occasionally, for 7 to 9 minutes or until vegetables soften. Add broth; bring to a boil. Stir in rice, cranberries and apricots.
  • Reduce heat, cover and simmer for 10 minutes. Remove from heat and let stand for 5 minutes or until liquid is absorbed. Fluff with a fork. Stir in almonds and parsley.

Nutrition

Calories: 285kcal | Carbohydrates: 24g | Protein: 5g | Fat: 21g | Saturated Fat: 8g | Cholesterol: 31mg | Sodium: 1022mg | Potassium: 289mg | Fiber: 5g | Sugar: 14g | Vitamin A: 3364IU | Vitamin C: 6mg | Calcium: 72mg | Iron: 1mg

Disclaimer: The rice for this post was provided by Minute Rice, however, as always, all opinions are genuine.

Abbey Sharp

Abbey Sharp is a Registered Dietitian (RD), regulated by the Ontario College of Dietitians. She is a mom, YouTuber, Blogger, award winning cookbook author, media coach specializing in food and nutrition influencers, and a frequent contributor to national publications like Healthline and on national broadcast TV shows.

www.abbeyskitchen.com/about-abbey/

Last Updated October 23, 2020. Published November 8, 2014 By Abbey Sharp 1 Comment

Reuben Egg Rolls | Best Party Appetizers for Game Day & Holidays

reuben_egg_rolls_6_of_7

These crazy good reuben egg rolls are going to blow your party guests’ minds. Be careful- they’re addictive.

The beauty of working in food media is that there is never any shortage of inspiration to garner from talented chefs and restaurants all around the world. Everywhere I go, and everything I eat sets my mind in motion for a new dish.

This can be particularly exciting during the holiday season when I don’t feel like I need to think so much about calories, fat, carbs, fibre etc. Sometimes it’s just fun to be decadent and think only about one thing- flavour.

This dish was inspired by the Caplansky Smoked Meat Spring Rolls at the new hot restaurant, Dailo. I started to think that if these were so delicious with spring rolls, then heck, they would surely be awesome with melty Swiss cheese, briny sauerkraut and a little thousand island dressing. OMG Reuben egg rolls.

Reuben Egg Rolls -> The NEW Egg Roll

I assume this can be done with spring roll wrappers, which would make them more reasonably sized, but I opted for the egg rolls for my reuben egg rolls for two reasons. A) Egg roll wrappers tend to be easier to find. B) Egg roll wrappers tend to be sturdier and a little thicker so I thought they would hold up to the moisture a bit better just in case I wasn’t able to get enough brine out of the sauerkraut.

Now, lets talk about that sauerkraut for making these reuben egg rolls. You’ve really got to squeeze the hell out of that stuff. I recommend throwing it into a cheesecloth to help out with the process, but either way, you’ve really got to put your back into it. Otherwise, these babies are super easy to put together.

These reuben egg rolls are perfect for a party or holiday because you can make them around a month ahead of time, freeze them, and then just deep-fry right before serving. Simply roll all of your egg rolls and place them on a baking tray lined with wax paper and covered in plastic wrap. Freeze on the tray until solid, then transfer to a freezer bag and put back in the freezer until ready to use. I would recommend taking them out about 30 minutes before you want to start frying but you don’t need to thaw them completely. I would also add an extra minute to the fry time just to ensure they’re fully heated through.

What fun food flavours do you want to see me pack into an egg roll? Have you tried making reuben egg rolls?


reuben_egg_rolls_6_of_7
Print Recipe
5 from 1 vote

Reuben Egg Rolls- Perfect Party Appetizers for Entertaining, Holidays & Game Day

Inspired by Nick Liu at Dailo. These crazy good reuben egg rolls are going to blow your party guests' minds. Be careful- they're addictive
Prep Time20 minutes mins
Cook Time5 minutes mins
Total Time25 minutes mins
Course: Appetizer
Cuisine: American
Servings: 15
Calories: 118kcal
Author: Abbey Sharp

Ingredients

  • 12-14 egg roll wrappers
  • 1 lb corn beef shredded
  • 1/2 cup sauerkraut
  • 1 cup Swiss cheese shredded
  • 2 L vegetable oil for frying
  • Thousand Island dressing and/or Mustards for dipping

Instructions

  • Put the sauerkraut in a cheesecloth and squeeze vigorously until all of the liquid comes out. Transfer to a cutting board and chop finely.
  • Finely cut the shredded corn beef and add to the sauerkraut. Add the shredded cheese and mix everything until evenly distributed.
  • Set up a small bowl with water in it for moistening your egg rolls.
  • Place an egg roll wrapper with one point facing towards you in a diamond shape. Add a bit of water to the top and side points of the diamond. Scoop out about 1/4 cup of the meat mixture and compress it into a log. Place it the middle but a bit more towards you- about 2/3 of the way down the wrapper.
  • Starting with the bottom, roll the wrapper around the meat until covered, then fold the outside corners in and continue to roll until fully sealed.
  • Place on a baking tray lined with wax paper and cover with plastic wrap until all of the egg rolls are finished. Repeat with the remaining egg rolls.
  • When ready to fry, preheat your oil in a deep pot or deep fryer to 360 F. Once to temperature, add in the egg rolls a few at a time, turning once when they start to brown- about 4 minutes total or until golden brown all over. Drain on paper towels and repeat with remaining egg rolls.
  • Serve on a platter with little ramekins of thousand island dressing and assorted mustards.

Nutrition

Calories: 118kcal | Carbohydrates: 7g | Protein: 7g | Fat: 7g | Saturated Fat: 3g | Cholesterol: 24mg | Sodium: 473mg | Potassium: 112mg | Fiber: 1g | Sugar: 1g | Vitamin A: 60IU | Vitamin C: 9mg | Calcium: 65mg | Iron: 1mg
Abbey Sharp

Abbey Sharp is a Registered Dietitian (RD), regulated by the Ontario College of Dietitians. She is a mom, YouTuber, Blogger, award winning cookbook author, media coach specializing in food and nutrition influencers, and a frequent contributor to national publications like Healthline and on national broadcast TV shows.

www.abbeyskitchen.com/about-abbey/

Last Updated November 4, 2014. Published November 4, 2014 By Abbey Sharp 11 Comments

10 Unique Peanut Butter Cookies Recipes

DISCLAIMER: This post was developed in sponsored partnership with Peanut Bureau of Canada, however, as always, all opinions are genuine.

These unique peanut butter cookies and ultimate recipe will become your go-to when the craving hits for something sweet.

Confession: I’m not usually a cookie girl. I am not of a “wet” dessert kind of girl. I know that sounds gross, but let me get into specifics so you can conjure up a more appetizing image. I like cheesecake, ice cream, mousses, puddings, sauces and custards more than cookies, pastries and crusts. But- there is a very big exception to this rule anytime peanut butter comes into play. Put a plate of unique peanut butter cookies in front of my face and BAM, don’t expect me to share. Now that the weather is getting cooler, the days are getting shorter, there’s definitely a strong urge to warm the house with the smell of baked goods. And cookies are the go-to treat for satisfying that call for something cozy and sweet at the end of a chilly Wednesday because they’re fast, easy and convenient. No one has time to whip up an elaborate 6- step cake that inevitably leaves the kitchen (and in my case, the rest of the house) covered in flour, dishes and cooking tools. No one wants to go shopping for a bunch of unusual ingredients. No one wants to wait for hours for temperamental goods to cool or set. When it’s cold outside, I don’t even want to leave the house, nevermind go to the supermarket. But that’s exactly why I love peanut butter cookies. I always have all of the necessary ingredients in my fridge and pantry, they take a mere 10 minutes in the oven (because I tend to get real impatient when I smell warm peanut butter), and no one can deny their nutty appeal. Just check out this cute 30 second video to see just how simple this can be!

With the holidays coming up, a lot of you may also be participating in cookie exchanges, or heading to holiday parties where a scrummy (yummy+ scrumptious) baked good would be nice gift. Let me tell you, you may have a hard time giving these unique peanut butter cookies away (I highly suggest a double or triple batch), but if you manage, you’ll be rewarded in lots of praise and love.

10 Unique Peanut Butter Cookies

This cookie recipe from the Peanut Bureau is really the best I’ve ever tried, but how can you make these babies your own? Get creative! Here are some of my top ideas:

  1. Buy a cookie press that will add stenciled designs on the cookies.
  2. Make the cookies half sized, smear a little dark chocolate on the bottom of them and sandwich two of them together.
  3. Add chocolate chips- dark, milk, white- whatever you like!
  4. Add toffee bits and crushed banana chips- love this combo!
  5. Add cooked diced bacon (hello!). Salty sweet perfection.
  6. Make a little imprint in the centre before baking and fill it with your favourite jam. Now it’s a PB & J cookie!
  7. Make big cookies and let the kids decorate them with colourful M&Ms or other candies before baking.
  8. Substitute half of the flour with oats to make a more chewy and healthier cookie.
  9. Add a little chopped dark chocolate, a hint of chili powder and some sea salt on top for a real sweet-salty-spicy experience.
  10. Add even more peanut flavour with nuts sprinkled on top before baking- go spicy with BBQ, sweet with honey roasted, or just find the craziest flavours in the store! They’re your cookies- go nuts!

How are you going to make these Peanut Butter cookies your own? What are your favourite unique peanut butter cookies?

Tip: While natural peanut butter is delicious, it varies in texture. So, to ensure the recipe works perfectly every time, make cookies with regular peanut butter.

Print Recipe
3.50 from 4 votes

The Best Classic Peanut Butter Cookie

These unique peanut butter cookies and ultimate recipe will become your go-to when the craving hits for something sweet.
Prep Time10 minutes mins
Cook Time11 minutes mins
Total Time21 minutes mins
Course: Dessert
Cuisine: American
Servings: 48 Cookies
Calories: 190kcal
Author: Abbey Sharp

Ingredients

  • 1 1/2 cups all-purpose flour 375 mL
  • 1/2 tsp baking soda 2 mL
  • 1/2 tsp salt 2 mL
  • 1 cup peanut butter crunchy or smooth (regular, not natural - see tip below), 250 mL
  • 1/2 cup unsalted butter at room temperature, 125 mL
  • 1/2 cup brown sugar lightly packed, 125 mL
  • 1/3 cup granulated sugar 75 mL
  • 1 egg
  • 1 tsp vanilla 5 mL
  • 1/2 cup coarsely chopped peanuts 125 mL, optional

Instructions

  • Preheat oven to 350°F (180°C). In a small bowl, whisk flour with baking soda and salt until mixed. Using an electric mixer, in a large bowl, beat peanut butter with butter and sugars until well blended. Beat in egg, scraping down sides to mix well. Beat in vanilla. Gradually beat in flour mixture. Stir in peanuts, if using, until evenly distributed.
  • Using floured hands, roll dough into 1-inch (2.5 cm) balls. Place at least 2 inches (5 cm) apart on ungreased baking sheets. Dip the flat base of a glass in flour and gently press on each ball to flatten cookie to a little thicker than 1/4-inch (0.5 cm). Then, dip the tines of a fork in flour and press gently into centre of cookie. Press again at a different angle to form a cross pattern.
  • Bake in centre of preheated oven until golden and just set, 9 to 11 minutes. Remove from oven. Leave on baking sheet for 1 minute, then transfer to a rack to cool completely.

Nutrition

Calories: 190kcal

Disclaimer: The preceding post was developed as part of a paid Ambassador program with the Peanut Bureau, however, as always, all opinions are genuine.

Abbey Sharp

Abbey Sharp is a Registered Dietitian (RD), regulated by the Ontario College of Dietitians. She is a mom, YouTuber, Blogger, award winning cookbook author, media coach specializing in food and nutrition influencers, and a frequent contributor to national publications like Healthline and on national broadcast TV shows.

www.abbeyskitchen.com/about-abbey/

Last Updated October 30, 2014. Published October 30, 2014 By Abbey Sharp 1 Comment

Banana Salted Caramel Budino

This recipe for adorable banana salted caramel budino will impress your guests and become a holiday favourite.

If you ask anyone who knows me what my favourite flavours are, they will immediately tell you caramel and banana. I will always find a way to sneak caramel and/or bananas into a recipe no matter what the theme or occasion- even if it’s for someone who doesn’t really like caramel (oops- I didn’t know?).

banana_budino_1_of_7.jpg

Well, this past thanksgiving, I found these adorable little mini mason jars at Canadian tire for $1.99 each. I don’t honestly know what they’re supposed to be for, but I was inspired to make some sort of layered parfait type of dessert to showcase their adorable size. It was time to master the salted caramel budino.

banana_budino_3_of_7.jpg

Salted Caramel Budino – You’re New Favourite Dessert

I decided on a salted caramel budino with caramelized bananas, and gingersnap crust. The result? Ooey, gooey, sweet, salty, almost bitter goodness.

The key with this salted caramel budino is to wait until it’s reached a nice dark amber so you get a really deeply flavoured caramel. Don’t pussy foot around this. Don’t chicken out. Don’t end up with a dull blonde caramel without any real substance or depth. You need that tiny hint of bitterness to balance out the mild budino custard, sweet caramelized bananas and whipped cream. Just note that there is a fine line between deep caramel and burnt caramel- don’t turn your back for a second or it’s possible it will go on you.

banana_budino_7_of_7.jpg

What’s your favourite flavour combination to incorporate into a budino recipe? Have you tried salted caramel budino? Leave me a comment below!

Print Recipe
5 from 1 vote

Salted Caramel Banana Budino

Inspired by Bon Appetit's Caramel Budino with Salted Caramel Sauce. This recipe for adorable banana salted caramel budino will impress your guests and become a holiday favourite.
Prep Time5 hours hrs 20 minutes mins
Cook Time25 minutes mins
Total Time5 hours hrs 45 minutes mins
Course: Dessert
Cuisine: American
Servings: 12 people
Calories: 410kcal
Author: Abbey Sharp

Ingredients

Cookie Crust

  • 1/3 cup chocolate cookie crumbs
  • 1/3 cup ginger cookie crumbs
  • 1 1/2 tbsp unsalted butter melted
  • 1 Pinch salt

Bananas

  • 2 tbsp unsalted butter
  • 2 tbsp brown sugar
  • 3 bananas sliced
  • 1 Pinch cinnamon
  • 1 Pinch fleur de sel

Caramel Sauce

  • 1/2 cup heavy cream
  • 1/2 vanilla bean split
  • 5 tbsp white sugar
  • 1 tbsp light corn syrup
  • 1 tbsp water
  • 3 tbsp unsalted butter very cold
  • 1/3 tsp fleur de sel

Cream

  • 1/4 cup heavy cream
  • 2 tsp sugar
  • A few drops of vanilla extract

Budino

  • 3 cups whole milk divided
  • 1/4 cup cornstarch
  • 3/4 cups dark brown sugar packed
  • 3/4 water
  • 5 egg yolks
  • 3 tbsp unsalted butter
  • 1 tsp fleur de salt
  • 1/4 cup toffee milk chocolate bar shaved or curled with a potato peeler

Instructions

Cookie Crust

  • Mix together the cookie crumbs, butter and salt. Divide between 12 small glass ramekins or dessert bowls.

Bananas

  • Heat a medium skillet over medium heat and melt the butter with the sugar. Add in the bananas, cinnamon and salt and stir until fully coated in the caramel, just about 1-2 minutes. You don’t want the bananas to get too cooked.

Caramel Sauce

  • Put the cream in a container with the vanilla bean seeds and residual bean.
  • Heat a medium saucepan over medium heat and add in the sugar, corn syrup and water. Heat until the sugar dissolves.
  • Increase the heat to high and swirl until a deep amber colour forms and a thermometer reaches 350 F.
  • Immediately remove from the heat and add in the vanilla cream. Whisk until smooth, about 2 minutes. Then add in the butter and salt. Transfer to a heat-proof bowl and allow to cool.

Cream

  • Whip the cream until soft peaks form. Add in the sugar and vanilla and refrigerate until ready to use.

Budino

  • Whisk 1/2 cup of the milk and cornstarch in a small bowl and set aside.
  • Heat the remaining milk in a small saucepan until it begins to simmer slightly, about 4 minutes. Set aside.
  • In another saucepan, heat the sugar and water over medium heat until dissolved. Once dissolved, cook on medium high without stirring until it reaches 210-220 F. Immediately remove from the heat.
  • Whisk egg yolks in a large bowl and slowly add in the scalded milk. Once combined, whisk in the cornstarch milk, and then (very slowly!!) the caramel.
  • Return everything to a saucepan and whisk constantly over medium heat until the mixture coats the back of a wooden spoon and reaches about 175 F. This usually takes around 3-4 minutes. Remove from the heat, stir in the butter and salt and strain through a sieve into a bowl.

Assembly

  • Add a few slices of caramelized bananas over the cookie crust.
  • Top with the budino almost all the way to the top of the ramekin. Allow to cool in the fridge until set, about 5 hours.
  • Before ready to serve, top with a tablespoon or so of the caramel sauce and a dollop of whipped cream. Garnish with some shaved chocolate.

Nutrition

Calories: 410kcal
Abbey Sharp

Abbey Sharp is a Registered Dietitian (RD), regulated by the Ontario College of Dietitians. She is a mom, YouTuber, Blogger, award winning cookbook author, media coach specializing in food and nutrition influencers, and a frequent contributor to national publications like Healthline and on national broadcast TV shows.

www.abbeyskitchen.com/about-abbey/

Last Updated October 26, 2014. Published October 26, 2014 By Abbey Sharp 3 Comments

Massaged Kale Salad with Israeli Couscous, Butternut Squash & Maple Vinaigrette

This massaged kale salad with Israeli couscous, butternut squash and maple vinaigrette will become a family favourite for holiday parties and week night dinners.

Oh kale. You and I haven’t been the best of friends in the past, and my partner- he’s not your biggest fan either. But yet, something deep inside me (maybe the Dietitian part) has made me determined to find a way to love you- no matter what it takes.

kale_salad_2_of_5.jpg

Well, in my quest to find true love, I have learned a lot about this green and I want to share a few things you gotta do to make it shine.

How to Make Amazing Massaged Kale Salad

kale_salad_1_of_5.jpg

1)      Get rid of the woodsy stalks and stems. They’re just too tough to eat raw.

2)      Cut the kale into very small pieces or ribbons. Choking on kale is not a cute look.

3)      Sprinkle it with a little salt and oil and massage those leaves well- for at least 5 minutes. Yes, we’re making massaged kale salad. It will help to reduce some of its bitterness and soften it up just a touch. I know it feels and looks funny to massage your salad greens, but trust me, it’s totally worth it.

4)      Dress your salad 1-2 hours (even a day ahead) before you want to eat it. This will allow the flavours to merry and the leaves again to soften up a touch. It’s like cabbage- freshly made slaw is never as good as a slaw that’s had time to sit.

kale_salad_3_of_5.jpg

To make this massaged kale salad a bit more palatable for the bitter-averse (like my mum), I added lots and lots of sweet bright flavours- roasted butternut squash (which I did ahead, and allowed to cool to room temperature), dried raisins, juicy pomegranate seeds, fluffy couscous (also precooked and cooled), crunchy sunflower seeds, and lots of maple syrup. Even the folks who hate kale will eat this.

kale_salad_5_of_5.jpg

What’s your favourite ways to eat kale? Have you tried a massaged kale salad?

Print Recipe
5 from 1 vote

Kale, Israeli Couscous and Butternut Squash Salad with Maple Vinaigrette & Top Kale Tips

This massaged kale salad with Israeli couscous, butternut squash and maple vinaigrette will become a family favourite for holiday parties and week night dinners.
Prep Time10 minutes mins
Cook Time10 minutes mins
Total Time20 minutes mins
Course: Salad
Cuisine: American
Servings: 12 people
Calories: 240kcal
Author: Abbey Sharp

Ingredients

Squash

  • 1 tbsp butter
  • 1 tbsp oil
  • 2 cups Butternut Squash finely diced
  • 2 tbsp maple syrup
  • Salt and pepper to taste

Dressing

  • 1/2 cup olive oil
  • 1/4 cup apple cider vinegar
  • 3 tbsp maple syrup
  • 1 tsp Dijon mustard
  • 1 tsp salt and pepper 1 tsp each

Salad

  • 1 lb kale leaves torn into small pieces
  • Salt
  • 1 cup cooked Israeli couscous prepared according to box directions
  • 1 cup pomegranate seeds
  • 1/4 cup pumpkin seeds toasted and salted
  • 1/4 cup dried golden raisins

Instructions

Squash

  • Preheat a large nonstick skillet over medium high heat and add in the butter and oil.
  • Pan-fry the squash until golden on all sides, then toss with the maple syrup and salt and pepper to taste. Set aside to cool to room temperature.

Dressing

  • Mix everything together until combined and set aside.

Salad

  • Add a good pinch of salt to the kale and a few tablespoons of the dressing. Start to massage the greens to help remove some of the bitterness in the leaves and to break down some of their toughness. I usually massage my kale for at least a solid 5 minutes. I know it’s hard work, but it pays off. Ideally you could do this ahead of time and let the kale sit in the fridge for a few hours but its fine if you need to serve it right away.

Assembly

  • Mix together the kale, couscous, squash, pomegranate seeds, pumpkin seeds and golden raisins and toss with the vinaigrette. Enjoy!

Nutrition

Calories: 240kcal


Abbey Sharp

Abbey Sharp is a Registered Dietitian (RD), regulated by the Ontario College of Dietitians. She is a mom, YouTuber, Blogger, award winning cookbook author, media coach specializing in food and nutrition influencers, and a frequent contributor to national publications like Healthline and on national broadcast TV shows.

www.abbeyskitchen.com/about-abbey/

Last Updated October 21, 2014. Published October 21, 2014 By Abbey Sharp 1 Comment

Garden Layered Dip with Dehydrated Olive Soil and Celeriac Cream

This stunning Garden Layered Dip is planted like a real garden and will impress the pants off all of your dinner guests.
 
Many of my long time readers and subscribers surely know that I just got back from a trip to Spain where I literally ate my way through pintxos and Michelin star meals.  One of the last meals of our trip was in Madrid at a 2 Michelin star restaurant in an old gentleman’s club called Casino de Madrid. It was a lovely meal with lots of surprises, but the dish that really blew me away was this garden layered dip with crudité.


I know, normally I’m pretty blasé about veggies and dip but it was truly so much more then that. The dish was described to us as a celeriac and cauliflower dip with a dehydrated olive and breadcrumb topping to make the “soil”. When Chef Paco Roncero popped by our table to present his masterpiece, he told me the most beautiful narrative about the dish. He shared that his food is almost always inspired by the inedible world around him and one morning he was out for his daily run and he found himself sprinting through a botanical garden. Suddenly, it hit him to recreate nature’s masterpiece on the plate.  Well, I’m not a Michelin Star chef, and most of you reading probably aren’t either, so the pressure to create something so mind-blowingly new is somewhat irrelevant. As long as it tastes good and looks pretty, most of us will impress our guests. So while professional chefs may have to seek external inspiration for their innovative restaurant dishes, I often find inspiration for my home cooking in restaurants.  And that was exactly what happened here. I went home from that trip to Spain a few pounds heavier this year –the extra weight packed on from langoustines, chorizo and knowledge.

garden_app_1_of_7.jpg

Boiling the celeriac

How to Make Garden Layered Dip Like a Boss

So I began to research how to reproduce the garden layered dip, but not surprisingly, there weren’t any exact recipes online. The closest thing I could find were some rough instructions on how to dehydrate olives, which thanks to their high oil content was going to be a royal pain without a commercial dehydrator. My next step then was to consult with a few of my chef friends on Facebook who too confirmed that yes, it would be hard, but with patience, it could be done. I persevered.

garden_app_3_of_7.jpg

Dry out the olives and bread

Piecing all of that information together into an uncertain but optimistic plan, I put the olives in the oven with the door open just a crack. Yes, I was nervous that it wouldn’t work and yes, I was scared that my house would burn down. Actually, I didn’t sleep at all worrying that I would die in a fire on the 33rd floor the day before Thanksgiving. But when I finally got up at 5 in the morning, I was pleased to see they had really started to dry out. Another 10 hours later, and they were ready to go to the food processor to be transformed into crumbs.

garden_app_4_of_7.jpg

Process/ pulse the crumbs

Now, I used marble rye here in my garden layered dip because I love the caraway flavour with the olives and I thought it would go beautifully with the slightly sweet nutty celeriac dip. To make sure my theory was correct, I simply took a slice of bread, smeared it with the dip and topped it with a single olive. That’s pretty much the best way I know to test a recipe before it’s made. And voila- yes, it worked.

garden_app_2_of_7.jpg

Creamy dip!

As for the dip- this is the easy part. If you can master the olives, you can put any dip underneath and it will likely be fine, but I wanted to stick somewhat close to what I had at the restaurant. I loved the idea of a hearty root vegetable standing in as the base-note, but I decided against using cauliflower to safe guard against a loose watery dip. Plus, this was going to be for Thanksgiving, so a little extra indulgence was in order. In other words, lots of thick unctuous crème fraiche and mayonnaise it was.  Feel free to experiment with whatever root vegetables you like with olives to switch things up if you’re not a big fan of celeriac or just don’t have it on hand. Having said that, I would try to keep the flavours relatively neutral because you want to be able to appreciate the fantastic olive flavour.

garden_app_6_of_7.jpg

So how do you build up your magical garden layered dip? Well, I went online and ordered a planter box on Amazon.ca but just my luck, it didn’t arrive in time. Uh. So in a last minute holiday panic, I ran out to Home Sense and got an expandable wooden drawer divider. It was half the price of the damn planter (which now sits in my locker like most of the stuff I buy haphazardly online) and ended up working perfectly because the centre section looked like a divided garden and the two expansion sections were perfect for storing extra crudité to dip. Then, of course, it’s just a matter of having fun planting your garden. Laying down your “ground”, then sprinkling it with “soil” and carefully planting your vegetables throughout the space. I even bought some microgreens and sprouts to add in as “grass” the same way I saw chef Paco do in Madrid. Get creative with this- it’s your garden- plant it up however you’d like!

garden_app_7_of_7.jpg

So tell me, foodie friends, what dishes have you had at restaurants that have inspired your home cooking adventures? Do you think you could try making a garden layered dip?

Print Recipe
5 from 2 votes

Garden Layered Dip with Dehydrated Olive Soil and Celeriac Crème Fraiche Dip

This stunning Garden Layered Dip is planted like a real garden and will impress the pants off all of your dinner guests.
Prep Time10 minutes mins
Cook Time18 hours hrs 20 minutes mins
Total Time18 hours hrs 30 minutes mins
Course: Dip
Cuisine: American
Servings: 4
Calories: 220kcal
Author: Abbey Sharp

Ingredients

  • Assorted baby vegetables cut into smaller pieces if needed
  • Assorted sprouts

Soil

  • 2 cups pitted kalamata olives
  • 2 cups torn marble rye bread

Dip

  • 2 celery roots peeled and finely diced
  • 2 cups crème fraiche
  • 2 cups mayonnaise
  • 3 sprigs rosemary leaves only
  • Zest of 1 1/2 lemons
  • Juice of 1/2 lemon
  • 1/8 tsp celery seed
  • Salt and pepper to taste

Instructions

Soil

  • Preheat oven to 170 F. Spread the olives onto two baking sheets.
  • Bake with the door open a crack for 18-24 hours, or when the olives feel dry and no longer oily.
  • About 4 hours before you’re finished (the olives should still have a bit of moisture to them), add in the torn pieces of bread. Continue dehydrating until everything is very dry. Remove from the oven, transfer to a food processor and process until it forms small crumbs. Transfer to a container and refrigerate until ready to use. This can be made up to 2 days in advance.

Dip

  • Put the celery root in a medium pot and cover with salted cold water. Bring to a boil and cook until very tender, about 15-20 minutes. Transfer to a food processor and allow the mixture to cool.
  • Once cooled to room temperature, add in the crème fraiche, mayo, rosemary, zest, juice, and celery seed. Puree until very smooth then season with salt and pepper to taste.

Assembly

  • Get a wooden box (I bought a cheap wooden cutlery divider and used that) and fill it with the celeriac dip. Top it with the soil until everything is covered. Then arrange the vegetables in rows, and stick the sprouts into the corners of the box like grass.
  • Serve with additional vegetables for dipping and enjoy.

Nutrition

Calories: 220kcal
Abbey Sharp

Abbey Sharp is a Registered Dietitian (RD), regulated by the Ontario College of Dietitians. She is a mom, YouTuber, Blogger, award winning cookbook author, media coach specializing in food and nutrition influencers, and a frequent contributor to national publications like Healthline and on national broadcast TV shows.

www.abbeyskitchen.com/about-abbey/

Last Updated October 14, 2014. Published October 14, 2014 By Abbey Sharp Leave a Comment

Asian Grilled Corn Salad with Coconut Milk Dressing and Spicy Peanuts

This Asian Grilled Corn Salad with Coconut Milk Dressing and Spicy Peanuts is sure to become a family favourite that you’re going to get asked to bring to every BBQ, holiday dinner and buffet.
 
Recently I have gone a bit coo-coo with the Middle Eastern recipes in my repetoire. I guess after my trip to Israel, and a number of sexy new Middle-Eastern inspired restaurants opening up around town, I have become completely obsessed with the sumac, za’atar, chickpeas and tahini. But one of my Jewish New Year resolutions this year was to get more into Asian inspired cuisine and incorporate some of those flavours into my to-go recipes.
 
asian_corn_salad_1_of_5.jpg

While that was part of the reason for this Asian grilled corn salad recipe,  it was developed for my Thanksgiving spread to break up all the sweet stuff on the buffet table. All of those sweet comforting Fall/Winter flavours can be quite taxing on the palate and sometimes you need a little heat or acid to break things up.

asian_corn_salad_2_of_5.jpg

Asian Grilled Corn Salad for the Win

This Asian grilled corn salad uses the last of the cobbed corn I could find in the store but feel free to substitute frozen corn if the whole stuff doesn’t look great (you’ll just have to make sure to use a pan and not an actually grated grill). I also used an assortment of microgreens in my salad and ideally, I would have used cilantro leaves to add a bit of colour, but 90% of my family and partner’s family are adverse. You can use any kind of greens you can find- some chopped cabbage would work nicely, cilantro, or baby arugula will all work.

asian_corn_salad_3_of_5.jpg

Finally, get creative with the peanuts you add. I managed to find a chili and lime flavour while really cut through the creamy coconut milk dressing nicely, but I do think this would be just as tasty with a honey roasted nut if you can’t handle the heat.

asian_corn_salad_5_of_5.jpg

What are some of your favourite Asian- inspired recipes? Have you ever tried making Asian grilled corn salad?

Print Recipe
5 from 1 vote

Asian Grilled Corn Salad with Coconut Milk Dressing and Spicy Peanuts

Inspired by Vegetarian Times' Thai Style Grilled Corn with Roasted Peanuts. This Asian Grilled Corn Salad with Coconut Milk Dressing and Spicy Peanuts is sure to become a family favourite that you're going to get asked to bring to every BBQ, holiday dinner and buffet.
Prep Time10 minutes mins
Cook Time7 minutes mins
Total Time17 minutes mins
Course: Salad
Cuisine: Asian
Servings: 6
Calories: 339kcal
Author: Abbey Sharp

Ingredients

Dressing

  • 1/4 cup coconut milk you can use light
  • 1/2 cup mayonnaise you can use reduced fat
  • 1 tbsp brown sugar
  • Zest and juice of 1 lime
  • 1 1/2 tbsp reduced sodium soy sauce
  • 1 tsp sriracha or more to taste
  • Salt and pepper to taste

Salad

  • 10 ears of corn husked
  • 2 tbsp olive oil
  • 2 cups assorted microgreens (I used basil, daikon and purple cabbage)
  • 2 cups bean sprouts
  • 1/4 cup spicy peanuts I found lime and habanero spiced peanuts
  • 1 red chili finely minced

Instructions

Dressing

  • Mix together the dressing ingredients until smooth. Set aside.

Salad

  • Preheat a grill pan or BBQ over medium high heat. Rub the corn with oil and grill until charred and cooked through on all sides, about 5-7 minutes. Set aside to cool.
  • Once cool enough, remove the corn kernels from the husk by running a sharp knife down the corn core.

Assembly

  • Create a bed of microgreens and sprouts. Top with the corn and drizzle with the dressing.
  • Top with some additional microgreens, sprouts, the peanuts, and chili. Serve at room temperature.

Nutrition

Calories: 339kcal | Carbohydrates: 35g | Protein: 9g | Fat: 22g | Saturated Fat: 5g | Cholesterol: 8mg | Sodium: 340mg | Potassium: 563mg | Fiber: 5g | Sugar: 14g | Vitamin A: 392IU | Vitamin C: 27mg | Calcium: 19mg | Iron: 2mg
Abbey Sharp

Abbey Sharp is a Registered Dietitian (RD), regulated by the Ontario College of Dietitians. She is a mom, YouTuber, Blogger, award winning cookbook author, media coach specializing in food and nutrition influencers, and a frequent contributor to national publications like Healthline and on national broadcast TV shows.

www.abbeyskitchen.com/about-abbey/
  • Previous Page
  • Go to page 1
  • Interim pages omitted …
  • Go to page 85
  • Go to page 86
  • Go to page 87
  • Go to page 88
  • Go to page 89
  • Next Page

Get started with

Eight Free Recipe Books

From the co-founder of Neue Theory and creator of the Hunger Crushing Combo

Sign me up!
Abbey smiling at table
Abbey Sharp

“Foods may never be nutritionally equal. But we can make them morally equal by recognizing that our worth is never determined by what's on our plate.”

— Abbey Sharp, RD About Abbey ◥

Books

  • HCC™
  • Mindful Glow
  • Free E-Books

Blog

  • Nutrition
  • Recipes
  • Motherhood
  • Life

Explore

  • Neue Theory™
  • Bite Back
  • YouTube

Abbey

  • About
  • Coaching
YouTube TikTok Instagram Facebook X Pinterest
Abbey Sharp - The No BS Dietitian From Abbeys Kitchen

© Abbey's Kitchen 2026  All Rights Reserved •  ACCESSIBILITY STATEMENT •  Privacy Policy

This site uses cookies. By continuing to browse the site, you are agreeing to the use of cookies Accept Privacy Policy
Privacy & Cookies Policy

Privacy Overview

This website uses cookies to improve your experience while you navigate through the website. Out of these, the cookies that are categorized as necessary are stored on your browser as they are essential for the working of basic functionalities of the website. We also use third-party cookies that help us analyze and understand how you use this website. These cookies will be stored in your browser only with your consent. You also have the option to opt-out of these cookies. But opting out of some of these cookies may affect your browsing experience.
Necessary
Always Enabled
Necessary cookies are absolutely essential for the website to function properly. This category only includes cookies that ensures basic functionalities and security features of the website. These cookies do not store any personal information.
Non-necessary
Any cookies that may not be particularly necessary for the website to function and is used specifically to collect user personal data via analytics, ads, other embedded contents are termed as non-necessary cookies. It is mandatory to procure user consent prior to running these cookies on your website.
SAVE & ACCEPT

Rate This Recipe

Your vote:


A rating is required
A name is required
An email is required