• Skip to main content

Abbey's Kitchen

Healthy Recipes, Nutrition Myth Busting, Healthy Eating Tips

  • Books
    • HCC™
    • The Mindful Glow Cookbook
    • Recipe eBooks
      • Family
      • Hypothyroidism
      • BLW
      • Vegan Week 1
      • Vegan Week 2
      • Vegan Week 3
      • Keto
      • Gluten Free Week 1
      • Gluten Free Week 2
      • Fitness
      • Paleo
  • Blog
    • Nutrition
    • Recipes
    • Motherhood
    • Life
  • Explore
    • Neue Theory™
    • Bite Back With Abbey Sharp
      • Apple Music
      • Spotify
      • Amazon Music
    • YouTube
  • Abbey
    • About
    • Coaching
    • Contact

Abbey Sharp

Last Updated January 20, 2025. Published January 20, 2025 By Abbey Sharp 9 Comments

Post Workout Smoothie with Pistachios and Tahini

This creamy pistachio & tahini post workout smoothie is a perfect post-workout pick-me-up for getting you through any tough workout!

Two glasses of pistachio and tahini protein smoothie with a yellow straw in each glass.

This week was a bit of a doozy. I recently started workout out with a TRX suspension trainer, which for those who don’t know stands for HOLY-THIS-LOOKS-EASY-BUT-IS-CRAZY-HARD. Okay, so maybe that wasn’t the exact translation of the abbreviation but I’m pretty sure it’s close. Anyhoo, after an hour doing pistol squats, plank pikes, and upright rows galore on that monster of a machine, I am so ravenous (and sweaty) I rush into my kitchen with REAL determination. If only I had that kind of energy during my workout. I need protein, I need carbs, I need real food – that’s where this pistachio & tahini post-workout smoothie really came into play.

Table of contents

  • Why This Recipe Works
  • Key Ingredients
  • How To Make This Recipe
  • Expert Tips
  • Recipe FAQs
  • More Recipes You Make Like

Why This Recipe Works

So if you’re staring at the tahini in this post workout smoothie and thinking WHAT THE WHAT? Trust me; I’ve got you on this. The tahini adds this subtle savory note that totally works with our smoothie. I also love this recipe because it’s:

  • Packed with protein (22 grams, to be specific)
  • Has monounsaturated and polyunsaturated fats to keep you satiated
  • Incredibly easy to prepare and is ready in 5 minutes!

Key Ingredients

Pistachios– Not only do pistachios pack a powerful nutrition punch in this post-workout smoothie, but they’re also totally shelf-stable, so I can just throw a baggie of them in my gym bag to quickly grab after a workout.

Tahini- Tahini is the perfect ingredient to add to this post workout smoothie as it helps gives it the perfect creamy & smooth texture.

Figs– Figs are the perfect hint of sweetness to add into this recipe. They’re also rich in antioxidants and fiber!

An overhead image of a glass of smoothie that is topped with pistachio, pomegranate seeds, and fig.

How To Make This Recipe

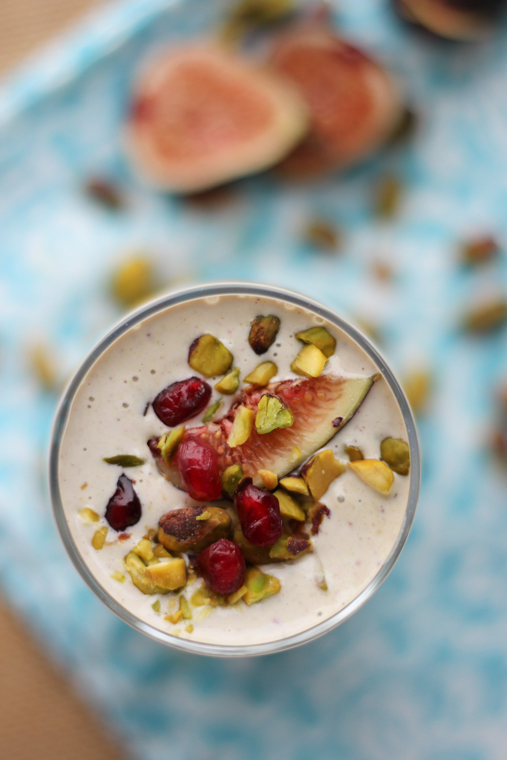
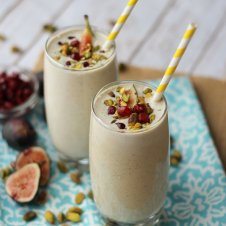
Step 1: In a blender, pulse the pistachios until they reach a ground-up consistency. Add in the yogurt, figs, dates, tahini, and milk. Puree until smooth.

Step 2: To serve, pour into two glasses. Top with sliced fig, crushed pistachios, and pomegranate arils, if desired.

Expert Tips

For those of you who have planned your new year’s resolution to try to eat more mindfully, pistachios may be your BFF. Since in-shell pistachios may take longer to eat (you actually have to open each one), you can slow down your eating enough that you will be more likely to hear those satiety cues before you overeat. In fact, a preliminary behavioural study showed that in shell snackers ate 41% fewer calories than those with shelled nuts, and another study showed that when the shells were cleared away immediately, snackers ate 22% more nuts then when they saw them. We call this little bit of magic the pistachio principal (and yes, you can bust out that little factoid at your next dinner party).

Two glasses of post workout smoothie with pistachio and tahini with a yellow straw in each glass.

Recipe FAQs

What makes this recipe high in protein?

A lot of the protein in this recipe comes from the 2% Plain greek yogurt! Pistachios and tahini also contain plant-based protein!

Is this recipe gluten free?

Yes! Overall this recipe is gluten free, however, make sure to check packaged foods to make sure gluten ingredients aren’t added as a thickening agent.

How can I make this post workout smoothie dairy free?

It’s super easy! By swapping the yogurt and milk for non-dairy alternatives, you can easily make this smoothie completely plant-based!

Can I switch out the type of nuts used in this recipe?

Of course! Although I recommend keeping the pistachios for the flavour, you can use any type of nuts you enjoy.

More Recipes You Make Like

If you’re looking for more delicious smoothies like this pistachio & tahini post work out smoothie check out the recipes below:

  • HEALTHY PEANUT BUTTER CHOCOLATE SMOOTHIE WITH BANANA AND FLAX 
  • HEALTHY BLUEBERRY COBBLER SMOOTHIE
  • HEALTHY SMOOTHIE BOWL WITH CHOCOLATE, PEANUT BUTTER & BANANA
  • GREEN SMOOTHIE BOWL WITH ANTIOXIDANT PACKED MATCHA & BERRIES
  • PUMPKIN PIE PROTEIN SMOOTHIE BOWL

So tell me, friends, what are some of your favourite post-workout snacks? Have you tried making this Pistachio & Tahini Protein Smoothie? Let me know your thoughts in the comments below!

Two glasses of pistachio and tahini protein smoothie with a yellow straw in each glass.
Print Recipe
5 from 2 votes

Post Workout Smoothie with Pistachios and Tahini

This creamy pistachio & tahini post workout smoothie is a perfect post-workout pick-me-up for getting you through any tough workout!
Prep Time5 minutes mins
Total Time5 minutes mins
Course: Breakfast
Cuisine: Mediterranean, Middle Eastern
Servings: 2 Smoothies
Calories: 420kcal
Author: Abbey Sharp

Ingredients

  • 1/3 cup Wonderful Pistachios unsalted and shelled
  • 1 cup 2% Plain Greek Yogurt
  • 4 ripe figs stems removed and quartered
  • 2 dates pitted and diced
  • 2 tsp tahini
  • 1 cup 1% milk
  • Optional: ½ cup pomegranate arils and honey to taste (depending on how sweet your figs are)

Optional Garnish:

  • 1 fig quartered
  • 2 tbsp pistachios unsalted, shelled and crushed
  • 2 tbsp pomegranate arils

Instructions

  • In a blender, pulse the pistachios until they reach a ground up consistency. Add in the yogurt, figs, dates, tahini and milk. Puree until smooth.
  • To serve, pour into two glasses. Top with sliced fig, crushed pistachios and pomegranate arils, if desired.

Nutrition

Calories: 420kcal | Carbohydrates: 50g | Protein: 22g | Fat: 17g | Saturated Fat: 3g | Trans Fat: 1g | Cholesterol: 11mg | Sodium: 92mg | Potassium: 999mg | Fiber: 8g | Sugar: 38g | Vitamin A: 533IU | Vitamin C: 6mg | Calcium: 342mg | Iron: 2mg
Abbey Sharp

Abbey Sharp is a Registered Dietitian (RD), regulated by the Ontario College of Dietitians. She is a mom, YouTuber, Blogger, award winning cookbook author, media coach specializing in food and nutrition influencers, and a frequent contributor to national publications like Healthline and on national broadcast TV shows.

www.abbeyskitchen.com/about-abbey/

Last Updated November 2, 2020. Published January 20, 2025 By Abbey Sharp 9 Comments

Butternut Squash and Lentil Soup (Easy Vegan Recipe)

This vegan butternut squash and lentil soup is one of my favourite vegan pantry & freezer recipe for using up what you have on hand in a pinch. It is also made in one pot and only takes 30 minutes to prepare.

Image of lentil butternut squash soup in a white bowl topped with parsley and nuts with red curry paste in the background.

**Cozy Soup Recipe Alert **

I guess you can say we are on a serious soup kick lately. But honestly, what is autumn without a cozy soup? I think I speak for most summer people when I say that soup season makes the colder weather a bit more tolerable. So as soon as it started getting a bit nippy outside, I jumped on the soup train REAL QUICK. This vegan butternut squash and lentil soup is one of my favourites because not only does it use up a LOT of ingredients you might already have on hand, but its also super flavourful, veggie packed, and feels like a nice warm hug.

Table of contents

  • Why This Recipe Works
  • Key Ingredients
  • How to Make This Recipe
  • Expert Tips
  • Recipe FAQs
  • More Recipes that Uses Pantry or Freezer Staples

Why This Recipe Works

This butternut squash and lentil soup is definitely one of my new go-to recipes because it’s hearty, satisfying and uses up a LOT of the bits of random ingredients I’ve got on hand. Here are a few more reasons why we are loving this recipe right now!

  • Budget friendly
  • Made in one pot making for easy prep and clean up
  • Freezer friendly
  • Made in under 30 minutes
  • Vegan & gluten free

Key Ingredients

flatlay of ingredients required to make the soup: red curry paste, butternut squash, cauliflower, olive oil, lemon, lentils, garlic, coconut milk, onion, ginger, and broth.

Lentils – I like red lentils for their pretty colour and the fact that they cook down super smooth in soup. Make sure you rinse them well before adding them to the pot!

Cauliflower – This recipe is a great way to sneak in lots of extra veggies and no one will even taste the cauliflower.

Butternut squash – I hate hacking into a fresh squash, but when it’s frozen, it’s so easy because it’s already cooked.

Red curry paste – This adds undeniable flavour and a little kick. See my notes below if you’re worried about it being too spicy (because I do like it spicy).

Coconut milk- I tried this recipe with and without the coconut milk, so you can see my tips below if you don’t have it or want to keep this lower in fat.

How to Make This Recipe

Instruction step by step photo of cooking the onion garlic, and ginger before adding in the red curry paste and then the lentils, butternut squash, and cauliflower.

Step 1: Heat the olive oil in a large soup pot over medium heat. Add the onion, garlic and ginger and cook until softened and fragrant, about 3 minutes.

Step 2: Add the red curry paste and cook until it coats the onions.

Step 3: Add in the lentils, butternut squash, cauliflower.

4 instructional photos of adding in broth to simmer, lemon juice and coconut milk, then blending in a blender until smooth.

Step 4: Add in the broth, cover and cook on medium low for 20 minutes or until the vegetables are very soft.

Step 5: Add the lemon juice and coconut milk and stir until combined.

Step 6/7: Transfer to a blender to puree until smooth. Season with salt and pepper, to taste and garnish (if desired) with a swirl of coconut milk, crushed pistachios, parsley, and hemp hearts

Expert Tips

There are a few important considerations when it comes to making this vegan butternut squash lentil soup super creamy. One is that I like to use a super high-power blender to puree everything together.

Two, I like to make sure my vegetables are VERY soft before I puree. Like they basically need to immediately fall apart when you poke them with a fork. This happens really quickly with frozen cauliflower and butternut squash (since it’s already cooked), but you can easily get there with fresh as well if that’s what you have.

Three, if you want vegan butternut squash and lentil soup to be even creamier, definitely add the coconut milk. It will balance out the heat and just add that luscious mouth feel. Coconut milk is also freezer friendly so it’s not an issue with adding it in before freezing.

Birds eye view of butternut squash soup with red lentils topped with parsley and nuts with bread, curry paste, and pistachios in the background.

Recipe FAQs

How spicy is the soup?

If you add the two teaspoons of the curry paste, it has a nice solid kick that is balanced out well by the coconut milk. If you want to make it more mild, I would half it. Either way, if you’re sensitive to heat, definitely add the coconut milk to mellow everything out.

Is this recipe appropriate for toddlers and kids?

If your kids are sensitive to heat, again make sure you take the curry paste down or out. My son definitely would not be able to handle the 2 teaspoons, but maybe could do a 1/2 teaspoon of the curry paste.

Can I use fresh cauliflower or squash?

Yes! You will need to cook the soup longer to get those vegetables nice and soft, but you can definitely use fresh. You can also use frozen cauliflower rice if that’s what you have.

What about other lentils?

Other lentils can be used but the cook time will have to be changed as whole lentils take longer to cook than split lentils.

Do I have to use coconut milk?

I have tried making this with and without coconut milk as a lower fat option. It’s delicious both ways but I will say the curry paste is stronger without it, so if you’re unsure and want to omit the coconut milk, I suggest cutting the curry in half until you try it and then adjusting.

Is this soup gluten free?

Yes, this is a naturally gluten free soup assuming you use a gluten free curry paste.

Can I batch prep this soup and freeze it?

This vegan butternut squash lentil soup is one of my all time favourite batch-prepped meals. I have two bags in the freezer I am so excited to enjoy later on. To freeze this soup, simply allow the soup to cool, then transfer to freezer bags and lay them flat in the freezer to firm up.

When ready to enjoy, you can let it thaw overnight in the fridge then transfer it to a bowl to reheat in the microwave or in a pot to reheat in the stove.

More Recipes that Uses Pantry or Freezer Staples

If you loved this butternut squash lentil soup and are looking for more pantry or freezer staple recipes, then you will love these recipes

  • KOREAN SAVOURY OATMEAL WITH RUNNY EGG 
  • EASY 10 MINUTE MEXICAN TORTILLA SOUP 
  • EASY VEGAN PASTA BAKE WITH SAUSAGE, WHITE BEANS & KALE 
  • VEGAN TACO CASSEROLE
  • VEGAN TOMATO SOUP (WITH EXTRA PROTEIN!)

What are your thoughts on this butternut squash and lentil soup? Leave me a comment below with your thoughts!

Print Recipe
5 from 5 votes

Butternut Squash Lentil Soup (Easy Vegan Recipe)

This Butternut Squash Lentil Soup is one of my favourite vegan pantry & freezer recipe for using up what you have on hand in a pinch. It is also made in one pot and only takes 30 minutes to prepare.
Prep Time10 minutes mins
Cook Time30 minutes mins
Total Time40 minutes mins
Course: Soup, Main Course
Cuisine: American
Diet: Vegan
Servings: 6
Calories: 440kcal
Author: Abbey Sharp

Ingredients

  • 1 tbsp extra virgin olive oil
  • 1 onion diced
  • 4 cloves garlic minced
  • 2 tsp ginger grated
  • 1-2 tsp red curry paste
  • 1 ½ cups dried red lentils rinsed
  • 4 cups frozen butternut squash
  • 4 cups frozen cauliflower
  • 6 cups low sodium vegetable broth
  • 1 tbsp lemon juice
  • 1 cup light coconut milk
  • Salt and pepper to taste

Instructions

  • Heat the olive oil in a large soup pot over medium heat. Add the onion, garlic and ginger and cook until softened and fragrant, about 3 minutes.
  • Add the red curry paste and cook until it coats the onions.
  • Add in the lentils, butternut squash, cauliflower and broth, cover and cook on medium low for 20 minutes or until the vegetables are very soft.
  • Add the lemon juice and coconut milk and stir until combined.
  • Transfer to a blender to puree until smooth. Season with salt and pepper, to taste and garnish (if desired) with a swirl of coconut milk, crushed pistachios, parsley, and hemp hearts.

Video

Notes

RECIPE TIPS:
Be sure to rinse the lentils before using to remove any of the surface debris and dust but no need to soak.
I used this Thai curry paste but feel free to use an option that you love. Yellow curry paste will also work!
To make creamier, use a super high power blender to puree and ensure that the vegetables are very soft before blending.

Nutrition

Calories: 440kcal | Carbohydrates: 72g | Protein: 23g | Fat: 8g | Saturated Fat: 4g | Sodium: 83mg | Potassium: 1489mg | Fiber: 27g | Sugar: 9g | Vitamin A: 15105IU | Vitamin C: 85mg | Calcium: 139mg | Iron: 7mg
Abbey Sharp

Abbey Sharp is a Registered Dietitian (RD), regulated by the Ontario College of Dietitians. She is a mom, YouTuber, Blogger, award winning cookbook author, media coach specializing in food and nutrition influencers, and a frequent contributor to national publications like Healthline and on national broadcast TV shows.

www.abbeyskitchen.com/about-abbey/

Last Updated January 5, 2025. Published January 6, 2025 By Abbey Sharp 24 Comments

Best Hangover Cure: Does a Greasy Meal Cure a Hangover?

This post looks at the best hangover cure options and debunks the common hangover myths like does a greasy meal cure a hangover and many more!

Bar tenders making various cocktails

Most of us have been here. It’s the morning after a huge rager and the only thing your mind is able to process is the location of your advil. Anyone that has ever had an hangover can tell you right away that they are a TOTAL BUZZ KILL. Some of these not-so-sexy symptoms include, but are not limited to, nausea, headaches, vomiting, and fatigue. You know the drill. Hangovers are one of those things that we can’t really avoid (unless you choose not to drink, of course), so since the dawn of time, many people have claimed that they have found the best hangover cure.

So What is a Hangover?

Before we explore some of these foods, let’s give you some biological context on what exactly happens in our body when we consume alcohol and how the nasty hangover rears its ugly head in the wee hours of the morning.

Essentially, alcohol is broken down by two different enzymes, alcohol dehydrogenase (ADH) and aldehyde dehydrogenase (ALDH), which produce acetaldehyde and acetate respectively before it is finally broken down into water and carbon dioxide for elimination. In relation to hangovers, the first by-product, acetaldehyde, is known as a toxic substance that is commonly associated with the unpleasant symptoms induced by alcohol. Let’s take a look at the common so-called best hangover cure and what the research says about each.

Caffeine

coffee maker next to a white mug on a wooden counter

In the movies, we often see coffee being used as a way to sober people up after a night of drinking. Coffee specifically targets the fatigue that you feel after a long night out so I guess this makes sense. In addition to combatting your exhaustion, some people also use it to lighten up their headache since alcohol dilates blood vessels and coffee constricts them. Although the caffeine boost in the morning may temporarily relieve headache symptoms and decrease feelings of fatigue, it is important to note that both alcohol and caffeine are diuretics. In other words, after a night of drinking, you’ve already lost a significant amount of fluid and are likely hella dehydrated, so drinking caffeine may only make matters worse. Therefore, it is recommended to cut back on the caffeine and up the H2O instead.

Water

ice water in a mason jar

When it comes to one of the best hangover cure options, water is the best choice to replenish fluid levels because of alcohol’s diuretic effect. Not to mention, any sweating, vomiting, or diarrhea that may have occurred can also contribute to fluid loss. This puts the individual at risk for dehydration if levels are not replenished, which can, in turn, result in weakness, dizziness, and dryness in the mouth – some of the gross symptoms of a hangover. Not to mention, dehydration may also make our hangover a lot worse, thanks to the headaches and migraines it induces. This is why it is often encouraged to drink plenty of water before, during, and after a boozy night. Staying hydrated also enables the kidneys to work more efficiently in filtering and eliminating toxins (aka acetaldehyde from alcohol) from the body, thereby alleviating some of those nasty hangover symptoms. It is also important to note that other foods with electrolytes should be consumed alongside drinking water to avoid water intoxication. This brings us to sports drinks and pickle juice.

Electrolytes Drinks: Sports Drinks/Pickle Juice

vegetables in a colander

In addition to losing fluids after a night of drinking, our body also experiences a loss of electrolytes as well. Some claim that drinking pickle juice or sports drinks can help replenish electrolytes, namely potassium, sodium, magnesium, and calcium, in addition to aiding in rehydration. Although there is a lack of evidence on whether or not these drinks can cure hangovers or some of its symptoms, the consumption of sports drinks for the purposes of replenishing electrolytes is reasonable. However, it is important to avoid sports drinks that contain caffeine as it will, as mentioned earlier, just dehydrate you further. You should also probably go easy on the pickle juice for the purposes of replenishing electrolytes as all that vinegar can be hard on your already achy gut. Alternative methods of rebalancing electrolyte levels that could be considered are food sources accompanied by a glass of water so that both electrolytes and hydration levels are balanced. Some examples include bananas, dates, and raisins for potassium; nuts and cereals for magnesium; and dairy products and figs for magnesium.

Get Your Grease On

multiple hands reaching for a plate of nachos

Another one of the best hangover cure choices is going for a high carbohydrate, high fat meal (aka chowing down on greasy breakfast fare). Although food composition does have an influence on alcohol absorption and alcohol levels, there hasn’t been a lot of studies out there to determine if a greasy, hearty breakfast can rid the hangover once and for all. However, some studies have found that eating high carbohydrate meals after drinking can help reduce overall blood alcohol levels and slightly improve those woozy feels because it helps to stabilize blood sugars. See, when you drink too much, your blood sugars spike and then quickly drop, resulting in low blood sugar and all those terrible feelings the next day. To prevent this drop in blood sugar, before you go to bed be sure to have a snack to stabilize blood sugar levels and potentially prevent low blood sugar symptoms in the morning. This information is especially important for individuals with diabetes, who will need to continually monitor their levels when they consume alcohol. Even given this information, more studies are needed to determine whether or not high-carbs, high-fat, or high-protein meals directly impact alcohol elimination rates.

What makes more sense is to have a healthy satiating meal prior to drinking to help slow the rate of alcohol absorption. Be sure to include fat in this meal, since it takes our body longer to digest fat, so by the time we start consuming alcohol, the digested fat in your gut will help to slow the rate of alcohol absorption. Oh, the wonders of science applied at the bar! LOVE IT.

So, is your diner breakfast a bad pick? Not necessarily. It may not be the dieters delight, but whole grain toast can help stabilize blood sugar levels, bacon can help provide some sodium, and your eggs will provide more help than you think, as we’ll see next.

Eggs

birds eye view of an egg on top of avocado toast on a white plate

As introduced earlier, hangover symptoms are associated with the accumulation of a toxic substance known as acetaldehyde. With the liver and kidneys working hard to eliminate these by-products, some claim that the consumption of eggs is an effective cure as it is a good source of cysteine, an amino acid that binds to acetaldehyde for elimination. The availability of cysteine enables the synthesis of glutathione, which is a compound that works with cysteine to combat free radicals and remove toxins from the body. So, when large amounts of alcohol have been consumed, it overwhelms the liver, and allows for the build-up of acetaldehyde to stay in the body longer and inflict its unpleasant symptoms. For that reason, eating eggs the morning after may help replenish the body’s cysteine levels in order for it to efficiently continue eliminating acetaldehyde. Scrambled or over easy?

Oatmeal

birds eye view of cereal and milk in a clear bowl

A bowl of hot oatmeal can provide an abundance of well-needed nutrients and minerals that were excreted as a result of the diuretic properties of alcohol. Instant oatmeal, in particular, may be fortified with B vitamins, calcium, magnesium, sodium and iron, all of which require replenishing after a night of drinking. Not to mention, it provides greater satiety in comparison to cold cereal, and improves low blood sugar so you’ll feel less dizzy, light-headed, and nauseous the next day. Oatmeal can also be dressed with various fruits and nuts to add an extra boost in electrolytes that were mentioned earlier, so make it part of your post-bar ritual!

Bloody Mary

cocktail in a wine glass

You’ve probably heard this one before. Hangover? Try the hair of the dog: aka- beat booze with more booze. The most suggested alcoholic drink to consume the morning after is a Bloody Mary, which is composed of tomato juice, hot sauce, some spices, Worcestershire sauce, and vodka, a classic brunch concoction. The idea of a Bloody Mary as the best hangover cure is largely associated with the vitamins and electrolytes that the body can obtain from the tomato juice, which is great on a normal day on its own, but might not do you too much good with extra liquor or when you’re already feeling sick. Firstly, the consumption of more alcohol can exacerbate the dehydration situation already present, making your symptoms way worse. And secondly, drinking alcohol irritates the stomach and intestines, resulting in some upper abdominal pain, nausea, and/or vomiting. And finally, acidic foods like tomatoes, and tomato juice and spicy foods like tabasco sauce, may further upset the stomach and intestines so you might be feeling even less peppy post-brunch.

Bottom Line: The Best Hangover Cure

You’re not going to like this, but you probably already knew that there is no real hangover cure. Rather, there are various food and beverages that can be considered to help alleviate symptoms like avoiding the hair of the dog, replenishing electrolytes and fluids and restoring blood sugar levels with foods like eggs and oatmeal. And you’re also not going to like this, but the BEST cure for a hangover: time and sleep. Oh, and maybe just going easy on the booze next time.

Become an Abbey’s Kitchen Subscriber

More Blog Posts You Might Like

  • QUICK HEARTBURN RELIEF | TIPS ON HOW TO AVOID THE HOLIDAY HEARTBURN & INDIGESTION
  • DOES ALCOHOL & CAFFEINE AFFECT FERTILITY OR CAUSE MISCARRIAGE?
  • THE TRUTH ABOUT DRINKING ALCOHOL WHILE BREASTFEEDING: WILL IT HARM MY BABY?

So now tell me, what is the best hangover cure that you have found work for you? Leave me a comment below with your DIY remedy!

Contribution By:

Amy Choi, RD2B

Abbey Sharp

Abbey Sharp is a Registered Dietitian (RD), regulated by the Ontario College of Dietitians. She is a mom, YouTuber, Blogger, award winning cookbook author, media coach specializing in food and nutrition influencers, and a frequent contributor to national publications like Healthline and on national broadcast TV shows.

www.abbeyskitchen.com/about-abbey/

Last Updated January 5, 2025. Published January 6, 2025 By Abbey Sharp 2 Comments

Gluten Free Christmas Cookie Recipe with Crushed Candy Canes

Be the star of your cookie exchanges this holiday season with these gluten free Christmas cookies with crushed candy canes. They are the perfect Christmas treat that is both kid, adult, and Santa friendly.

Birds eye view image of gluten free Christmas cookies on parchment paper surrounding by candy canes and Christmas ornaments.

It doesn’t feel quite like Christmas without a healthy dose of Christmas cookies! Theres something so nostalgic about biting into a cookie shaped like a snowman or Christmas tree and I am HERE FOR IT.

This gluten free Christmas cookie recipe will not only bring the Christmas spirit in a big way, but they are also totally gluten-free making them the perfect Christmas treat for the gluten intolerant or Celiac folks in your life.

Table of contents

  • Why This Recipe Works
  • Key Ingredients
  • How to Make This Recipe
  • Expert Tips
  • Recipe FAQs
  • More Recipes You Might Like

Why This Recipe Works

To make this gluten free Christmas cookie recipe, we use almond and coconut flour. While this dough tends to be a little more delicate than other doughs that use regular all purpose flour, it is still totally workable and yields a soft and chewy cookie.

I also love using these flour alternatives because they pack on an extra nutrition boost which makes me a happy dietitian. The almond flour provides some healthy fats and protein, while the coconut flour gives these cookies a fibre boost.

Depending on the size of your cookie cutters, roughly two of these gluten free Christmas cookies provides around 4 grams of protein and 2 grams of fibre. And when they are shaped into a cute little Christmas present and decorated to perfection? Come to mama!

Key Ingredients

Birds eye view image of portioned ingredients for gluten free Christmas cookie recipe including almond flour, vanilla and peppermint extract, butter, baking soda, almond milk, egg, coconut sugar, icing sugar, coconut flour, maple syrup, and cookie cutters.

Gluten-free Flour – these Christmas cookies use coconut and almond flour to make them gluten friendly. While there are definitely other gluten free flours on the market, I wouldn’t recommend substituting them in for this recipe as the quantities required would be totally different.

Icing Sugar – to make an easy icing for decorating, we whisk together icing sugar with a bit of almond milk. You can adjust the quantities to play around with the thickness of the icing.

Extracts – we use vanilla and peppermint extract to give these cookies an extra boost of Christmas flavour. Feel free to use one or the other depending on your taste preferences.

Cookie Cutters – we go full Christmas mood with these cookies by using a plethora of Christmas shaped cookie cutters like candy cane, snow flake, Christmas tree, presents, and snow man. The more opportunity for decorating the better!

How to Make This Recipe

Three side by side images showing how to make the gluten free Christmas cookie recipe.

Step 1: Add butter, sugar, maple syrup and vanilla extract to a bowl.

Step 2: Cream together until combined.

Step 3: Add in half of the almond flour, the coconut flour, salt, and baking soda and mix.

Three side by side images showing how to make the gluten free Christmas cookie recipe.

Step 4: Add the remaining almond flour.

Step 5: Stir to combine.

Step 6: Mix in the egg until a uniform dough forms. Roll the dough into two balls, cover them with plastic wrap, and refrigerate for at least 30 minutes.

Three side by side images showing how to roll gluten free cookie dough, cutting them into Christmas shapes with the cookie cutters, and what they look like after they are baked.

Step 7: Take out half of the dough and roll it between two pieces of parchment paper until the dough is just under ¼” thick.

Step 8: Use your favourite cookie cutters to carefully cut out shapes. The dough will be delicate, so it’s best to cut them out directly on the piece of parchment that you plan to bake them on. Scrape up any remaining dough and repeat by making shapes from them.

Step 9: Bake for 8-11 minutes. Pull them out when they are just slightly browned on the underside and firm yet slightly puffy on top. Set them aside to cool.

Three side by side images showing how to make the frosting with icing sugar and almond milk, as well as the finished Christmas cookies decorated with icing and sprinkles.

Step 10: To prepare the icing, mix a few tablespoons of the powdered sugar with a teaspoon of milk. Add half of the remaining powdered sugar slowly.

Step 11: Whisk to prevent clumps. Add an additional teaspoon of milk. Slowly add the remaining powdered sugar until you get a thick icing.

Step 12: Once you have a thick icing, pipe the icing on to the cookies in your favourite designs or shapes. While the icing is still sticky, sprinkle on any decorations you’d like – we used non-pareils, chocolate chips, and crushed candy cane pieces. Allow the icing to set and enjoy!

Expert Tips

The number of cookies this recipe makes will depend on how large your cookie cutters are and how thick you roll out the dough, but with my cutters it made about 2 dozen.

Coconut flour widely varies in absorbency across different brands. I have only tested this recipe with Bob’s Red Mill brand coconut flour so that’s what I recommend here. Use a fine blanched almond flour.

All ovens and pans cook a bit differently. Watch your cookies and pull them just when they begin to slightly brown on the underside for a softer cookie. Allow them to brown a little more if you want a crunchier cookie.

Feel free to use your own icing (homemade or store bought) or use this very simple powdered sugar icing. Add any type of flavoring you’d like to this gluten free Christmas cookie recipe.

Recipe FAQs

Can I make these vegan?

If you want to make these Christmas cookies vegan you can try using vegan butter and a flax egg instead.

Can I freeze these cookies?

Absolutely. Let the cookies cool down and freeze them on a baking sheet. Once they are solid, transfer to a container using parchment paper in between each cookie so they don’t stick together. Cookies will keep up to 3 months in the freezer.  With that said, you can totally use the dough to make valentines day or Easter themed cookies and thaw them just in time for decorating.

Is there a difference between almond flour and almond meal?

Almond flour and almond meal are both made from ground almonds, however almond flour is made using blanched skinless almonds, while almond meal is made with unblanched almonds with the skin which ends up creating a more course flour. For this recipe, we recommend using (blanched) almond flour.

What is the best way to store almond flour?

While almond flour is a bit more on the pricey side, a little goes a long way! So you definitely want to ensure you store almond flour correctly so that is doesn’t go to waste. Due to the fat content of the almond flour, it can go rancid at room temperature so be sure to store in the fridge or freezer to maximize it’s shelf life.

Are these cookies keto friendly?

One of these cookies provides around 7 grams of net carbs. To make them lower in net carbs you can substitute the coconut sugar for a keto friendly sweetener.

Several gluten free Christmas cookies sitting on parchment paper with Christmas cookie cutters and candy canes in the background.

More Recipes You Might Like

Here are some more Christmas treats that you might enjoy this holiday season!

  • 20 Best Healthy Vegan Christmas Desserts
  • Candy Cane Double Chocolate Chip Oatmeal Cookies
  • Coconut Flour Cookies with Chocolate Chips
  • Oatmeal Cookie Cups with Healthy Vegan Chocolate Mousse
  • No Bake Matcha Cheesecake Parfait
  • Vegan and Gluten Free Pecan Pie

Have you made cookies with almond flour before? What’s your go-to gluten free Christmas cookie recipe?

Print Recipe
5 from 4 votes

Gluten Free Christmas Cookies with Crushed Candy Canes

Be the star of your cookie exchanges this holiday season with these gluten free Christmas Cookies with crushed candy canes. They are the perfect Christmas treat that is kid and Santa friendly.
Prep Time1 hour hr
Cook Time10 minutes mins
Total Time1 hour hr 10 minutes mins
Course: Dessert, Snack
Cuisine: Amercian
Diet: Gluten Free
Servings: 24 Cookies
Calories: 100kcal
Author: Abbey Sharp

Ingredients

For the cookie:

  • ¼ cup very soft unsalted butter or you can use vegan butter
  • 3 Tbsp. coconut sugar
  • 2 Tbsp. maple syrup
  • 3/4 tsp. vanilla extract
  • 2 cups + 2 Tbsp. fine blanched almond flour
  • 2 Tbsp. coconut flour I used Bob’s Red Mill
  • ¼ tsp. salt
  • ¼ tsp. baking soda
  • 1 large egg

For the icing:

  • ⅔ cup powdered sugar
  • Almond milk to thin (a few teaspoons)
  • ¼ tsp. vanilla extract or a few drops of peppermint extract
  • Decorations sprinkles, crushed candy canes, chocolate chips, etc.

Instructions

  • In a bowl, cream together the butter, sugar, maple syrup and vanilla extract.
  • Add in half of the almond flour, the coconut flour, salt, and baking soda and mix. Mix in the remaining almond flour.
  • Mix in the egg until a uniform dough forms. Roll the dough into two balls, cover them with plastic wrap, and refrigerate for at least 30 minutes.
  • Preheat your oven to 340 degrees Fahrenheit. After the dough has refrigerated, take out half of the dough and roll it between two pieces of parchment paper until the dough is just under ¼” thick. Use your favorite cookie cutters to carefully cut out shapes. The dough will be delicate, so it’s best to cut them out directly on the piece of parchment that you plan to bake them on. Scrape up any remaining dough and repeat by making shapes from them.
  • After this, get the second ball of dough out from the fridge and repeat until you have 1 or 2 parchment covered baking sheets covered in cookie cut outs.
  • Bake for 8-11 minutes, depending on the size and thickness of your cookies. Pull them out when they are just slightly browned on the underside and firm yet slightly puffy on top. Set them aside to cool.
  • To prepare the icing, mix a few tablespoons of the powdered sugar with a teaspoon of milk. Add half of the remaining powdered sugar slowly, whisking as you go to prevent clumps. Add an additional teaspoon of milk. Slowly add the remaining powdered sugar until you get a thick icing. If desired, add your favorite extract. Depending on the type of milk and powdered sugar you use, you may need more or less liquid. Once you have a thick icing, pour it into a piping bag or plastic baggie and make a very small cut at the end corner of the bag.
  • Pipe the icing on to the cookies in your favorite designs or shapes. While the icing is still sticky, sprinkle on any decorations you’d like – we used non-pareils, chocolate chips, and crushed candy cane pieces. Allow the icing to set and enjoy!

Notes

  • The number of cookies this recipe makes will depend on how large your cookie cutters are and how thick you roll out the dough, but with my cutters it made about 2 dozen.
  • Coconut flour widely varies in absorbancy across different brands. I have only tested this recipe with Bob’s Red Mill brand coconut flour so that’s what I recommend here. Use a fine blanched almond flour.
  • All ovens and pans cook a bit differently. Watch your cookies and pull them just when they begin to slightly brown on the underside for a softer cookie. Allow them to brown a little more if you want a crunchier cookie.
  • Feel free to use your own icing (homemade or store bought) or use this very simple powdered sugar icing. Add any type of flavoring you’d like.

Nutrition

Calories: 100kcal | Carbohydrates: 8g | Protein: 2g | Fat: 7g | Saturated Fat: 2g | Cholesterol: 12mg | Sodium: 43mg | Potassium: 5mg | Fiber: 1g | Sugar: 6g | Vitamin A: 69IU | Calcium: 23mg | Iron: 1mg
Abbey Sharp

Abbey Sharp is a Registered Dietitian (RD), regulated by the Ontario College of Dietitians. She is a mom, YouTuber, Blogger, award winning cookbook author, media coach specializing in food and nutrition influencers, and a frequent contributor to national publications like Healthline and on national broadcast TV shows.

www.abbeyskitchen.com/about-abbey/

Last Updated January 5, 2025. Published January 6, 2025 By Abbey Sharp 11 Comments

Gingerbread Pancakes Recipe | Vegan Holiday Breakfast Recipe

These Vegan Gluten Free Gingerbread Men Pancakes make the perfect Holiday breakfast recipe for decorating and enjoying with the kids.

This Vegan Gluten Free Gingerbread Pancakes Recipe makes the perfect Holiday breakfast for decorating and enjoying with the kids.

birds eye view of gingerbread holiday pancakes next to a glass of milk.

When I was a kid, Christmas morning was legitimately my favourite few hours of the year. We had a strict 7 AM rule in my house for when I was allowed to go look at the tree, so my sister and I would be able to open up our stocking and play with it until it was time to go downstairs. Once our gifts were open, we would have a festive breakfast and my parents would spend the rest of the day likely cleaning up, calling relatives, and preparing the big holiday feast for the night. Now, I think making this gingerbread pancakes recipe together with my boys will be a really lovely future addition to our holiday morning tradition.

Table of contents

  • Why This Recipe Works
  • Key Ingredients
  • How to Make This Recipe
  • Expert Tips
  • Recipe FAQs
  • More Recipes You Might Like

Why This Recipe Works

Decorating the little gingerbread men would be a fantastic little activity to keep the kiddos busy while the adults get the rest of their holiday affairs in order. I also love this recipe because it’s

  • Vegan and Gluten Free – perfect for any dietary restrictions
  • Quick to make – less than 30 minutes including prep time!
  • Perfect for the Christmas holiday and SO delicious

Key Ingredients

Gluten Free Flour – You can use any type of gluten-free flour of your choice! I personally like to use this brand, but any gluten free alternative works.

Molasses, Ginger, Cloves, and Nutmeg – The blend of these ingredients give this gingerbread pancakes recipe the iconic colour, scent, and flavor we all know and love!

Decorations – This is where the fun comes in! You can add any fun decorations to these pancakes! We love to use red and green M&Ms, sprinkles, and candy canes to keep within the Christmas theme!

vegan and gluten free holiday pancakes on a white plate garnished with icing and candy

How to Make This Recipe

Step 1: In a bowl, mix together the flour, baking soda, baking powder, salt, cinnamon, ginger, cloves, and nutmeg. In another bowl, mix together the molasses, almond milk, vinegar, and vanilla. Whisk into the dry ingredients until smooth.

Step 2: Heat a nonstick skillet over medium heat with vegan butter and spray a silicon gingerbread man or woman pancake mold with nonstick cooking spray. Place the mold onto the pan and fill just a light layer with pancake mix. Allow to cook until brown on one side, remove the mold, and flip.

Step 3: Meanwhile, whisk together the powdered sugar with a tablespoon of almond milk. Add the remaining almond milk, if needed, to get to a thick stiff consistency. Transfer to a piping bag.

Step 4: Decorate your gingerbread pancakes with icing and candies. Enjoy!

Expert Tips

To make this super simple vegan gluten free gingerbread pancakes recipe, I just mix my dry ingredients with my wet and use a silicon gingerbread men cut out to form the shape in my frying pan. If you can’t find silicon molds, you can totally use a metal cookie cutter, you just have to make sure you thoroughly spray it with nonstick cooking spray first to prevent sticking.

In my experience, decorating can get a wee bit messy when you give kids free reign with sprinkles, but throw down a plastic tablecloth and let them have some fun. It’s Christmas!!

Birds eye view of vegan and gluten free holiday pancakes garnished with icing and candy.

Recipe FAQs

Can I make this recipe ahead of time?

Yes! You can also make this gingerbread pancakes recipe ahead of time to keep the holiday morning even more stress-free. Simply make your batch and freeze them on a baking tray in a single layer. Once frozen, you can pop them all into a freezer bag and then just rewarm them covered in tin foil before serving.

Do I have to use almond milk for the recipe?

You can use any type of plant-based milk you want to keep this recipe vegan. You can also use cow’s milk if you prefer.

What other decorations can I use for this gingerbread pancakes recipe?

The options are endless! You can use gumdrops, cookie crumbs, licorice, and mini marshmallows to name a few.

birds eye view of gingerbread man pancakes for the holidays on a white plate

More Recipes You Might Like

Looking for other Christmas recipes like this gingerbread pancakes recipe that your family will love? Check out some of my favorites!

  • GLUTEN FREE CHRISTMAS COOKIES WITH CRUSHED CANDY CANES
  • GLUTEN FREE GINGERBREAD COOKIES
  • 20 HEALTHY VEGAN CHRISTMAS DESSERTS
  • CHOCOLATE PEPPERMINT COOKIES (VEGAN)

I would love to know what your holiday breakfast recipe traditions are! Have you tried making this gingerbread pancakes recipe? Leave me a comment below with your thoughts!

These Vegan Gluten Free Gingerbread Men Pancakes make the perfect Holiday breakfast recipe for decorating and enjoying with the kids.
Print Recipe
5 from 3 votes

Gingerbread Pancakes Recipe | Vegan Holiday Breakfast Recipe

These Vegan Gluten Free Gingerbread Men Pancakes make the perfect Holiday breakfast recipe for decorating and enjoying with the kids.
Prep Time20 minutes mins
Cook Time5 minutes mins
Total Time25 minutes mins
Course: Breakfast
Cuisine: American
Servings: 6 people
Calories: 218kcal
Author: Abbey Sharp

Ingredients

  • 1 1/2 cups gluten free flour
  • 1 1/2 tsp baking powder
  • 1/4 tsp baking soda
  • 1/2 tsp salt
  • 1/2 tsp cinnamon
  • 1/2 tsp ground ginger
  • 1/4 tsp ground cloves
  • 1/4 tsp ground nutmeg
  • 3 tbsp molasses
  • 1 cup unsweetened vanilla almond milk
  • 1 tbsp apple cider vinegar
  • 1 tsp vanilla
  • Vegan butter for cooking
  • Nonstick cooking spray

Decoration:

  • 1 cup powdered sugar
  • 1-2 tbsp unsweetened vanilla almond milk
  • Red and green candies gluten free and/or vegan if desired

Instructions

  • In a bowl, mix together the flour, baking soda, baking powder, salt, cinnamon, ginger, cloves, and nutmeg.
  • In another bowl, mix together the molasses, almond milk, vinegar, and vanilla. Whisk into the dry ingredients until smooth.
  • Heat a nonstick skillet over medium heat with vegan butter and spray a silicon gingerbread man or woman pancake mold with nonstick cooking spray. Place the mold onto the pan and fill just a light layer with pancake mix. Allow to cook until brown on one side, remove the mold, and flip.
  • Meanwhile, whisk together the powdered sugar with a tablespoon of almond milk. Add the remaining almond milk, if needed, to get to a thick stiff consistency. Transfer to a piping bag.
  • Decorate your gingerbread pancakes with icing and candies. Enjoy!

Nutrition

Serving: 1serving | Calories: 218kcal | Carbohydrates: 50g | Protein: 3g | Fat: 2g | Saturated Fat: 0.03g | Polyunsaturated Fat: 0.5g | Monounsaturated Fat: 0.4g | Sodium: 302mg | Potassium: 254mg | Fiber: 3g | Sugar: 28g | Vitamin A: 1IU | Vitamin C: 0.01mg | Calcium: 140mg | Iron: 2mg
Abbey Sharp

Abbey Sharp is a Registered Dietitian (RD), regulated by the Ontario College of Dietitians. She is a mom, YouTuber, Blogger, award winning cookbook author, media coach specializing in food and nutrition influencers, and a frequent contributor to national publications like Healthline and on national broadcast TV shows.

www.abbeyskitchen.com/about-abbey/

Last Updated January 5, 2025. Published December 30, 2024 By Abbey Sharp 24 Comments

Candy Cane Chocolate Chip Skillet Cookie Recipe | Vegan Christmas Dessert!

This Vegan Candy Cane Skillet Cookie is the perfect plant-based gluten free holiday dessert for entertaining friends and family this Christmas!

 This Candy Cane Chocolate Chip Skillet Cookie recipe is the perfect plant-based gluten free holiday dessert for entertaining friends and family this Christmas!

Okay, so I’m not generally a cookie person. I like cakes, and ice cream, and puddings and pie, but cookies need to be special to be exciting. Then enters my chocolate chip skillet cookie recipe. This base recipe can be used year-round, BUT adding candy canes for Christmas just makes it SO much better. Holidays, get at me!

Table of contents

  • Why This Recipe Works
  • Key Ingredients
  • How to Make This Recipe
  • Expert Tips
  • Recipe FAQs
  • More Recipes You Might Like

Why This Recipe Works

I love this recipe partially because it’s huge. I mean, it fills and entire cast-iron skillet for goodness sake. But I also love this chocolate chip skillet cookie recipe because it’s

  • Absolutely DELICIOUS: has chocolate AND candy cane pieces, name a better combo!
  • Plant Based (Vegan)
  • Gluten Free – perfect for those with certain food restrictions!

Key Ingredients

Flax Egg – To keep this chocolate chip skillet cookie recipe vegan, I made an “egg” out of flaxseed and water, super easy! We use this as the vegan “glue” that holds this recipe together!

Coconut Sugar – Coconut sugar and regular sugar are almost identical nutrition-wise, coconut sugar just has larger granules that make the crunch a bit more impactful which is perfect for this recipe

Almond Flour – To help ensure this recipe is gluten free, we subbed regular flour with almond flour.

Toppings – This is where you can have fun!! We used some sliced almonds, vegan vanilla ice creamm and more crushed candy canes sprinkled on top. This is a great chance to get the kiddos involved in the kitchen and see what toppings they like!

Large chocolate chip skillet cookie recipe in a pan topped with ice cream and candy canes.

How to Make This Recipe

Step 1: Preheat oven to 350 F and grease a 9″ cast iron skillet. Place the flax and almond milk for the flax eggs in a small bowl and refrigerate for at least 20 minutes until gloopy.

Step 2: In one bowl, mix the flax egg, coconut sugar, coconut oil, almond butter, almond milk and vanilla.

Step 3: In another bowl, mix the almond flour, baking soda, baking powder, cinnamon, nutmeg and salt. Mix the wet into the dry until combined, then fold in half of the chocolate, almonds and candy canes.

Step 4: Spread out into the skillet and add the remaining chocolate, almonds and candy on top. Bake for about 20-22 minutes or until crispy and golden around the edges and firm in the centre.

Step 5: Slice and serve warm with ice cream, sprinkled with additional candy cane bits.

Expert Tips

One tip is I love to add lots of mini dark chocolate chips plus some crushed candy cane bits INTO the cookie dough before baking to really nail the holiday vibe.

Even though this chocolate chip skillet cookie recipe is tweaked to make it vegan and gluten free, feel free to sub those items if you don’t have any dietary restrictions you need to accommodate to!

Candy cane cookie served in a skillet.

Recipe FAQs

What other toppings work well with this chocolate chip skillet cookie recipe?

I think chocolate syrup, M&Ms, crushed Oreos, or even some caramel drizzle would be so delicious with this recipe!

What makes this recipe gluten free?

We subbed regular flour for almond flour to keep this recipe gluten free! You can use regular flour if you don’t need this recipe to be gluten free.

Do I need a cast iron skillet for this recipe?

Even though traditionally these cookie skillets are made in a cast iron skillet, it’s mainly just for show. Feel free to use another oven safe skillet or baking dish to make this recipe as well!

More Recipes You Might Like

Need some other fun cookie ideas like this chocolate chip skillet cookie recipe? Check out some of my favorites below!

  • PEANUT BUTTER AND JELLY COOKIES
  • CHOCOLATE PEPPERMINT COOKIES
  • CHAI COOKIES
  • SALTED TOFFEE COOKIES
Slice of large cookie served on a white plate topped with ice cream.

Now I want to know, have you tried making this chocolate chip skillet cookie recipe? What’s your go-to easy holiday dessert for Christmas entertaining? Are you YAY or NAY to the chocolate candy cane desserts? What do you plan to make for your guests who are vegan or gluten free?

Leave me a comment below with your thoughts!

This Vegan Candy Cane Skillet Cookie is the perfect plant-based gluten free holiday dessert for entertaining friends and family this Christmas!
Print Recipe
5 from 4 votes

Vegan Candy Cane Skillet Cookie

This chocolate chip skillet cookie recipe is the perfect plant-based gluten free holiday dessert for entertaining friends and family for Christmas.
Prep Time20 minutes mins
Cook Time22 minutes mins
Total Time42 minutes mins
Course: Dessert
Cuisine: American
Servings: 10 -12 people
Calories: 340kcal
Author: Abbey Sharp

Ingredients

Flax egg:

  • 2 tbsp flax seed
  • 1/4 cup unsweetened vanilla almond milk

Cookie:

  • 1/4 cup plus 2 tbsp. coconut sugar
  • ¼ cup melted coconut oil
  • 2/3 cup natural almond butter
  • 2 tbsp unsweetened vanilla almond milk
  • 4 tsp vanilla
  • 2 cup almond flour
  • 1/2 tsp baking soda
  • 1/2 tsp baking powder
  • 1/2 tsp cinnamon
  • 1/4 tsp nutmeg
  • 1/2 tsp salt
  • 1/2 cup mini dark chocolate chips vegan
  • 1/2 sliced toasted sliced almonds
  • 1/4 cup crushed candy canes plus more for serving
  • Fleur de sel for garnish
  • Vegan ice cream for serving

Instructions

  • Preheat oven to 350 F and grease a 9″ cast iron skillet.
  • Place the flax and almond milk for the flax eggs in a small bowl and refrigerate for at least 20 minutes until gloopy.
  • In one bowl, mix the flax egg, coconut sugar, coconut oil, almond butter, almond milk and vanilla.
  • In another bowl, mix the almond flour, baking soda, baking powder, cinnamon, nutmeg and salt. Mix the wet into the dry until combined, then fold in half of the chocolate, almonds and candy canes.
  • Spread out into the skillet and add the remaining chocolate, almonds and candy on top. Bake for about 20-22 minutes or until crispy and golden around the edges and firm in the centre.
  • Slice and serve warm with ice cream, sprinkled with additional candy cane bits.

Video

Nutrition

Serving: 12servings | Calories: 340kcal | Carbohydrates: 14g | Protein: 9g | Fat: 30g | Saturated Fat: 9g | Polyunsaturated Fat: 3g | Monounsaturated Fat: 6g | Cholesterol: 0.1mg | Sodium: 195mg | Potassium: 221mg | Fiber: 5g | Sugar: 5g | Vitamin A: 1IU | Vitamin C: 0.1mg | Calcium: 158mg | Iron: 2mg
Abbey Sharp

Abbey Sharp is a Registered Dietitian (RD), regulated by the Ontario College of Dietitians. She is a mom, YouTuber, Blogger, award winning cookbook author, media coach specializing in food and nutrition influencers, and a frequent contributor to national publications like Healthline and on national broadcast TV shows.

www.abbeyskitchen.com/about-abbey/

Last Updated November 30, 2024. Published December 2, 2024 By Abbey Sharp 3 Comments

Homemade Gingerbread Cookies | Gluten Free & Healthy Christmas Recipe

Holiday baking just isn’t complete without these homemade gingerbread cookies! Decorating these gingerbread cookies also doubles as a fun family activity to keep the kiddos busy and excited for Christmas.

Several gingerbread cookies in a white bowl with more cookies on a baking tray in the background.

One of my favourite holiday traditions is baking up a big batch of homemade gingerbread cookies.

It’s hard to tell what I enjoy about it the most – the smell of gingerbread cookies baking in the oven, decorating them with candy, or gobbling them down like I’m Santa Claus. All I know is that its an all around jolly old time that the whole family enjoys!

This year we have a few gluten intolerant folks in the fam. To ensure that everyone can enjoy these delicious holiday treats, we decided to make these homemade gingerbread cookies for everyone to get in on the holiday cheer.

Table of contents

  • Why This Recipe Works
  • Key Ingredients
  • How to Make This Recipe
  • Expert Tips
  • Recipe FAQs
  • More Recipes Like This

Why This Recipe Works

These homemade gingerbread cookies could not be easier to make, even for a novice baker! They’re soft, chewy, and perfectly spiced with ginger, cinnamon, and a touch of molasses. Are you drooling yet?

To make this recipe gluten friendly, we use almond flour and coconut flour. I love any excuse to incorporate these flours into my baking because they pack a serious nutrition punch while also making these gingerbread cookies naturally gluten free. The almond flour is adds healthy fats and protein, while the coconut flour adds a healthy dose of fibre. Case in point – one of these cookies has 5 grams of protein and 3 grams of fibre! Sounds like my kinda snack.

Key Ingredients

Birds eye view of portioned recipe ingredients including almond flour, icing sugar, coconut flour, coconut sugar, cinnamon, egg, molasses, food colouring, dried ginger, salt, baking soda, butter and vanilla.

Gluten Free Flour – to make this recipe gluten free and to add a nutrition boost, we use a blend of almond flour and coconut flour. Using these flours requires a bit more moisture to get the dough just right, so we wouldn’t recommend swapping the flours for another gluten free flour as they might not turn out the same.

Food colouring – to add a little bit of extra Christmas cheer, we use all natural food colouring for the icing. You can choose to omit the food colouring all together, or play around with the colours you want to use. We went with white and red icing.

Powdered Sugar – to prepare the icing we combine icing sugar with the food colouring and a bit of almond milk. You can also use store-bought icing for this recipe.

Spices – to make the classic gingerbread flavour come together we use a combination of cinnamon, dried ginger, and molasses to flavour these homemade gingerbread cookies.

Butter – We use regular butter for this recipe, but If you want to make this recipe dairy free, you can use vegan or dairy free butter.

How to Make This Recipe

Three side by side images showing how to make the cookie batter for the gingerbread cookies.

Step 1: In a bowl, cream together the butter, sugar, molasses, and vanilla extract. 

Step 2: Add in half of the almond flour, the coconut flour, salt, ginger, cinnamon, allspice, cloves, salt, and baking soda and mix.

Step 3: Mix in the remaining almond flour. Mix in the egg until a uniform dough forms. Roll the dough into a ball, cover them with plastic wrap, and refrigerate for an hour.

Two side by side images showing what the gingerbread cookies look like before and after coming out of the oven.

Step 4: After the chilling time, remove the dough from the fridge and roll it between two pieces of parchment paper until the dough is about ¼” thick. Use gingerbread men/women cookie cutters to cut out shapes. Carefully move them to a parchment covered sheet pan. Scrape up any remaining dough.

Step 5: Bake the cookies for 8-10 minutes, depending on the size and thickness of your cookies. Set them aside to cool.

Two side by side images showing how to make icing sugar as well as the final decorates gingerbread cookies.

Step 6: To make the icing, whisk together ¼ cup of powdered sugar with almond milk and food colouring until a thick frosting forms.

Step 7: Pipe the icing onto the cookies in your favourite designs or shapes. While the icing is still sticky, sprinkle on any decorations you’d like. We used mini chocolate chips for buttons.

Expert Tips

This recipe made 12 cookies with the cookie cutters I used.

Coconut flour widely varies in absorbancy across different brands. I have only tested this recipe with Bob’s Red Mill brand coconut flour so that’s what I recommend here. Use a fine blanched almond flour.

All ovens and pans cook a bit differently. Watch your cookies and pull them just when they begin to slightly brown on the underside for a softer cookie. Allow them to brown a little more if you want a crunchier cookie.

Feel free to use your own icing (homemade or store bought) or use this very simple powdered sugar icing. Add any type of flavoring you’d like.

You can taste the dough prior to adding the egg. For a spicier gingerbread, add a bit more of ginger.

Birds eye view of several gingerbread cookies on a cooling rack surrounded by Christmas ornaments.

Recipe FAQs

Can I freeze the dough?

Definitely! Wrap the cookie dough tightly with plastic wrap and add it to a freezer bag.

How long do the cookies stay fresh?

These cookies should stay fresh for about 4-6 weeks. Store in an air tight container in a cool dry place like your pantry.

Are these homemade gingerbread cookies dairy free?

You can easily make these gingerbread cookies dairy free by using vegan butter.

Can I make these egg free?

I have never tried to make these egg free, but you can try using an egg replacer like this one here. Otherwise, you can use a flax egg by combining 1 tablespoon of egg with 3 tablespoons of water and letting it set for 15 minutes before adding it to the dough.

More Recipes Like This

Looking for more yummy recipes like these homemade gingerbread cookies? Here are some of our favourite Christmas cookies to enjoy this holiday season!

  • Coconut Flour Cookies with Chocolate Chips (Gluten Free)
  • Candy Cane Double Chocolate Chip Oatmeal Cookies (Vegan)
  • Christmas Cookies with Crushed Candy Canes (Gluten Free)
  • Candy Cane Skillet Cookies (Vegan)
  • Cookie Cups with Chocolate Healthy Mousse (Vegan)

What gluten free treats are you whipping up for the holidays this year? Have you made homemade gingerbread cookies before? Let me know down in the comments below!

Print Recipe
5 from 2 votes

Homemade Gingerbread Cookies | Gluten Free & Healthy Christmas Recipe

Holiday baking just isn't complete without these homemade gingerbread cookies! Decorating these gingerbread cookies also doubles as a fun family activity that you can enjoy for years to come.
Prep Time1 hour hr 20 minutes mins
Cook Time15 minutes mins
Total Time1 hour hr 35 minutes mins
Course: Dessert, Snack
Cuisine: American
Diet: Gluten Free
Servings: 12 cookies
Calories: 217kcal
Author: Abbey Sharp

Ingredients

  • ¼ cup unsalted butter vegan or regular, very soft
  • 6 Tbsp. coconut sugar
  • 2.5 Tbsp. molasses
  • 1.25 tsp. vanilla extract
  • 2 cups + 1 Tbsp. fine almond flour
  • 4 tsp. coconut flour
  • ¾ tsp. dried ginger
  • ½ tsp. cinnamon
  • Pinch of allspice
  • Pinch of cloves
  • ¼ tsp. salt
  • ¼ tsp. baking soda
  • 1 large egg

White icing

  • ½ cup powdered sugar
  • 2 tsp. Almond milk
  • 1-2 drops of vanilla extract

Red icing

  • ¼ cup powdered sugar
  • 1 tsp. Almond milk
  • 1-2 drops vanilla extract
  • Red food coloring we used a natural option

Instructions

  • In a bowl, cream together the butter, sugar, molasses and vanilla extract.
  • Add in half of the almond flour, the coconut flour, salt, ginger, cinnamon, allspice, cloves, salt and baking soda and mix. Mix in the remaining almond flour.
  • Mix in the egg until a uniform dough forms. Roll the dough into a ball, cover them with plastic wrap, and refrigerate for an hour.
  • Preheat your oven to 350 degrees Fahrenheit. After the chilling time, remove the dough from the fridge and roll it between two pieces of parchment paper until the dough is about ¼” thick. Use gingerbread men/women cookie cutters to cut out shapes. Carefully move them to a parchment covered sheet pan. Scrape up any remaining dough.
  • Bake the cookies for for 8-10 minutes, depending on the size and thickness of your cookies. Pull them out when they are just slightly browned on the underside and firm yet slightly puffy on top. Set them aside to cool. Repeat with the remaining dough until you have used up all of the dough. Allow the cookies to fully cool.
  • To make the icing, whisk together ¼ cup of powdered sugar with a teaspoon of the almond milk. Add the remaining sugar slowly to prevent lumps. Add the second teaspoon of milk and vanilla and whisk until a thick frosting forms. Depending on the type of milk and powdered sugar you use, you may need more or less liquid.
  • Repeat the above steps for the colored icing. The amount of food coloring you add will depend on the type of food coloring you use and how deep and rich you’d like the color to be.
  • Once you have a thick icing, spoon each type of icing into piping bags or a plastic baggie and make a very small cut at the end corner of the bag.
  • Pipe the icing on to the cookies in your favorite designs or shapes. While the icing is still sticky, sprinkle on any decorations you’d like. We used mini chocolate chips for buttons.

Notes

 
  • This recipe made 12 cookies with the cookie cutters I used.
  • Coconut flour widely varies in absorbancy across different brands. I have only tested this recipe with Bob’s Red Mill brand coconut flour so that’s what I recommend here. Use a fine blanched almond flour.
  • All ovens and pans cook a bit differently. Watch your cookies and pull them just when they begin to slightly brown on the underside for a softer cookie. Allow them to brown a little more if you want a crunchier cookie.
  • Feel free to use your own icing (homemade or store bought) or use this very simple powdered sugar icing. Add any type of flavoring you’d like.
  • You can taste the dough prior to adding the egg. For a spicier gingerbread, add a bit more of ginger.

Nutrition

Calories: 217kcal | Carbohydrates: 22g | Protein: 5g | Fat: 14g | Saturated Fat: 3g | Cholesterol: 24mg | Sodium: 95mg | Potassium: 54mg | Fiber: 3g | Sugar: 15g | Vitamin A: 138IU | Calcium: 52mg | Iron: 1mg
Abbey Sharp

Abbey Sharp is a Registered Dietitian (RD), regulated by the Ontario College of Dietitians. She is a mom, YouTuber, Blogger, award winning cookbook author, media coach specializing in food and nutrition influencers, and a frequent contributor to national publications like Healthline and on national broadcast TV shows.

www.abbeyskitchen.com/about-abbey/

Last Updated November 25, 2024. Published November 25, 2024 By Abbey Sharp 2 Comments

Thanksgiving Leftover Soup | Easy + Healthy!

This easy thanksgiving leftover soup is the perfect Thanksgiving hack to help you use up turkey scraps. This recipe is also packed with fibre and protein, and is ready in only 30 minutes!

Birds eye view of leftover turkey soup in a white bowl on top of placemat garnished with lemon slices and a sprig of rosemary.

Every year I look forward to a delicious roasted turkey dinner for Thanksgiving with all the fixings! But every year I get into a bit of a rut about what to do with the turkey leftovers. I mean, no matter how many people are at our table we still manage to have a pile of leftovers the next day.

While I am TOTALLY not complaining (because leftovers are life), there are only so many turkey sandwiches I can make before I get a little bored and have to freeze the rest. That’s where this easy vegetable turkey soup comes in!

This thanksgiving leftover soup is a flavourful and nutrient packed way to enjoy Thanksgiving leftovers. Not only is it jam packed with veggies, protein and fibre, but it only takes 30 minutes to make.

Table of contents

  • Why This Recipe Works
  • Key Ingredients
  • How to Make This Recipe
  • Expert Tips
  • Recipe FAQs
  • More Recipes You Might Like

Why This Recipe Works

Still not convinced? Thanksgiving leftover soup is a post-Thanksgiving winner!

  • Reduce food waste
  • Cozy fall meal
  • Nourishing ingredients
  • Comes together in no time
  • 37g protein and 11g fibre!

Key Ingredients

Birds eye view of portioned ingredients to make leftover turkey soup including celery, butternut squash, turkey, cannellini beans, broth, carrots, kale, onion, garlic, and chicken broth.

Frozen Butternut Squash – Using frozen chopped butternut squash is one of my favourite cooking hacks. Not only do you save tons of time peeling, chopping, and deseeding – but it cooks down in no time! If you can’t find frozen butternut squash at the store, you can opt for raw pre-chopped butternut squash instead, but it will require more time to cook.

Leftover Turkey – It’s not quite Thanksgiving without leftover turkey to enjoy the next day. I would argue that it even tastes better the days following, so you bet it’s going to add tons of flavour to this soup. If you don’t have leftover turkey but still want to make this soup, see my “expert tips” below for how you can make this soup using turkey breast.

Cannellini Beans – This is another one of my favourite cooking hacks because not only do cannellini beans add tons of extra fibre and protein, but they are a great way for adding creamy texture to soup without the need to add any cream!

Kale – While kale is personally not my first choice for raw salad greens because I just can’t get past its rough bitter flavour, it is probably one of the most nutritionally dense salad greens out there! Which is why I love adding it into soups, pastas and sauces instead so I can reap the nutritional benefits. If you don’t have kale on hand, feel free to use spinach, arugula, or swiss chard.

How to Make This Recipe

Step 1: Heat the olive oil in a pot over medium heat. Once hot, add the onions and saute for a minute. Add the carrot and celery and saute until soft.

Step 2: Once the veggies begin to soften, add the garlic, pepper, thyme, and salt. Stir until the garlic is fragrant.

Step 3: Add 2.5 cups of the butternut squash and the chopped turkey and give everything stir. Add 5 cups of broth to the pot. Bring the pot to a boil and then reduce to a simmer.

Two side by side images showing how to prepare soup.

Step 4: Blend butternut squash, cannellini beans and broth in a blender. Pour the squash and bean mixture into the pot and stir everything together.

Step 5: Add remaining beans and the chopped kale. Simmer for 5-7 minutes uncovered, or until the soup thickens slightly and the kale is soft. Season with salt and pepper to taste.

Expert Tips

This soup is super simple and comes together very quickly. Since the turkey is already cooked, it only needs to simmer for a few minutes for you to get a delicious hearty meal. The soup is elevated by blending the broth with some butternut squash and cannellini beans, which gives the broth more body.

If you want a thicker soup, you can add an additional half can of beans to this recipe. Blend these additional beans in with the squash mixture. 

The salt content will depend on how salty your broth is. If you prefer, you can omit the salt and adjust the salt to taste after the soup is finished cooking.

If you want to make this recipe but don’t have a leftover turkey, you can roast half of a bone in turkey breast. Rub the turkey breast in butter or olive oil, garlic, salt, pepper, and herbs like thyme or rosemary, and place it in a baking dish with a little broth at the bottom. Roast at 375 or 400 until the internal temperature reads at least 165 degrees Fahrenheit. Remove the turkey and cube it, then toss the cubes in any juices in the pan.

Close up of leftover turkey soup in a white bowl garnished with two lemon slices and a sprig of rosemary.

Recipe FAQs

Is this soup gluten free?

Yes! This recipe is totally gluten free for all my celiac and gluten intolerant friends.

How long does this soup keep in the fridge?

This turkey soup lasts about 3-4 days in the fridge but can last up to 6 months in the freezer.

How can I freeze this soup?

Allow the soup to cool down for about an hour and freeze in a freezer bag or container. I personally prefer freezer bags because you can lay them flat in the freezer to help preserve space.

Do you have any other ideas for repurposing turkey leftovers?

I love throwing turkey leftovers into sandwiches or salads, but you can also use them to batch cook casseroles, pastas, chili’s, lasagnas etc! I have some more delish ideas in this post.

How can I make this soup lower in sodium?

Make sure you purchase canned cannellini beans and broth that are “no” or “low” sodium. You may also choose to omit adding salt to the soup and increasing the amount of thyme and pepper for more flavour.

More Recipes You Might Like

If you liked this thanksgiving leftover soup recipe, then you might also like more of our yummy soup recipes on the blog!

  • Easy Sweet Potato Curry Soup (Vegan & Gluten Free)
  • Roasted Cauliflower Soup with Parsnips (Vegan)
  • Butternut Squash Soup with Lentils (Vegan)
  • Creamy Tomato Soup (Vegan)

What are you making with your turkey leftovers this year? Leave me some ideas in the comments!

Print Recipe
5 from 2 votes

Thanksgiving Leftover Soup | Easy + Healthy!

This easy vegetable turkey soup is the perfect Thanksgiving hack to help you use up turkey leftovers. This recipe is also packed with fibre and protein, and is ready in only 30 minutes!
Prep Time10 minutes mins
Cook Time20 minutes mins
Total Time30 minutes mins
Course: Soup, Main Course, Dinner, Lunch, thanksgiving
Cuisine: American
Diet: Gluten Free
Servings: 4
Calories: 454kcal
Author: Abbey Sharp

Ingredients

  • 2 Tbsp. olive oil
  • 1 small onion diced (about 3/4 cup)
  • 1.5 cups chopped carrot
  • 1 cup chopped celery
  • 3 cloves minced garlic
  • 1 tsp. black pepper
  • 1 tsp. dried thyme
  • 1/2 tsp.+ salt depending on salt content of broth
  • 3.5 cups frozen cubed Butternut Squash
  • 3.5 cups chopped leftover Roasted Turkey
  • 6 cups Chicken or Turkey Broth
  • 15 oz. can Cannellini Beans rinsed and drained
  • 4 cups Chopped Kale

Instructions

  • Heat the olive oil in a pot over medium heat. Once hot, add the onions and saute for a minute. Add the carrot and celery and saute until soft. Once the veggies begin to soften, add the garlic, pepper, thyme, and salt. Stir until the garlic is fragrant.
  • Add 2.5 cups of the butternut squash and the chopped turkey and give everything stir. Add 5 cups of broth to the pot. Bring the pot to a boil and then reduce to a simmer.
  • While waiting for the soup to come up to temperature, blend the remaining butternut squash with ¾ cup of the cannellini beans and the remaining cup of broth in a blender or in a jar with an immersion blender. Blend until smooth.
  • Pour the squash and bean mixture into the pot and stir everything together. When the soup is simmering, add the remaining beans and the chopped kale. Simmer for 5-7 minutes uncovered, or until the soup thickens slightly and the kale is soft. Season with salt and pepper to taste. Garnish with any fresh herbs you like and slices of lemon.

Notes

This soup is super simple and comes together very quickly. Since the turkey is already cooked, it only needs to simmer for a few minutes for you to get a delicious hearty meal. The soup is elevated by blending the broth with some butternut squash and cannellini beans, which gives the broth more body.
If you want a thicker soup, you can add an additional half can of beans to this recipe. Blend these additional beans in with the squash mixture. 
The salt content will depend on how salty your broth is. If you prefer, you can omit the salt and adjust the salt to taste after the soup is finished cooking.
If you want to make this recipe but don’t have a leftover turkey, you can roast half of a bone in turkey breast. Rub the turkey breast in butter or olive oil, garlic, salt, pepper, and herbs like thyme or rosemary, and place it in a baking dish with a little broth at the bottom. Roast at 375 or 400 until the internal temperature reads at least 165 degrees Fahrenheit. Remove the turkey and cube it, then toss the cubes in any juices in the pan. 

Nutrition

Calories: 454kcal | Carbohydrates: 51g | Protein: 37g | Fat: 15g | Saturated Fat: 3g | Cholesterol: 63mg | Sodium: 518mg | Potassium: 1554mg | Fiber: 11g | Sugar: 7g | Vitamin A: 27943IU | Vitamin C: 113mg | Calcium: 312mg | Iron: 8mg

Have you made this leftover turkey soup? Let me know down in the comments below!

Abbey Sharp

Abbey Sharp is a Registered Dietitian (RD), regulated by the Ontario College of Dietitians. She is a mom, YouTuber, Blogger, award winning cookbook author, media coach specializing in food and nutrition influencers, and a frequent contributor to national publications like Healthline and on national broadcast TV shows.

www.abbeyskitchen.com/about-abbey/

Last Updated November 17, 2024. Published November 18, 2024 By Abbey Sharp 6 Comments

Vegan Pecan Pie Recipe (Gluten Free Thanksgiving Dessert Recipe)

This Vegan Pecan Pie is the perfect Thanksgiving, Christmas and Holiday dessert that is gluten free, dairy-free, plant-based and corn syrup free!

This Pecan Pie Recipe is the perfect Thanksgiving and Holiday dessert that is gluten free, dairy-free, and plant-based!

Slice of vegan pecan pie on a grey dish for thanksgiving.

Thanksgiving is one of my all-time favourite holidays because it’s largely about the food. And all my favourite foods, too. Stuffing. Sweet potatoes. Pie. Basically, it’s a carb fest with a mindful portion of turkey (because hey, it took someone- likely me- an entire day to cook that thing!) But if you’re entertaining a crowd this year, and there are multiple dietary restrictions, this gluten free AND vegan pecan pie recipe is going to save your life. Okay, so maybe that’s dramatic. But it will make you a holiday hero- I have no reservations about making a claim like that.

Table of contents

  • Why This Recipe Works
  • Key Ingredients
  • How to Make This Recipe
  • Expert Tips
  • More Recipes You Might Like

Why This Recipe Works

If you needed more convincing to add this vegan pecan pie to your Thanksgiving spread, here are a few more reasons why we love this recipe!

  • Can accommodate dietary preferences and intolerances at the table
  • Corn syrup free
  • Plant-based
  • Doesn’t sacrifice flavour
  • Guaranteed crowd pleaser

Key Ingredients

Birds eye view of a vegan pecan pie.

Gluten free flour: any gluten free flour can be used for this vegan pecan pie recipe! Make sure to read the package instructions ahead of time and adjust portion if needed. I like to use this gluten-free flour because it has a 1:1 ratio.

Pecans: Pecans are high in monounsaturated fats, which are great for heart health. Save time by buying pecan halves vs. whole.

Vegan butter: This recipe uses vegan butter because it provides the same consistency as regular butter, but keeps things plant-based.

Maple syrup and brown sugar: Instead of corn syrup, we went with these as sweeteners. I would argue that they are the best warming flavours for this time of year!

How to Make This Recipe

Birds eye view of vegan pecan pie with a slice taken out in a white pie dish.

Step 1: In a food processor, add the flour, salt, sugar, and butter and pulse until it reaches pea-sized pieces. Add in the ice water, a tablespoon at a time. Form into two thick round discs, wrap in plastic wrap and refrigerate for 1 hour to set up. Mix together the chia seeds and almond milk and refrigerate for 20 minutes.

Step 2: In a food processor, puree the chia egg (the chia and almond milk mixture), maple, sugar, cornstarch, vanilla, vinegar, vegan butter, salt and cinnamon. Stir in the pecan halves.

Step 3: Roll the first dough disk out to less than 1/4 inch and fit into a 9 inch pie plate. Prick the bottom. Chill until firm for about 30 minutes. Roll the second disk out and using a cookie cutter (or free-form with a knife) cut out leaf shapes.

Step 4: Pour the filling into the shell and press the leaf shapes all around the edge. Bake for about 1 hour or until it just gently jiggles in the center. After the first 20 minutes, you’ll likely want to cover the edges with tin foil to prevent the crust from overbrowning.

Expert Tips

I highly recommend making a big batch of the pie dough, wrapping it up in plastic and saving it for emergency pastry situations. You know, we all have those sometimes. And who wouldn’t want to have double the pie dough for the same amount of effort?

Along the lines of emergency pastry situations, I also love freezing individual slices of this pie for those nights I just need a little something-something. To do this, wrap each slice in plastic wrap or foil and keep in a freezer-safe bag for up to 3 months.

This vegan pecan pie filling uses a combination of maple syrup and brown sugar, so unlike the classic, it’s totally corn syrup free. I’m personally not anxious about a little corn syrup (it’s a pie, not something you eat every day) but hey, if we can make it a little less processed, let’s do it.

Recipe FAQ

How do I store this pie if I’m making it ahead?

You can make this pie up to a month ahead of time! Just wrap the pie tightly in a few layers plastic wrap and store in resealable bag to prevent freezer burn. When ready to serve, let the pie thaw in the fridge for at least 12 hours or overnight. Do not thaw at room temperature as this can cause the crust to turn soggy.

Can I make flavour variations with this pie?

While I don’t like messing with a classic, this vegan pecan pie recipe can easily be turned into an Italian pine nut tarte by using a tarte shell and loading it up with pine nuts instead of pecans. You can also make mini pecan pie tarts if you feel so inclined!

Close up of a fork taking a piece out of a pecan pie for thanksgiving on a grey plate.

More Recipes You Might Like

If you love plant-based desserts like this pecan pie recipe, give these recipes a try!

  • Vegan Key Lime Pie (Easy No Bake Snack)
  • Vegan Banoffee Pie Popsicles
  • Vegan and Gluten Free Pecan Pumpkin Pie Donuts
  • Frozen Vegan Peanut Butter Pie

So friends, tell me – are you team pecan or team pumpkin? Have you tried making this decadent Vegan Pecan Pie Recipe? Let me know down in the comments below!

This Vegan Pecan Pie is the perfect Thanksgiving, Christmas and Holiday dessert that is gluten free, dairy-free, plant-based and corn syrup free!
Print Recipe
5 from 5 votes

Vegan Pecan Pie Recipe (Gluten Free Thanksgiving Dessert Recipe)

This Vegan Pecan Pie Recipe is the perfect Thanksgiving, Christmas and Holiday dessert that is gluten free, dairy-free, plant-based and corn syrup free!
Prep Time1 hour hr 50 minutes mins
Cook Time1 hour hr
Total Time2 hours hrs 50 minutes mins
Course: Dessert
Cuisine: American
Servings: 8 people
Calories: 823kcal
Author: Abbey Sharp

Ingredients

Crust:

  • 2 ½ cups gluten free flour
  • ½ tsp salt
  • ¼ cup white sugar
  • 1 cup vegan butter very cold frozen is best
  • ½ cup cold ice water

Filling:

  • 3 tbsp ground chia seeds
  • 6 tbsp unsweetened vanilla almond milk
  • ¾ cup maple syrup
  • 1 ¼ cup light brown sugar
  • ¼ cup cornstarch
  • 1 tbsp vanilla extract
  • 1 1/2 tsp apple cider vinegar
  • 1/2 cup melted vegan butter
  • ¼ tsp salt
  • 1/2 tsp cinnamon
  • 2 cups pecan halves

Instructions

  • In a food processor, add the flour, salt, sugar, and butter and pulse until it reaches pea-like pieces. Add in the ice water, a tablespoon at a time until it comes together (you likely won't use it all!). Form into two thick round discs, wrap in plastic wrap and refrigerate for 1 hour to set up.
  • Meanwhile, preheat oven to 350F.
  • Mix together the chia seeds and almond milk and refrigerate for 20 minutes.
  • In a food processor, puree the chia egg (the chia and almond milk mixture), maple, sugar, cornstarch, vanilla, vinegar, vegan butter, salt and cinnamon.
  • Stir in the pecan halves.
  • Roll the first dough disk out to less than 1/4 inch and fit into a 9 inch pie plate. Prick the bottom. Chill until firm for about 30 minutes.
  • Roll the second disk out and using a cookie cutter (or free-form with a knife) cut out leaf shapes.
  • Pour the filling into the shell and press the leaf shapes all around the edge.
  • Bake for about 1 hour or until it just gently jiggles in the center. After the first 20 minutes, you’ll likely want to cover the edges with tin foil to prevent the crust from overbrowning.
  • Allow to cool completely before slicing and serving.

Nutrition

Calories: 823kcal | Carbohydrates: 97g | Protein: 7g | Fat: 48g | Saturated Fat: 9g | Sodium: 521mg | Potassium: 241mg | Fiber: 8g | Sugar: 60g | Vitamin A: 1630IU | Vitamin C: 0.2mg | Calcium: 147mg | Iron: 2.6mg
Abbey Sharp

Abbey Sharp is a Registered Dietitian (RD), regulated by the Ontario College of Dietitians. She is a mom, YouTuber, Blogger, award winning cookbook author, media coach specializing in food and nutrition influencers, and a frequent contributor to national publications like Healthline and on national broadcast TV shows.

www.abbeyskitchen.com/about-abbey/

Last Updated November 10, 2024. Published November 11, 2024 By Abbey Sharp 29 Comments

Baby Led Weaning First Foods | A Beginner’s Guide for Starting Solids Without Spoon Feeding

Thinking of trying baby led weaning with your baby? We share the dos and don’ts in this BLW beginners guide for starting solids without spoon-feeding.

Curious on baby led weaning first foods and how to start baby led weaning with your baby? We share the dos and don’ts in this BLW beginners guide for starting solids without spoon-feeding.

What is Baby Led Weaning (BLW)?

Food on a baby's plate.

Search any Facebook mom group and you’ll undoubtedly see “How to Start Baby Led Weaning” come up in your feed. Baby led weaning (or BLW) is where handheld finger foods are introduced to babies when they start solids rather than spoon-fed purees. This method has always been around but has recently been gaining a lot of popularity amongst dietitians, pediatric feeding experts and moms in general. The concept of BLW is based on a long-term midwife and lactation consultant Gill Rapley’s view of infant feeding. She argues that just as infants learn to crawl, walk and talk at their own pace, eating should be no different. It should be baby led.

If you ask your parents how you were fed, they would probably tell you it started with a spoon. Traditionally, babies around the 6-month mark are started on infant baby cereal or pureed fruits and veggies, spoon-fed by an adult into the baby’s mouth. Once they mastered those purees, parents would slowly introduce chunkier textures until solid finger foods would be served. In baby led weaning, parents can offer a variety of baby led weaning first foods right from the get go. This can include whole pieces of food (like toast), or purees (like mashed potatoes). The key is that the baby is in control of the feeding (by pre-loading a spoon, for example). The idea is that baby led weaning allows the infant to control their food consumption by “self-feeding” and “self regulating” their intake.

BLW & the division of responsibility

So, what is this weaning business all about? It’s a bit of a misnomer, so some experts prefer to use the term baby-led feeding as starting solids does not mean that breastmilk is removed. But rather, it means that solid foods are added in complementary to baby’s milk to ensure that their nutritional needs are met. The child can explore the food options at their own pace rather than being passively spoon-fed by an adult. In the view of infant feeding expert Ellyn Satter, a method like baby led weaning promotes the division of responsibility. The parent decides on what, when and where the infant will eat and should not try to control how much their babe consumes. Infants are responsible for how much and whether they want to eat at all! According to the division of responsibility, it’s more important that we foster a positive eating environment, then worry about how much of every nutrient our baby is eating.

What are some of the benefits of BLW?

Baby's food on plate.

Nutrition

It is important to introduce solid foods by around the 6 month mark because breastmilk or formula alone don’t provide adequate amounts of important nutrients like iron and zinc. Low iron and zinc levels can lead to impaired growth, motor and cognitive development and immune function, hence the importance of paying attention to these important nutrients. Eating whole foods through baby led weaning has the potential to be very nutrient-dense when compared with some homemade or commercial baby foods which sometimes parents water down.

One of the criticisms of baby led weaning, however, is that because babe is in control of her eating (vs an adult being in control), she may not actually eat enough to thrive. But one study comparing the BMI of baby-led weaners to a group of babies fed purees found no difference in body weight or growth. There is also no evidence that either group universally get more iron compared to another, so parents don’t need to necessarily worry about that if they’re staying on their curve. Baby led weaning first foods that are an excellent source of iron for infants include iron fortified cereals, meats, egg, sweet potatoes and beets so you can focus on serving those.

Involvement During Family Meal Time

The key features of baby led weaning are that the baby sits with their family during mealtimes and are offered the same meals options (in appropriate piece sizes, without salt or sugar). The baby can then self-feed the by using their hands, a spoon or another self-feeding tool like a “boon spoon”. With time, babies can learn, just as we do, that eating reduces their hunger and they will adapt to their new eating routines with their family.

Improves Dexterity

Baby grabbing cereal.

One of the biggest advantages of learning how to start baby led weaning is that it allows babies to have greater dexterity as they self-feed themselves. They develop better hand-eye coordination which leads to independence and less micromanaging from parents during meal time. Winning!

Improves Oral Motor Skills

Baby led weaning may help improve oral motor skills as they learn to create a bolus (ball of food) and swallow. When an infant eats a new food item, their tongue reflex forces them to lick and taste the food. With continuous practice and exposure, babies learn to move their tongue from side to side the same way we do when we eat.

Improves Palate

Babies who were fed using baby led weaning are less likely to be picky eaters because they are exposed to different food textures and flavors from a younger age. Since a lot of picky eating revolves around texture issues, introducing a wide variety early on may help minimize this down the road.

Lower Risk of Obesity

We talk all the time about the importance of mindful eating for adults, why not build those same skills in babes? One study in this area found that BLW infants had a lower risk of obesity because they could practice self-regulation from a younger age. As a result, they may become more aware about their satiety cues and could use those skills later on in life.

How to Start Baby Led Weaning + Baby Led Weaning First Foods

Baby food on a plate.

Now we have an understanding of baby led weaning under our belt, let’s look at how to start baby led weaning.

Readiness

Just because your pediatrician says you can start solids at 4, 5, or 6 months (recommendations that we will cover in another post), doesn’t mean they’re ready. Parents should be on the lookout for signs of readiness in their baby before beginning the baby led weaning process. Here’s some things to look out for:

  • They should be able to sit up with support and have neck support so it’s easy for them to spit out food.
  • Baby should be showing interest in food and reaching out
  • They’re opening their mouth to suck on items (hands, food or inedible items)
  • Alertness or change in facial expressions during mealtime

Self-Feeding Instruments

There are lots of different self-feeding instruments on the market but there is no scientific evidence that supports the need for them. If you want to give them a try, here are some popular options I’ve seen:

Boon feeders

Silicon spoon with small holes for infants to self-feed easily

Boon Platter

Plate with divided sections for the different variety of foods offered

Num Num Pre-spoons

A starter set of spoons with grips to help babies keep the food on the spoon to self-feed

Kidsme feeder

Think of it as a sippy cup with pureed meals, infants can suck and squeeze their meals

It is important to note that eating is a skill to learn. Using some of these instruments may prolong that process as infants are not able to touch and explore their foods.  If you use them, you may find it’s best to use them alongside simply letting baby use their hands.

Small, Frequently & Varied

There is no specific amount of food that babies are required to consume at any point in this process. The beauty of it being baby led is that they will tell you when they’ve had enough, and since breast milk or formula is being continued, they will make up the calories through milk.

Infants starting complementary foods should initially consume solids 2-3 times a day between 6-8 months, in addition to milk feeding. The frequency should be increased to 3-4 times between 9-11 months as the infant improves their skills.

Start with Soft Foods

When first learning how to start baby led weaning, begin with steamed and sliced food so the infant can easily chew and swallow the items. Give soft fruits and vegetables initially. Then introduce lightly cooked harder foods that can be easily chewed with bare gums. Soft foods should be soft enough to be mash with the tongue or your finger.

Great first soft foods might be avocado, banana, steamed sweet potato, steamed carrots, ricotta cheese, and scrambled eggs. With slippery foods, try rolling the foods in something like ground flax, baby cereal or ground almonds.  Offer water in small amounts during mealtime in an open cup as early as 6 months. This helps them develop their oral motor skills faster than them using a sippy cup which require a similar sucking technique as bottles.

Food Shapes

Food on a baby's plate.

Food should ideally be shaped like a finger and be easily able to fit in the infant’s hand with a some sticking out of their fists. Initially, babe will be exploring the food and creating a mess more than eating but hey that’s part of the process. Also, that’s what dogs are for. Poppy, my pup, was just as excited as Baby E when it was meal time.

Offer New Foods

Try offering one new food as a challenge for yourself each day for baby to explore. This allows the baby to have a variety of food selection and explore more options. It also allows you an opportunity to see what kind of foods or shapes are working best.

Avoid Choking Hazard Foods

Small round foods should be avoided as they can be choking hazards. Steer clear of whole grapes, hot dog pieces, whole cherry tomatoes, peanuts and popcorn. Cut round soft foods into quarters and avoid hard items like peanuts or popcorn. Some foods that have tougher skins such as apples can be removed to make it a bit easier for baby to manage, and can also be cooked to soften the texture. Avoid foods that form too much crumb in the mouth (like dry crackers) as they can get dislodged in the infant’s mouth. Good examples of food are bananas, avocados and meats as they keep their shape when an infant holds on to them.

Be a Role Model

The goal is to create a routine for the infant similar to the families so that they mirror their parents’ dietary behaviors. According to the BLISS study, babies show an interest in their parent’s activities, including eating and enjoy engaging in the activity. Sit down with your baby to show them how to eat. It was amazing to watch Baby E follow my lead when I put something in my mouth. Monkey see, monkey do!

How do I know if My Baby is Full?

Your baby is done eating when they turn their head away and close their mouth. It’s important not to keep feeding the baby. Parents need to trust their child’s satiety cues and stop feeding the baby when these signs are visible.

Worried About Choking with BLW?

Food on baby's plate.

One of the first things parents worry about most when it comes to baby led weaning is choking. This is the number one barrier people have when learning how to start baby led weaning and I totally get why. It’s scary! But the reality is, it’s a lot less likely than you think. When infants first transition to solid foods, they will gag and cough. Babies gag and cough frequently at a younger age because their gag relax is more forward in their mouth. The gag reflex will move back around 6-8 months and be completely developed around 12 months.

Believe it or not, research suggests that by 8 months, baby led weaning infants tend to actually gag less frequently when compared to spoon-fed infants.. Remember, eating is a skill that we need to learn and develop. So, the earlier and more frequently your baby practices, the better their skills become!

To help reduce the risk of choking, here are some important precautions you need to take.

Supervision

Baby sitting in a high chair.

As with everything, parents need to supervise their child during mealtime to watch for any signs of choking. This is not the time to be checking facebook, especially when you’re first starting out on solids.

Know the Signs of Choking

Parents should be able to differentiate choking from gagging. Choking is often silent as infants are not able to talk or breathe, and babe’s nails, lips and skin may turn blue. Gagging, in contrast, is noisy and dramatic as the infant will cough and jump. Most babies gag and choke multiple times during mealtime. Don’t be too concerned, this is the body’s best defense mechanism against choking. It’s actually a good sign!

Support

Babies should have neck support when learning how to start baby led weaning. Use a high chair to support their posture. This makes it easier for the baby to spit out their food rather than choking on it. The baby should be sitting in an upright position and not reclining downward. A proper foot rest helps add stability and less distraction.

Food shape and size

This is one of the most important tips when learning how to start baby led weaning. To prevent food from getting stuck in babe’s throat, avoid small and round foods. Serve finger-shaped food so they can easily fit inside baby’s hand with a some sticking out of their fists. Additionally, solid foods options should be cooked and soft as these items are easier to chew and shallow.

Limit distractions

Avoid distractions during mealtime. Remove toys, turn off the TV and excessive new faces should be minimized while the baby is learning to eat.

CPR

An infant CPR course teaches parents how to handle any potential choking episodes and is (in my opinion) important for any adult to take who will be watching your child. All friends and family need to learn these important skills.

The Bottom Line on Baby Led Weaning First Foods

Baby sitting in a high chair.

This is really just scratching the surface understanding baby led weaning first foods and how to start baby led weaning. I hope this learning how to start baby led weaning beginners guide will give you the confidence to get started. Follow my Instagram stories, to get lots of inspiration for tasty baby appropriate meals.

More Blog Posts You Might Like

If you liked this post about baby led weaning first foods and how to start BLW, you may like:

  • Baby Led Weaning Easy Meal Planner for Babies & Toddlers
  • 1 Month BLW Baby Meal Plan For Babies & Toddlers
  • How and When to Introduce Food Allergens to Babies with Baby Led Weaning

Now mamas, tell me, did you I baby led weaning or spoonfeeding? What did you fin worked best for your kid? Any favourite BLW foods? What were your BLW first foods? Leave me a comment below with your thoughts!

Contribution By: RD2B Sumeet Chopra

Abbey Sharp

Abbey Sharp is a Registered Dietitian (RD), regulated by the Ontario College of Dietitians. She is a mom, YouTuber, Blogger, award winning cookbook author, media coach specializing in food and nutrition influencers, and a frequent contributor to national publications like Healthline and on national broadcast TV shows.

www.abbeyskitchen.com/about-abbey/
  • Previous Page
  • Go to page 1
  • Go to page 2
  • Go to page 3
  • Go to page 4
  • Interim pages omitted …
  • Go to page 89
  • Next Page

Get started with

Eight Free Recipe Books

From the co-founder of Neue Theory and creator of the Hunger Crushing Combo

Sign me up!
Abbey smiling at table
Abbey Sharp

“Foods may never be nutritionally equal. But we can make them morally equal by recognizing that our worth is never determined by what's on our plate.”

— Abbey Sharp, RD About Abbey ◥

Books

  • HCC™
  • Mindful Glow
  • Free E-Books

Blog

  • Nutrition
  • Recipes
  • Motherhood
  • Life

Explore

  • Neue Theory™
  • Bite Back
  • YouTube

Abbey

  • About
  • Coaching
YouTube TikTok Instagram Facebook X Pinterest
Abbey Sharp - The No BS Dietitian From Abbeys Kitchen

© Abbey's Kitchen 2026  All Rights Reserved •  ACCESSIBILITY STATEMENT •  Privacy Policy

This site uses cookies. By continuing to browse the site, you are agreeing to the use of cookies Accept Privacy Policy
Privacy & Cookies Policy

Privacy Overview

This website uses cookies to improve your experience while you navigate through the website. Out of these, the cookies that are categorized as necessary are stored on your browser as they are essential for the working of basic functionalities of the website. We also use third-party cookies that help us analyze and understand how you use this website. These cookies will be stored in your browser only with your consent. You also have the option to opt-out of these cookies. But opting out of some of these cookies may affect your browsing experience.
Necessary
Always Enabled
Necessary cookies are absolutely essential for the website to function properly. This category only includes cookies that ensures basic functionalities and security features of the website. These cookies do not store any personal information.
Non-necessary
Any cookies that may not be particularly necessary for the website to function and is used specifically to collect user personal data via analytics, ads, other embedded contents are termed as non-necessary cookies. It is mandatory to procure user consent prior to running these cookies on your website.
SAVE & ACCEPT

Rate This Recipe

Your vote:


A rating is required
A name is required
An email is required