• Skip to main content

Abbey's Kitchen

Healthy Recipes, Nutrition Myth Busting, Healthy Eating Tips

  • Books
    • HCC™
    • The Mindful Glow Cookbook
    • Recipe eBooks
      • Family
      • Hypothyroidism
      • BLW
      • Vegan Week 1
      • Vegan Week 2
      • Vegan Week 3
      • Keto
      • Gluten Free Week 1
      • Gluten Free Week 2
      • Fitness
      • Paleo
  • Blog
    • Nutrition
    • Recipes
    • Motherhood
    • Life
  • Explore
    • Neue Theory™
    • Bite Back With Abbey Sharp
      • Apple Music
      • Spotify
      • Amazon Music
    • YouTube
  • Abbey
    • About
    • Coaching
    • Contact

Abbey Sharp

Last Updated November 3, 2024. Published November 4, 2024 By Abbey Sharp 17 Comments

Risotto with Butternut Squash Recipe | Vegan + Gluten Free

This risotto with butternut squash recipe is a perfect gluten free holiday recipe that will be sure to satisfy all of your friends and family!

Birds eye view of butternut squash risotto in a white bowl on a wooden board with rice and butternut squash in the background.

Every year for Thanksgiving, I feel like I am frantically trying to figure out what I’m going to make for dinner. Can you relate?

Often times, I got a bit of a mixed crowd. I have people who are gluten free and people who are vegetarian, so my stuffing and turkey are both no-nos. So to satisfy all dietary preferences one of my go-to’s to complete my Thanksgiving spread is this vegan risotto with butternut squash. So whether you are a meat eater or vegan, this risotto with butternut squash recipe is sure to be the standout of your holiday spread.

Table of contents

  • Key Ingredients
  • How to Make This Recipe
  • Expert Tips
  • Recipe FAQs
  • More Thanksgiving Recipes You Might Like

Key Ingredients

Portioned ingredients needs to make risotto including butternut squash, rice, wine, cashews, onion, garlic, swiss chard, sage, rosemary, broth, almond milk, olive oil, cinnamon, and nutmeg.

How to Make This Recipe

Birds eye few of the following steps: Onions caramelizing on a pan with a wooden spoon, Dry arborio rice heating up in a pan with rosemary and sage, Vegetable broth being added to risotto.

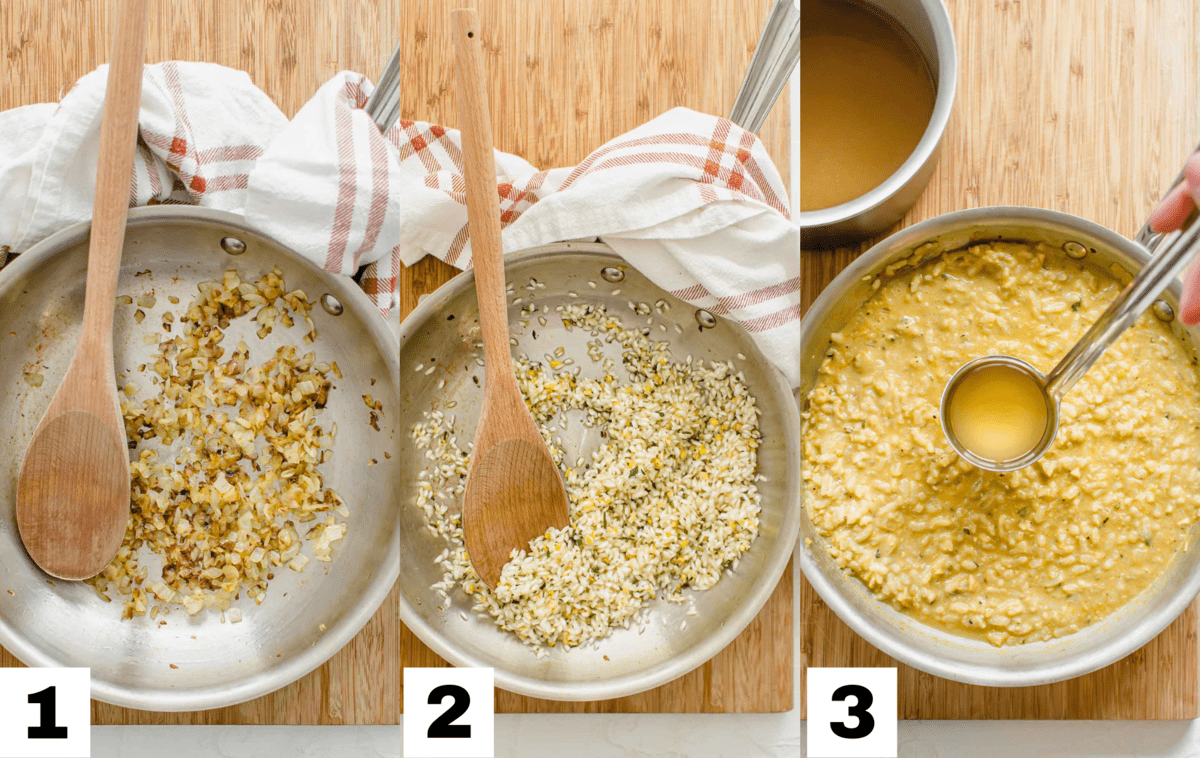
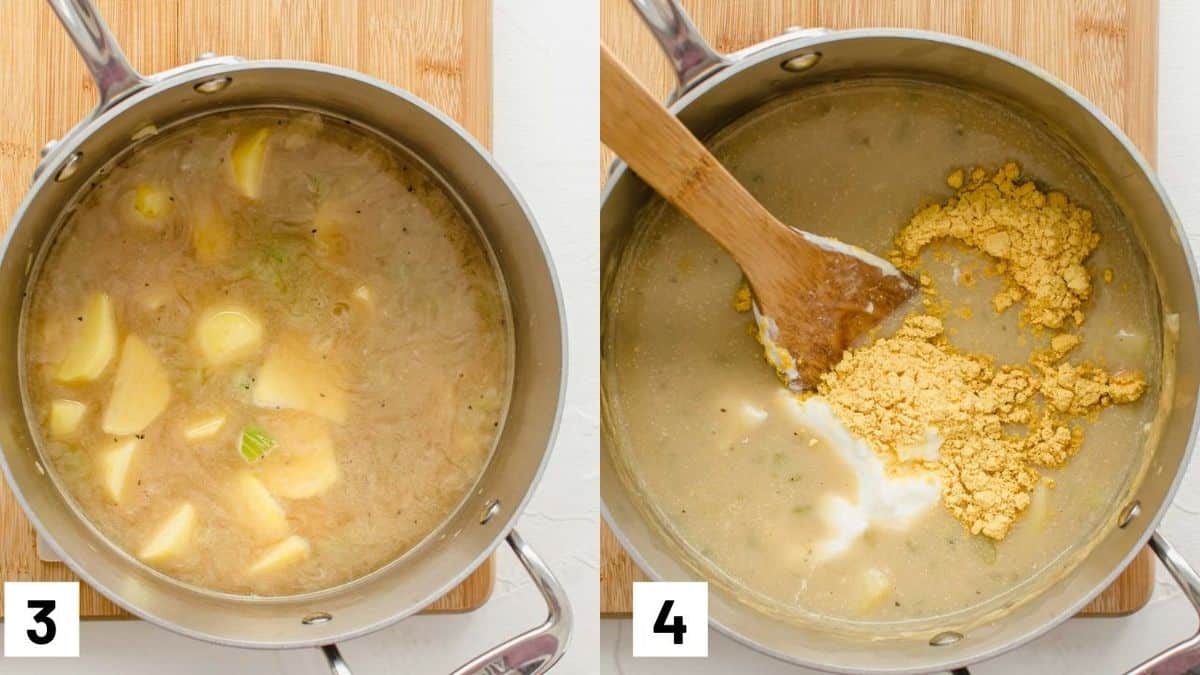
Step 1: In a medium pot, add two tablespoons of oil over medium low heat. Add the onion and cook slowly until golden brown, about 5-6 minutes. Remove and set aside in a bowl.

Step 2: Add the remaining tablespoon of oil to the pot and cook the garlic, ginger, sage and rosemary over medium high heat. Add in the rice and stir.

Step 3: Reduce heat to medium low and add in the wine. Stir until the wine has evaporated. Then slowly start to ladle in the broth and stir constantly until all of it is absorbed.

Birds eye view of the following steps: Cashew cream in a blender & Cashew cream, butternut squash, swiss chard, and onions adding to risotto.

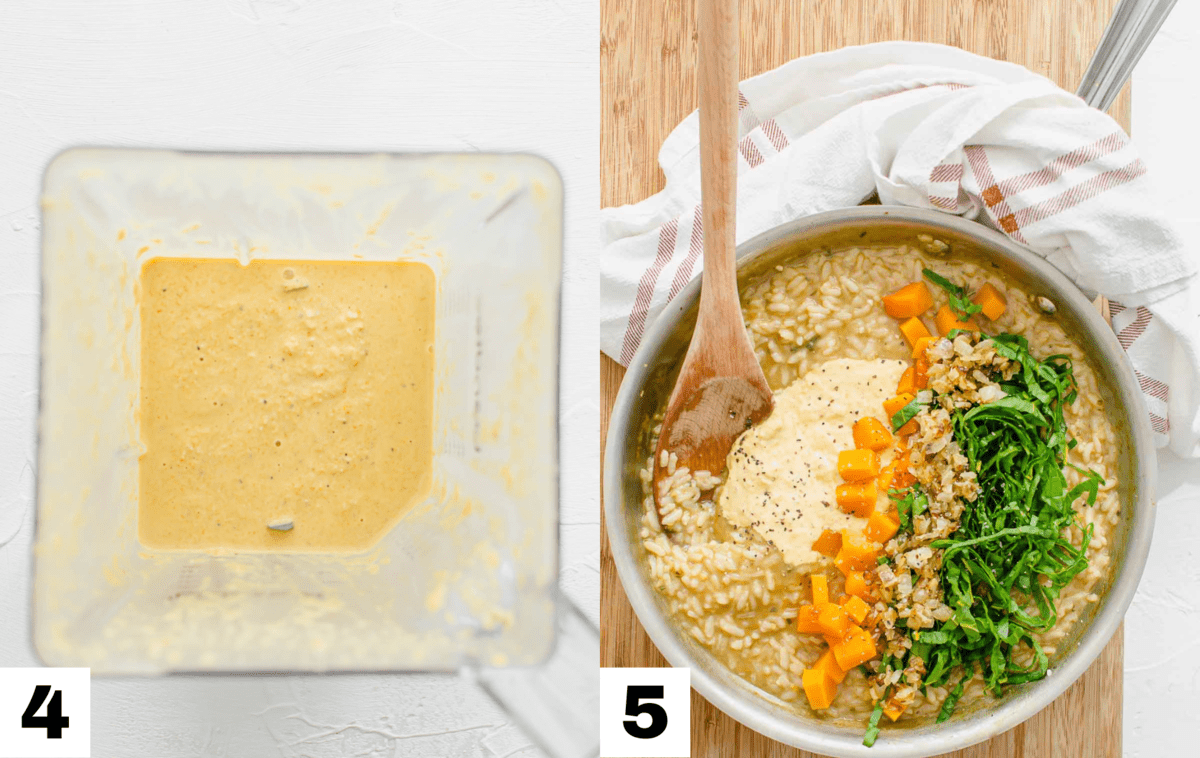
Step 4: Add cashews to a high speed blender and puree. Add in milk, thawed squash, cinnamon, nutmeg, salt and pepper and puree until very smooth.

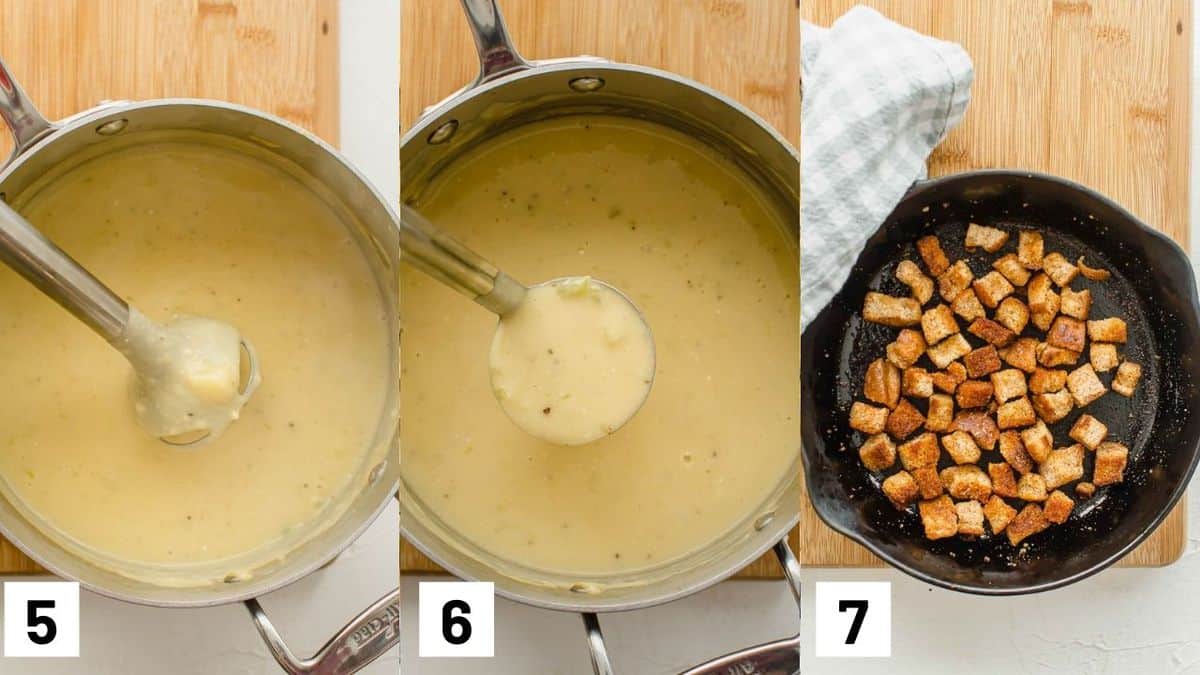
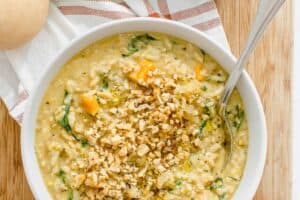
Step 5: Once the rice is cooked, stir in the cashew cream, along with the remaining frozen squash, chard and cooked caramelized onion. Season with salt and pepper, to taste.

Expert Tips

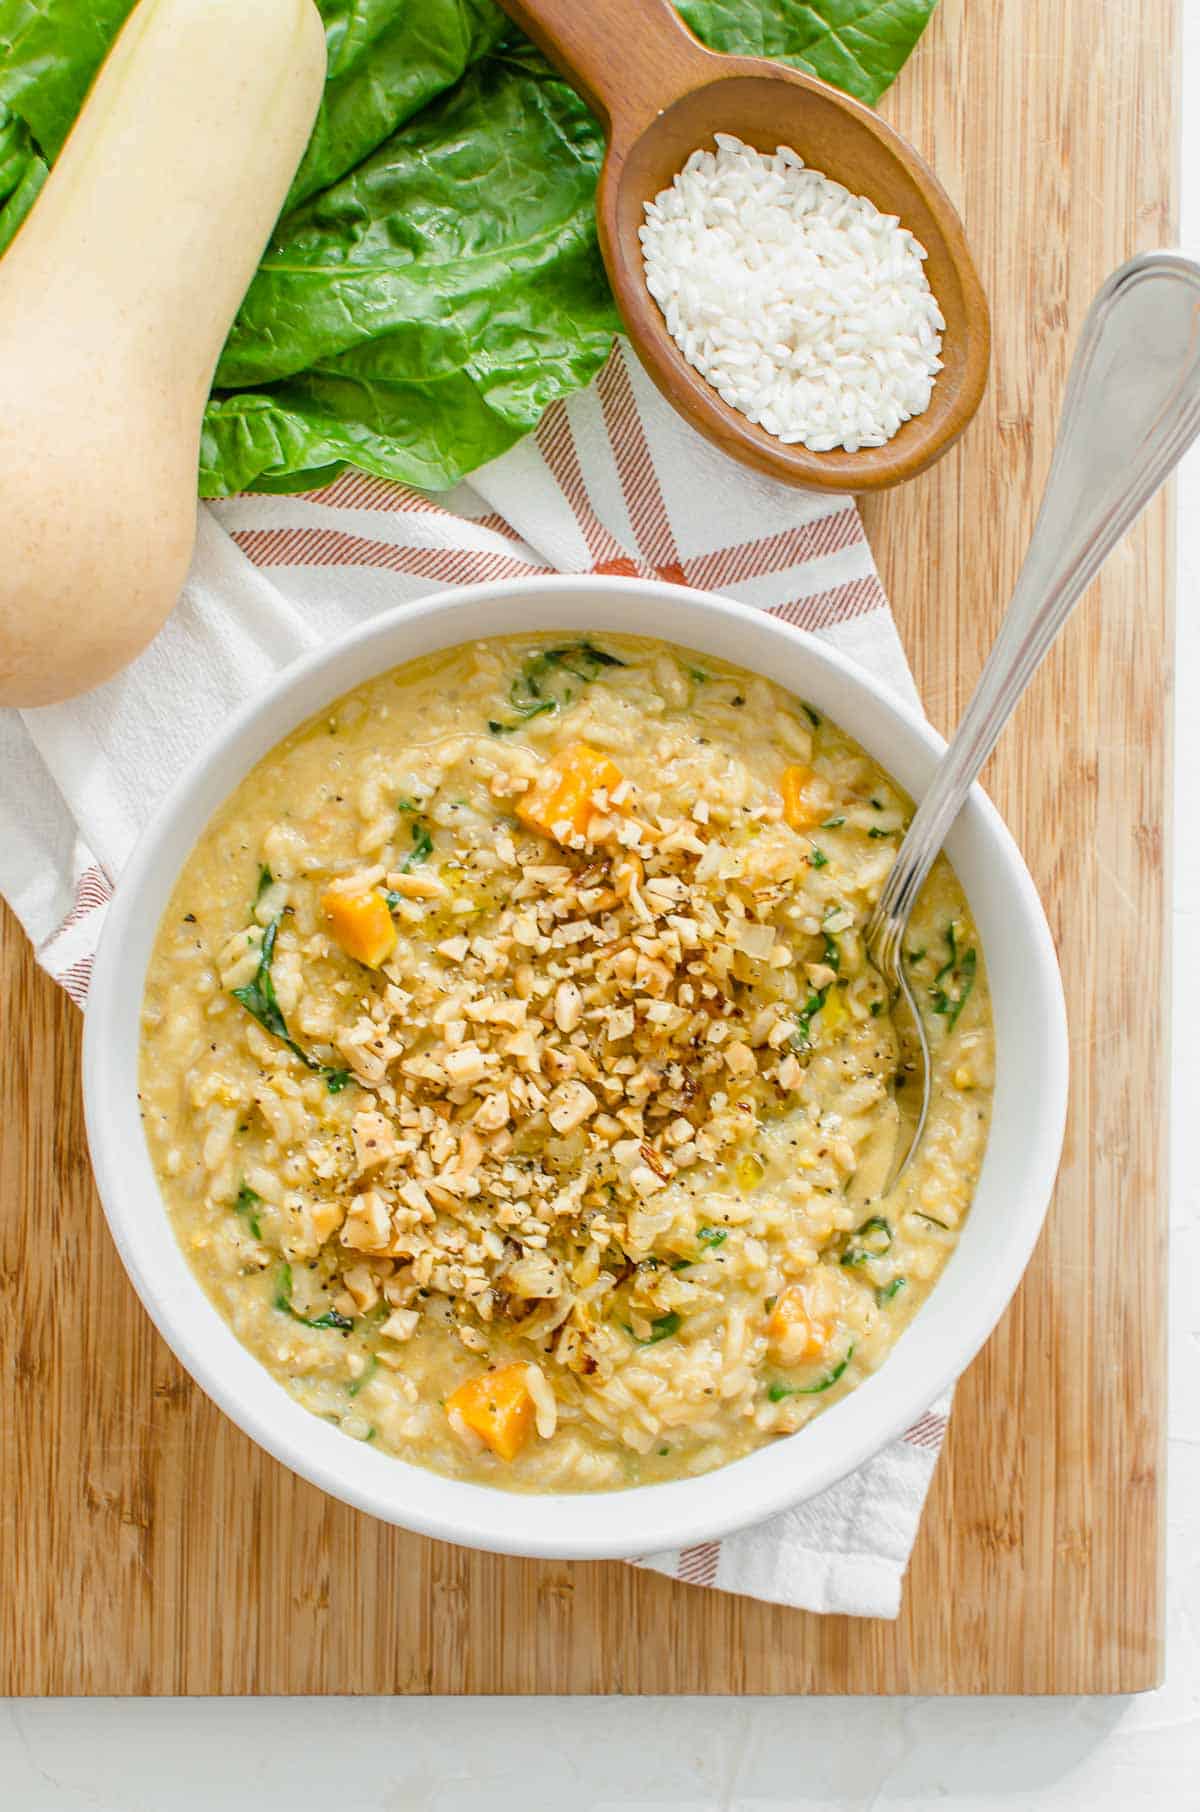
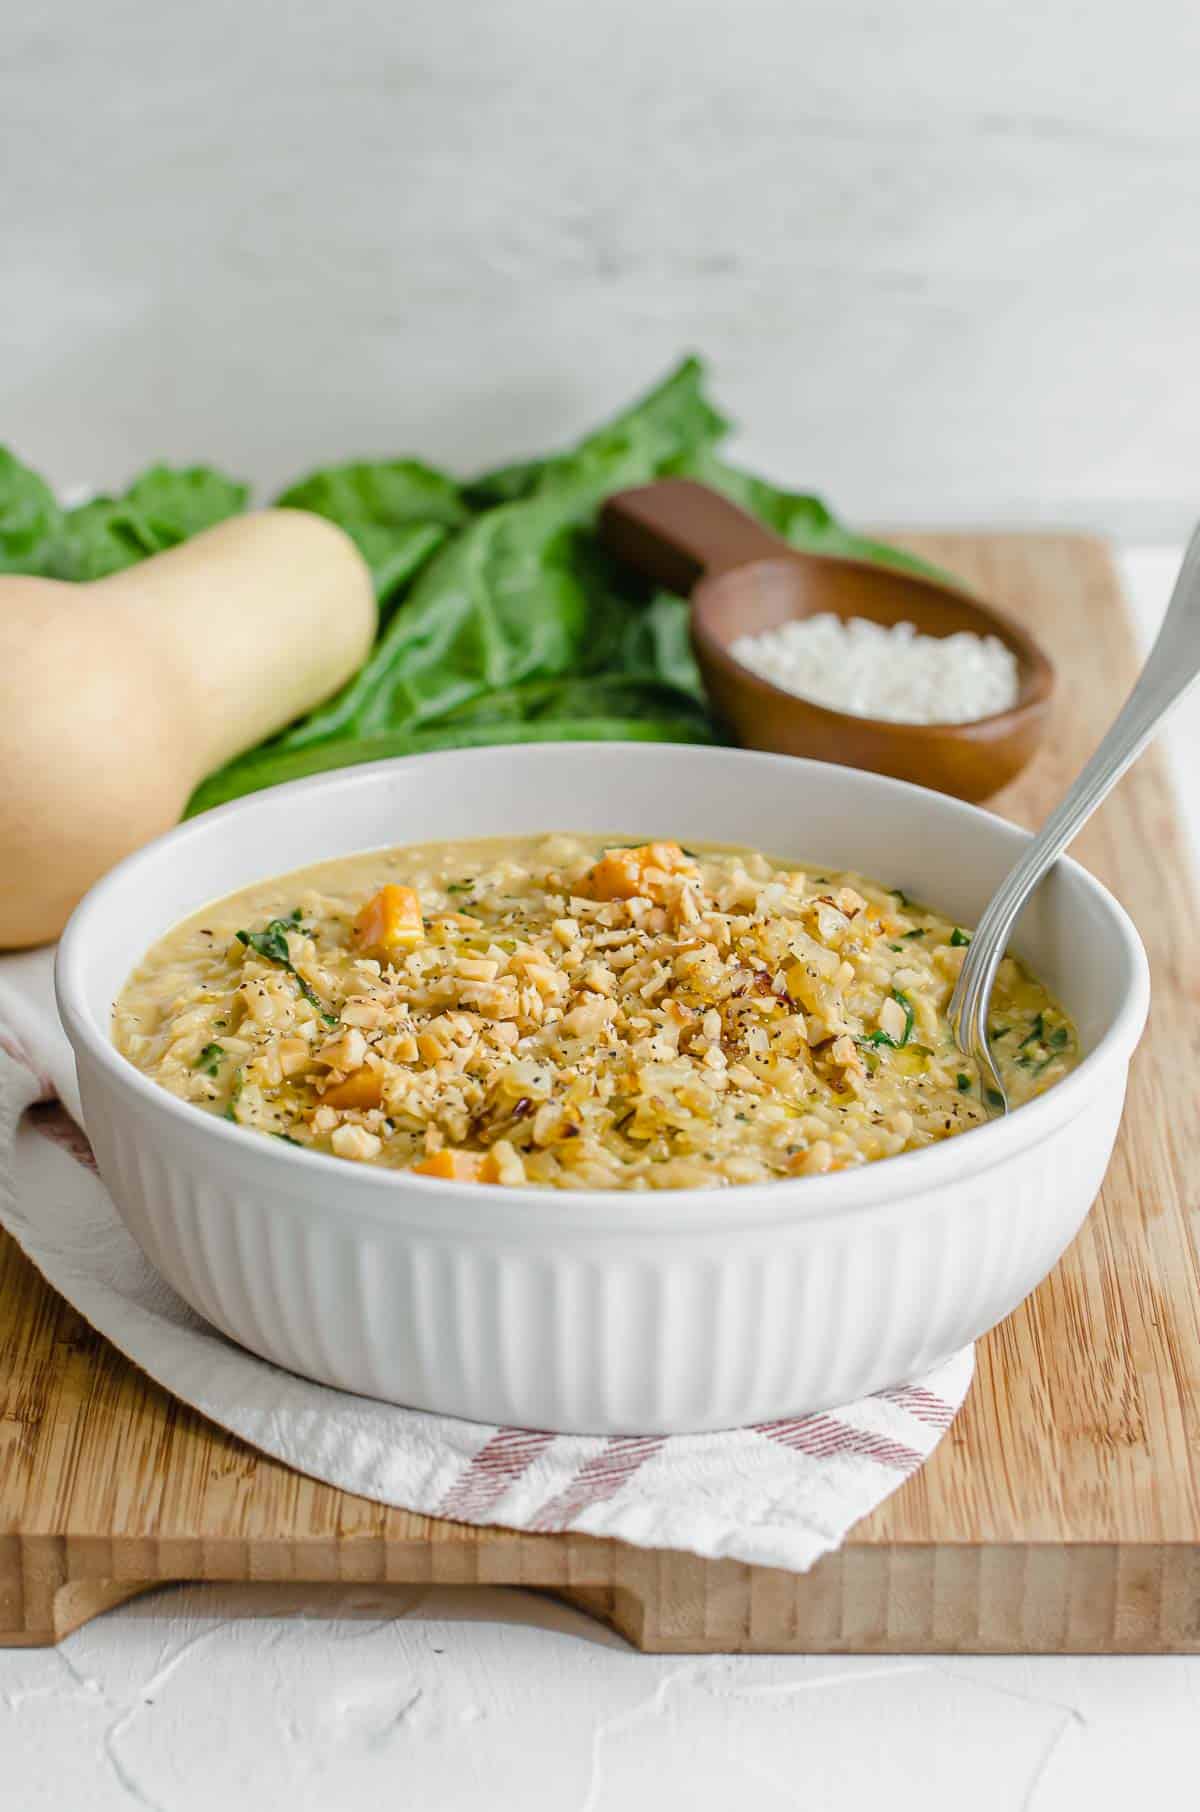
I also add in lots of big bold cool-weather flavours like caramelized onions, sage, rosemary, ginger and swiss chard. It’s almost too pretty too eat. Almost being the key word here, of course.

Oh, and to make it seem like there’s a little parmesan cheese on top, I dust a little bit of pulverized cashews that I processed into a powder in the food processor or blender.

This risotto with butternut squash recipe also takes some short cuts from the store like frozen butternut squash. So while it’s elegant enough for your holiday party, it is so simple you can pull it off on a weeknight.

Vegan risotto in a white bowl.

Recipe FAQs

How is this vegan butternut squash risotto recipe so creamy?

While usually risotto requires a ton of butter and cheese, my vegan risotto gets its cream-factor from pureed cashews and butternut squash.

How do I store this recipe?

You can store this vegan risotto in an airtight container in the fridge for 2-5 days!

What makes this recipe gluten free?

This recipe requires no flour or breadcrumbs, and rice is naturally gluten free making this dish great for those with dietary restrictions!

More Thanksgiving Recipes You Might Like

Need more recipes like this risotto with butternut squash recipe to impress your fam at the next event? Check out some of my favorites below!

  • Stuffed Acorn Squash with Wild Rice, Apples and Caramelized Onions
  • Hasselback Sweet Potatoes (Vegan & Healthy!)
  • Balsamic Roasted Brussel Sprouts with Figs & Grapes
  • Pecan Pie (Vegan)

So tell me – what recipes are on your list for the holiday season?

Print Recipe
5 from 2 votes

Butternut Squash Risotto Recipe | Vegan + Gluten Free

This vegan risotto with butternut squash is a perfect gluten free holiday recipe that will be sure to satisfy all of your friends and family!
Prep Time5 minutes mins
Cook Time25 minutes mins
Total Time30 minutes mins
Course: Main Dish
Cuisine: Italian
Servings: 4 people
Calories: 767kcal
Author: Abbey Sharp

Ingredients

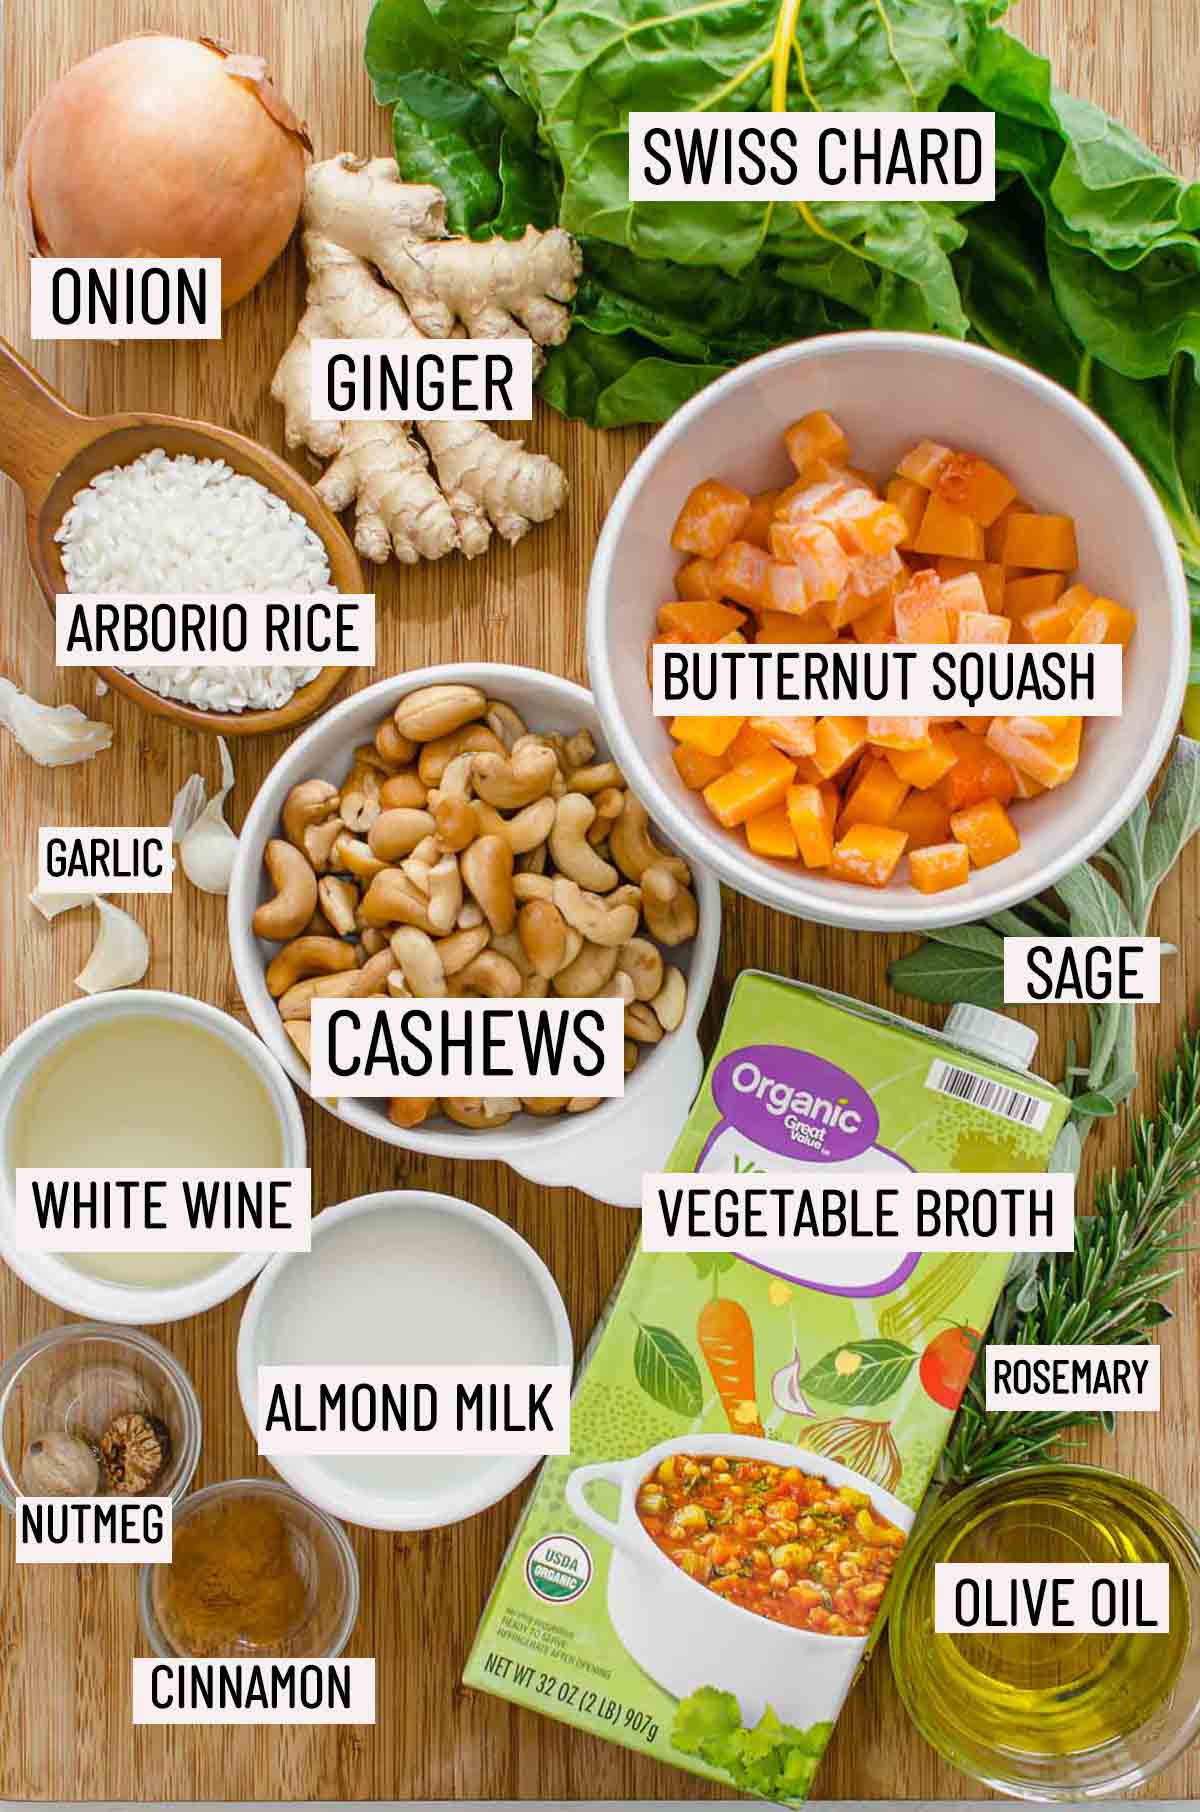
  • 3 tbsp extra virgin olive oil divided
  • 1 onion thinly sliced
  • 5 cups low sodium vegetable broth
  • 1 tbsp minced sage
  • 1 tbsp minced rosemary
  • 1 tbsp grated ginger
  • 2 cloves garlic minced
  • 2 cups Arborio rice
  • 1 cup dry white wine
  • 1 cup cashews soaked in water in the fridge overnight
  • 1/2 cup unsweetened almond milk
  • 1/4 tsp cinnamon
  • Pinch nutmeg
  • 3 cups frozen butternut squash divided
  • 1 1/2 cups swiss chard leaves chiffonade
  • Salt and pepper to taste
  • Raw cashews processed in a food processor or blender until they reach a coarse powder for garnish

Instructions

  • In a medium pot, add two tablespoons of oil over medium low heat. Add the onion and start to cook slowly until it gets a deep golden brown, about 5-6 minutes. Remove and set aside in a bowl.
  • In a small saucepot, add the stock and heat covered over medium low until simmering.
  • Add the remaining tablespoon of oil to the pot and cook the garlic, ginger, sage and rosemary over medium high heat. Add in the rice and stir until it’s well coated in the oil. Reduce the heat to medium low and add in the wine. Stir until the wine has evaporated. Then slowly start to ladle in the broth and stir constantly until all of it is absorbed. You may not use all of the broth, but once you get to 3 1/2- 4 cups, taste it for doneness.
  • Thaw out 1 1/2 cups of the squash (you can do this in the microwave, or just let it sit out for a bit).
  • While it’s bubbling away, add the cashews to a high speed blender and puree until chalky, then add in the milk, thawed squash, cinnamon, nutmeg, salt and pepper and puree until very smooth.
  • Once the rice is cooked, stir in the cashew cream, along with the remaining frozen squash, chard and cooked caramelized onion. Season with salt and pepper, to taste.
  • To serve, top with pulverized raw cashews, if desired. Enjoy!

Video

Nutrition

Calories: 767kcal | Carbohydrates: 111g | Protein: 14g | Fat: 26g | Saturated Fat: 4g | Sodium: 1259mg | Potassium: 792mg | Fiber: 7g | Sugar: 9g | Vitamin A: 12640IU | Vitamin C: 29.1mg | Calcium: 145mg | Iron: 8mg

Have you tried making this vegan risotto with butternut squash? Let me know down in the comments below!

Abbey Sharp

Abbey Sharp is a Registered Dietitian (RD), regulated by the Ontario College of Dietitians. She is a mom, YouTuber, Blogger, award winning cookbook author, media coach specializing in food and nutrition influencers, and a frequent contributor to national publications like Healthline and on national broadcast TV shows.

www.abbeyskitchen.com/about-abbey/

Last Updated October 28, 2024. Published October 28, 2024 By Abbey Sharp 4 Comments

Pumpkin Hummus Recipe | Vegan Halloween Snack

My vegan Pumpkin Hummus recipe is the perfect Halloween Snacks because have protein, fibre and healthy fats to fuel our kids before trick or treating!

Toddler reaching for rice cakes topped with pumpkin hummus.

I have a solid strategy for dealing with Halloween candy (read about it here), but I still like to switch it up and include non-sweet festive snacks. Both E and O are big fans of my pumpkin hummus recipe, especially when I make Jack-o-Lantern rice cakes.

Pumpkin hummus rice cakes are amazing for kids Halloween parties, or trick-or-treating fuel. Who doesn’t want an adorable Jack-o-Lantern rice cake, am I right?!

Table of contents

  • Why This Recipe Works
  • Key Ingredients
  • How To Make This Recipe
  • Expert Tips
  • Recipe FAQs
  • More Recipes You Might Like

Why This Recipe Works

My pumpkin hummus recipe always comes out around Halloween, and for good reason:

  • Budget friendly – so much cheaper than store-bought hummus
  • Protein, fibre and healthy fats
  • Packed with Vitamin A
  • Fun and festive for Halloween

Key Ingredients

Rice cake with pumpkin hummus with a bite taken out of it.

Chickpeas – Chickpeas are a great source of plant based protein. They contain ~10 g of protein per cup and also give you a whopping 9 g of fiber.

Pumpkin – Not only is pumpkin festive and delicious, it’s a great source of fibre and vitamin A. You might be used to seeing it in pumpkin pie, but it’s amazing in savoury recipes too.

Olives – These are key for making our adorable Jack-o-Lantern faces. If your kiddos aren’t a fan, feel free to opt out.

Rice cakes – My vehicle of choice because they’re the perfect size and roundness for our Jack-o-Lanterns. If you’re not feeling rice cakes, go for a crusty piece of bread. The vehicle is up to you!

How To Make This Recipe

Pumpkin hummus recipe added to rice cakes to make jack-o-lantern face.

Step One: To a food processor, puree the chickpeas, pumpkin, garlic, tahini, lemon, olive oil, cumin, cinnamon, paprika and salt and pepper, to taste. Set aside.

Step Two: Add a few tablespoons of hummus to a rice cake. Top with a piece of celery as the stem, and some black olives cut into eyes, nose and a mouth.

Expert Tips

For the smoothest hummus ever, you can remove the skins of the chickpeas before you add them to the food processor. I find the best way to do this is by gently rubbing the chickpeas between my hands to loosen them. This can be time consuming, so you can always skip and add a little more olive oil + more pureeing to ensure your hummus is silky smooth.

Recipe FAQs

Is this pumpkin hummus recipe vegan?

Yes! I love pumpkin hummus because it’s a naturally plant-based protein source so it’s great for our kiddos who often are not fond of meat (or for families who choose not to eat it).

Are rice cakes gluten free?

Yep! Rice cakes are gluten free, and this pumpkin hummus is as well!

Are pumpkin hummus rice cakes safe for school?

You bet! There’s no nuts in them so that’s good. Unless you have a kid in your kids class with a sesame allergy, you should be good to go. If you DO have a sesame allergy, you could leave the tahini out.

How long does pumpkin hummus last?

The pumpkin hummus will last about 5 days in the fridge, and if you assemble the rice cakes the night before, they should be fine in lunches.

Can I make these jack-o-lantern rice cakes ahead of time?

Yes! Make the hummus up to 5 days ahead, and for the prettiest and crispiest kids Halloween snacks, I recommend assembling them the day you plan to eat them.

Pumpkin hummus rice cakes in a lunchbox.

More Recipes You Might Like

I LOVE Halloween. Check out some of our favourite kids Halloween snacks and treats like:

  • Banana Ghosts and Clementine Pumpkins
  • Apple and Almond Butter Alien Smiles
  • 18 Healthy Halloween Treats for Kids
  • Smoked Salmon Pumpkin Sandwiches

Have you made my pumpkin hummus recipe? Let me know what Halloween snacks your kids love!

Print Recipe
5 from 1 vote

Vegan Pumpkin Hummus Rice Cakes

These Vegan Pumpkin Hummus Rice Cakes are the perfect Kids Halloween Snacks because they’re a source of protein, fibre and good fats for filling our kids bellies before trick or treating!
Prep Time15 minutes mins
Total Time15 minutes mins
Course: Snack
Cuisine: American
Servings: 8 rice cakes
Calories: 54kcal
Author: Abbey Sharp

Ingredients

  • 2 15 oz cans no salt added chickpeas, drained and rinsed
  • 15 oz can pumpkin puree
  • 2 cloves garlic minced
  • 2 tbsp lemon juice
  • 2 tbsp tahini
  • 2 tsp extra virgin olive oil
  • 1 tsp cumin
  • 1/2 tsp cinnamon
  • 1/4 tsp smoked sweet paprika
  • Salt and pepper to taste
  • Plain rice cakes
  • Celery cut into small stem pieces
  • Black olives cut into face shapes

Instructions

  • To a food processor, puree the chickpeas, pumpkin, garlic, tahini, lemon, olive oil, cumin, cinnamon, paprika and salt and pepper, to taste. Set aside.
  • Add a few tablespoons of hummus to a rice cake. Top with a piece of celery as the stem, and some black olives cut into eyes, nose and a mouth.

Nutrition

Calories: 54kcal | Carbohydrates: 6g | Protein: 1g | Fat: 3g | Saturated Fat: 1g | Sodium: 5mg | Potassium: 131mg | Fiber: 2g | Sugar: 2g | Vitamin A: 8303IU | Vitamin C: 4mg | Calcium: 24mg | Iron: 1mg
Abbey Sharp

Abbey Sharp is a Registered Dietitian (RD), regulated by the Ontario College of Dietitians. She is a mom, YouTuber, Blogger, award winning cookbook author, media coach specializing in food and nutrition influencers, and a frequent contributor to national publications like Healthline and on national broadcast TV shows.

www.abbeyskitchen.com/about-abbey/

Last Updated November 17, 2020. Published October 21, 2024 By Abbey Sharp 51 Comments

Pumpkin Spice Pancake Recipe | High Protein!

This pumpkin spice pancake recipe is high in protein, gluten free, and are the perfect freezer meal that you can enjoy for a healthy easy breakfast any day of the week!

A large stack of pumpkin protein pancakes topped with pecans and being drizzled with maple syrup.

We all know those hectic mornings where its a STRUGGLE to get a healthy breakfast in (#momlife). While a quick croissant from the drive-thu window may be necessary some days, I think we can all agree that taking the extra few minutes to meal prep a nourishing breakfast to have on hand for the week makes life that much easier!

That’s where this pumpkin spice pancake recipe come into play. These pancakes are a great recipe to make-ahead and freeze so that a healthy and tasty breakfast is always within reach on those busy mornings.

Table of contents

  • Why This Recipe Works
  • Key Ingredients
  • How to Make This Recipe
  • Expert Tips
  • Recipe FAQs
  • More Pancake Recipes You May Like

Why This Recipe Works

Not only will this pumpkin spice pancake recipe help you save a little cash during the week, but they are also packed with protein which will help to keep you fuelled until lunch. They are also gluten free and have all the delicious festive flavours of pumpkin spice latte season, making them the perfect breakfast recipe to enjoy during the fall months. So no matter how crazy life can get some days, these pumpkin spice pancake have your back.

Key Ingredients

Portioned ingredients for protein pumpkin pancakes including oats, cottage cheese, egg whites, pumpkin puree, cinnamon, mashed banana, maple syrup, flax seed, and pumpkin pie spice.

Cottage Cheese – to make these pancakes high in protein, I like to use my secret weapon – cottage cheese. While you can totally add in protein powder if thats your go-to, I love using cottage cheese because not only does it add in a hefty dose of protein (about 28grams per 1 cup!) it will also enhance both the flavour and texture of these pancakes.

Gluten Free Oats – to make these pancakes gluten free, I use gluten free oats. If you don’t need to make them gluten free, then feel free to use regular oats.

Flax Seed – I love to add flax seed to my pancake batters because its an easy way to up the fibre content as well as adding in some healthy omega 3 fats.

Pumpkin Puree – the pumpkin puree and pumpkin spice combo is a must to make these pancakes festive for the fall season. However, this pancake recipe is super versatile and reusable any time of the year – without or without the pumpkin flavour.

How to Make This Recipe

Three side by side images showing how to prepare pumpkin pancakes.

Step 1: Put all ingredients into a blender and process until smooth.

Step 2: Heat a large nonstick skillet over medium heat and lightly grease. Using an ice cream scoop, scoop about 1/4 cup of batter into circles.

Step 3: Cook until bubbling around the edges, then flip to cook the other side until golden brown and cooked through.

Expert Tips

I make a big batch of this pumpkin spice pancake recipe and freeze them in layers between wax paper in a freezer bag. This is makes it super easy to grab a few in the morning and head out the door!

You can either enjoy them thawed out on their own, warmed up in the toaster or microwave, or topped with all the fixings when you have a little more time to spare.

Top these pancakes with yogurt, jam, syrup, fruit, syrup or honey, or whatever nuts and seeds you have on hand.

A large stack of pumpkin protein pancakes cut in the middle and topped with pecans and syrup.

Recipe FAQs

How long will these pancakes last in the freezer?

These pancakes will keep in the freezer for around 3 months.

Can I make these dairy free?

For sure! You can replace the cottage cheese with about 3/4 cup of soy milk or any other plant milk that is fortified with protein to keep it protein-rich.

Can I make these vegan?

In addition to replacing the cottage cheese with dairy-free milk, you can use a flax egg instead of regular eggs as well to make these pumpkin pancakes totally vegan.

What is the best reheating method for this recipe?

After thawing, place pancakes in a preheated 300F oven for 10 minutes.

More Pancake Recipes You May Like

If you loved this pumpkin spice pancake recipe, then you are going to love more of our pancake recipes on the blog!

  • Sheet Pan Protein Pancakes with PB, Chocolate & Banana (Gluten Free)
  • Nutella Protein Pancakes
  • Red Velvet Pancakes (Vegan)
  • Black Forest Cake Chocolate Pancakes (Gluten Free)

What are your favourite make ahead breakfasts for those busy mornings?

Print Recipe
4.95 from 17 votes

Pumpkin Spice Pancake Recipe | High Protein Recipe

This pumpkin spice pancakes recipe is gluten free and is the perfect freezer meal that you can enjoy for a healthy easy breakfast any day of the week!
Prep Time15 minutes mins
Cook Time20 minutes mins
Total Time35 minutes mins
Course: Breakfast
Cuisine: American
Diet: Gluten Free
Servings: 6 (2 Pancakes Each)
Calories: 198kcal
Author: Abbey Sharp

Ingredients

  • 1 3/4 cups gluten free oats
  • 1 1/2 cups low fat cottage cheese
  • 1 tbsp plus 1 tsp. vanilla extract
  • 1 cup egg whites
  • 1 tsp pumpkin pie spice
  • 2 1/2 tsp baking powder
  • 1/2 cup pumpkin puree
  • 1 large mashed ripe banana
  • 3/4 tsp cinnamon
  • 2-3 tsp maple syrup depending on sweet you want it
  • 2 tsp ground flax seed
  • Pinch salt
  • Non stick spray, butter or vegetable oil for greasing
  • Jam, fruit sauce, syrup and/ or nuts for serving

Instructions

  • Put all of the ingredients into a blender and process until smooth.
  • Heat a large nonstick skillet over medium heat and lightly grease. Using an ice cream scoop, scoop about 1/4 cup of batter into circles. Cook until bubbling around the edges, then flip to cook the other side until golden brown and cooked through.
  • Keep the finished pancakes warm in a 200 F oven while you finish the rest of the batch. Enjoy warm with jam, sauce or other toppings, or pack into freezer bags separated by wax paper to freeze for another day. Enjoy!

Video

Notes

If you make a big batch of these pumpkin protein pancakes, freeze them in layers between wax paper in a freezer bag. This is makes it super easy to grab a few in the morning and head out the door!
You can either enjoy them thawed out on their own, warmed up in the toaster or microwave, or topped with all the fixings when you have a little more time to spare.
Top these pumpkin protein pancakes with yogurt, jam, syrup, fruit, syrup or honey, or whatever nuts and seeds you have on hand.

Nutrition

Calories: 198kcal | Carbohydrates: 28g | Protein: 15g | Fat: 3g | Saturated Fat: 1g | Cholesterol: 2mg | Sodium: 302mg | Potassium: 532mg | Fiber: 4g | Sugar: 7g | Vitamin A: 3213IU | Vitamin C: 3mg | Calcium: 156mg | Iron: 2mg

Have you tried these pumpkin protein pancakes? Let me know down in the comments below!

Abbey Sharp

Abbey Sharp is a Registered Dietitian (RD), regulated by the Ontario College of Dietitians. She is a mom, YouTuber, Blogger, award winning cookbook author, media coach specializing in food and nutrition influencers, and a frequent contributor to national publications like Healthline and on national broadcast TV shows.

www.abbeyskitchen.com/about-abbey/

Last Updated October 13, 2024. Published October 14, 2024 By Abbey Sharp 5 Comments

Spaghetti Squash Burrito Bowl | Vegan & Gluten Free

This spaghetti squash burrito bowl is an easy gluten free dinner that is fibre and protein packed!

spaghetti squash burrito bowl on a white plate topped with cilantro and sour cream

I think most families can agree that Mexican night is always a good night. In fact, I am planning a Mexican inspired dinner right now (it’s cooking as I type up this recipe I tested last week). Mexican recipes are not just limited to Taco Tuesday in my house, as any excuse to put avocado on ANYTHING is a good idea around here. This spaghetti squash burrito bowl is packed with plant-based protein and lots of fibre, and it could not be easier to make!

Table of contents

  • Why This Recipe Works
  • Key Ingredients
  • How To Make This Recipe
  • Expert Tips
  • Recipes FAQs
  • Other Recipes You Might Like

Why This Recipe Works

This spaghetti squash burrito bowl is such a great way to incorporate a variety of vegetables while also making dinner fun for the family! I also love this recipe because it’s:

  • Packed with fiber (22 grams) and protein (19 grams)
  • Super customizable (add whatever veg you desire!)
  • Family friendly – delicious and requires minimal dishes (perfect for easy clean up)!

Key Ingredients

Spaghetti squash – I love spaghetti squash as an alternative to noodles, especially for this spaghetti squash burrito bowl. There’s just 40 calories per cup and over 2 grams of fibre, and it’s surprisingly easy to cook in the microwave, or oven (if you have a bit more time).

Black beans – Rich in fibre and protein, I love the ease and convenience of black beans! I also prefer to go with the no salt added beans and then season it up myself.

Vegan Ground Round – I usually buy the cooked soy ground round because it’s so fast and easy and already cooked. But you can also find a variety of “raw” options now that you would just need to pan-fry first.

Veggies – This is totally your call, but I like to throw in a diced bell pepper and frozen corn for extra veg and fibre.

Lime Juice– again, for flavour and zing! This can also be omitted if you have enough flavour coming from your salsa.

Vegan cheddar cheese- This can also be regular cheese if you’re not vegan.

close up of vegan burrito bowl with spaghetti squash topped with cilantro

How To Make This Recipe

OVEN instructions

Step 1: To cook your squash, preheat the oven to 400°F.

Step 2: Cut the squash in half lengthwise, and scoop out the seeds. Season with salt and pepper, then place them cut side down on a baking sheet. Poke some holes on top.

Step 3: Roast for about 30-40 minutes or until fork tender. Allow to cool just enough to handle.

Step 4: Add the beans and the vegan “meat” (which should already be cooked) to the pan and break up the meat. Add the bell peppers, corn, salsa, and then season with the spices, lime, salt and pepper, to taste.

Step 5: Mix the meat mixture in with the spaghetti squash noodles, and pile it on top. Top the squash halves with shredded cheese and pop it back into the oven for 10 minutes until the cheese melts and looks golden brown.

MICROWAVE instructions

Step 1: Cut the squash in half and scoop out the seeds.

Step 2: Place in a microwave safe baking dish, cut side down, with 1/4 cup of water in the dish.

Step 3: Cover in plastic wrap and cook on high for 10-15 minutes or until tender when pricked with a fork. Allow to cool just enough to handle.

Step 4: Add the beans and the vegan “meat” (which should already be cooked) to the pan and break up the meat. Add the bell peppers, corn, salsa, and then season with the spices, lime, salt and pepper, to taste.

Step 5: Mix the meat mixture in with the spaghetti squash noodles, and pile it on top. Top the squash halves with shredded cheese and pop it back into the oven for 10 minutes until the cheese melts and looks golden brown.

birds eye view close up of vegan burrito bowl with spaghetti squash noodles

Expert Tips

Looking for some something to serve with this spaghetti squash burrito bowl? Lots of great options for serving with this main meal! Check out some of my favorites:

  • Vegan Baked Beans
  • Guacamole Stuffed Sweet Potatoes
  • Spicy Grilled Sweet Potatoes
  • Chili Lime Pineapple Donuts

Recipes FAQs

Can I meal prep this spaghetti squash burrito bowl ahead of time?

You can totally prep the squash and meat-bean mixture ahead of time and then just assemble with all your favourite toppings when it’s time to eat. If doing this for meal prep, this will last in the fridge for about 4 days.

Is this vegan bean burrito mixture kid friendly?

Oh yes! Assuming you use a mild salsa (and maybe omit the extra chili), my kiddo LOVES this meal.

Can I swap in other toppings?

Yes, this is a very versatile recipe, so if you prefer other veggies or add-ons (or any other kind of cheese), you can totally go for it! I kinda went for the works here so have fun with whatever you have on hand.

Can I use pasta or rice instead of spaghetti squash?

Absolutely. In fact, even a bed of lettuce is delicious if you want to turn this into a hearty salad.

full shot vegan and gluten free spaghetti squash burrito bowl served on a white plate garnished with fresh japalenos and cilantro

Other Recipes You Might Like

If you’re in the mood for Mexican and looking for something like this spaghetti squash burrito bowl, here are some favourites:

  • MEXICAN CHICKEN TORTILLA SOUP
  • VEGAN MEXICAN PASTA CASSEROLE 
  • MEXICAN STREET CORN CHILI CHICKEN ONE POT MEAL 
  • MEXICAN CAULIFLOWER MINI MUFFINS 
  • MEXICAN MEATLOAF MUFFINS 

What are you making tonight? Leave me a comment below with your thoughts on this spaghetti squash burrito bowl!

Print Recipe
5 from 4 votes

Vegan Spaghetti Squash Burrito Bowl

This vegan spaghetti squash burrito bowl is an easy gluten free dinner that is fibre and protein packed!
Prep Time5 minutes mins
Cook Time30 minutes mins
Total Time35 minutes mins
Course: Main Course
Cuisine: Mexican
Servings: 4
Calories: 487kcal
Author: Abbey Sharp

Ingredients

  • 2 spaghetti squash
  • 1 19 oz can no salt added black beans drained and rinsed
  • 1 pack 340 g vegan ground round
  • 1 bell pepper diced
  • 1/2 cup frozen or canned corn
  • 1/2 cup salsa your choice, however spicy you like it
  • 1 tsp cumin or to taste (depends on your salsa)
  • 1/2 tsp chili pepper or to taste (depends on your salsa)
  • Juice of 1/2 lime or to taste (depending on your salsa)
  • Salt and pepper to taste
  • 1 cup shredded Vegan cheddar cheese

For topping:

  • Halved cherry tomatoes
  • Pickled jalapeno
  • Red cabbage shredded
  • Diced avocado
  • Vegan sour cream
  • Cilantro

Instructions

  • To cook your squash, preheat the oven to 400°F. Cut the squash in half lengthwise, and scoop out the seeds. Season with salt and pepper, then place them cut side down on a baking sheet. Poke some holes on top.
  • Roast for about 30-40 minutes or until fork tender.
  • Alternatively, cut the squash in half and remove seeds. Place in a baking dish cut side down with 1/4 cup of water in the bottom of the dish. Cover in plastic wrap and cook on high for 10-15 minutes or until tender when pricked with a fork.
  • Flip upright and once it’s cool enough, run your fork through the flesh to yield strands.
  • Meanwhile, add the beans and the vegan “meat” (which should already be cooked) to the pan and break up the meat. Add the bell peppers, corn, salsa, and then season with the spices, lime, salt and pepper, to taste.
  • Mix the meat mixture in with the spaghetti squash noodles, and pile it on top. Top the squash halves with shredded cheese and pop it back into the oven for 10 minutes until the cheese melts and looks golden brown.
  • To serve, top with toppings of your choice.

Nutrition

Calories: 487kcal | Carbohydrates: 86g | Protein: 19g | Fat: 10g | Saturated Fat: 3g | Sodium: 626mg | Potassium: 1226mg | Fiber: 22g | Sugar: 16g | Vitamin A: 1667IU | Vitamin C: 50mg | Calcium: 184mg | Iron: 6mg

Abbey Sharp

Abbey Sharp is a Registered Dietitian (RD), regulated by the Ontario College of Dietitians. She is a mom, YouTuber, Blogger, award winning cookbook author, media coach specializing in food and nutrition influencers, and a frequent contributor to national publications like Healthline and on national broadcast TV shows.

www.abbeyskitchen.com/about-abbey/

Last Updated December 30, 2020. Published October 7, 2024 By Abbey Sharp 11 Comments

BEST Potato Soup Recipe | Vegan, Creamy with NO Cream!

This vegan potato soup will soon be your go to creamy pureed soup to help keep you warm during the winter months! It’s gluten free, super flavourful, and nutrient packed.

Birds eye view of vegan potato soup in a bowl topped with croutons and chives, with more croutons on a pan in the background.

Arguably, one of the only redeeming qualities of a Canadian winter is that soup just tastes THAT much better. I mean, how can you beat coming inside from the cold and having a delicious soup warm you up from the inside out? There’s nothing better than that!

So now that the winter is officially in full swing, I thought it would be the perfect time to whip up one of my favourites – the best potato soup recipe!

Table of contents

  • Why This Recipe Works
  • Key Ingredients
  • How to Make This Recipe
  • Expert Tips
  • Recipe FAQs
  • More Recipes You Might Like

Why This Recipe Works

The best potato soup recipe has everything you could ever want in a warming meal. Here’s why I love it:

  • Creamy
  • Requires simple ingredients
  • High in protein and fibre
  • Can be made in one pot
  • Insanely easy to prepare

Have I sold you yet?

Key Ingredients

Flat lay image of portioned ingredients for potato soup including nutritional yeast, flour, sour cream, garlic, onion, celery, broth, soy milk, and potato.

Potatoes – for this recipe, we used Yukon gold potatoes because they have a creamy texture and a slightly buttery taste compared to other potato varieties, which really helps to elevate this vegan potato soup.

Soy Milk – This recipe uses soy milk to add creaminess to the soup while also adding extra protein. Cashew milk would also be a good alternative to use in this recipe, however it may not provide the same amount of protein to the soup unless it’s been fortified. So make sure to check the label if you choose to use cashew milk instead.

Nutritional Yeast – What is a vegan soup without a bit of that NOOCH? The nutritional yeast not only adds a delicious cheesy flavour to the vegan potato soup but, similar to the soy milk, it helps increase the protein content to help boost the staying power of the soup.

Croutons – We made some homemade croutons from scratch using some stale bread and a bit of olive oil. But if you just can’t be bothered and want to get dinner on the table state, you can use store bought croutons instead.

How to Make This Recipe

Two side by side images of sauteeing celery with garlic and flour.

Step 1: Place a large soup pot over medium-low heat. Add the olive oil and butter. Once the butter melts, add the onion and celery. Saute until translucent, about 5 minutes. Add the garlic and stir until fragrant, about 30 seconds. Season with salt and pepper.

Step 2: Add the flour and stir to coat the veggies.

Two side by side images of how to make potato soup including adding the broth, milk, potatoes, sour cream, and nutritional yeast to a pot.

Step 3: Slowly stir in the broth and milk, then add the potatoes. Bring to a boil over medium-high heat, then reduce to a simmer. Simmer for 15-20 minutes until the potatoes are tender and easily pierced with a fork.

Step 4: Add the sour cream and nutritional yeast over low heat, stirring to combine. Heat on low for 5-10 minutes, stirring occasionally, until the mixture is heated through.

Three side by side images showing pureed potato soup and homemade croutons.

Step 5: Remove the pot from heat, then use an immersion blender to puree the soup to desired smoothness, leaving a few chunks of potato as desired.

Step 6: Ladle soup into bowls, then top as desired with chopped chives, sour cream, and croutons.

Step 7: To make the croutons, place a small skillet over medium heat. Add the olive oil, and once it is shiny, add the bread cubes. Toss to coat the cubes in the oil, then toast over medium-low heat for 5-6 minutes, stirring often, until the cubes are golden brown and crispy. Remove the croutons from heat and add the smoked paprika and salt. Toss to coat, then serve as desired as a soup topping.

Expert Tips

To puree the soup, we like to use an immersion blender because so that everything stays in one-pot and keeps things low mess. But if you don’t have an immersion blender on hand – no problemo! You can puree the soup by ladling the contents into a high speed blender or food processor. Just be mindful of the heat of the soup if your blender is plastic- you may need to give it some time to slightly cool.

Recipe FAQs

What other toppings can I add to the soup if I don’t have croutons?

I personally love to add some crunchy texture to my soups so I’d suggest topping this off with sunflower seeds or crispy chickpeas. If you don’t need to make this vegan, it would also taste totally delish topped with some crispy bacon (or tempeh bacon to keep it vegan) and some sharp cheddar cheese.

Can I have this as a main?

You certainly can! This soup has enough calories, protein, and fibre to serve as a main dish that won’t leave you hungry an hour later. But obviously, follow your hunger cues and add sides if necessary!

How long will this recipe last in the fridge and freezer?

This vegan potato soup should last about 5 days in the fridge and 6 months in the freezer.

How did you make this soup creamy without the cream?

Using Yukon gold potatoes is one of the secrets to making this soup extra creamy – but the additional of vegan sour cream, flour and soy milk also helps to boost up the cream factor.

Birds eye view of vegan potato soup in a white bowl with a spoon topped with croutons, sour cream, and chives.

More Recipes You Might Like

Here are some more of our favourite vegan soup recipes on the blog!

  • Tomato Soup (Creamy & Protein Packed)
  • Sweet Potato Curry Soup
  • Butternut Squash Soup with Red Lentils
  • Roasted Cauliflower Soup with Parsnips

What are some of your favourite pureed soups to keep you warm during the winter months? Let me know in the comments if you’ve tried the best potato soup recipe!

Print Recipe
5 from 10 votes

BEST Potato Soup Recipe | Vegan, Creamy with NO Cream!

This vegan potato soup will soon be your go to creamy pureed soup to help keep you warm during the winter months! Its gluten free, super flavourful, and nutrient packed.
Prep Time5 minutes mins
Cook Time35 minutes mins
Total Time40 minutes mins
Course: Soup
Cuisine: American
Diet: Gluten Free, Vegan
Servings: 4
Calories: 522kcal
Author: Abbey Sharp

Ingredients

  • 2 teaspoons olive oil
  • 1 tablespoon vegan butter
  • 1 small onion diced
  • 2 stalks celery diced
  • 3 cloves garlic minced
  • ½ teaspoon salt
  • ½ teaspoon pepper
  • ¼ cup gluten free flour tested w/ Bob’s Red Mill GF All-Purpose Baking Flour
  • 2 cups vegetable stock
  • 2 cups unsweetened soy milk
  • 1 ½ lbs peeled Yukon gold potatoes cut into ½’’ cibes
  • 1 cup vegan sour cream
  • ¼ cup nutritional yeast

Croutons:

  • 2 tablespoons olive oil
  • 2 slices whole wheat bread cut into ½’’ cubes
  • ½ teaspoon smoked paprika
  • ½ teaspoon salt

Additional toppings:

  • Chopped green onions or chives
  • Vegan sour cream

Instructions

For the soup:

  • Place a large soup pot over medium-low heat. Add the olive oil and butter. Once the butter melts, add the onion and celery. Saute until translucent, about 5 minutes. Add the garlic and stir until fragrant, about 30 seconds. Season with salt and pepper.
  • Add the flour and stir to coat the veggies.
  • Slowly stir in the broth and milk, then add the potatoes. Bring to a boil over medium-high heat, then reduce to a simmer. Simmer for 15-20 minutes until the potatoes are tender and easily pierced with a fork.
  • Add the sour cream and nutritional yeast over low heat, stirring to combine. Heat on low for 5-10 minutes, stirring occasionally, until the mixture is heated through.
  • Remove the pot from heat, then use an immersion blender to puree the soup to desired smoothness, leaving a few chunks of potato as desired.
  • Ladle soup into bowls, then top as desired with chopped chives, sour cream, and croutons.

For the croutons:

  • Place a small skillet over medium heat. Add the olive oil, and once it is shiny, add the bread cubes. Toss to coat the cubes in the oil, then toast over medium-low heat for 5-6 minutes, stirring often, until the cubes are golden brown and crispy.
  • Remove the croutons from heat and add the smoked paprika and salt. Toss to coat, then serve as desired as a soup topping.

Nutrition

Calories: 522kcal | Carbohydrates: 66g | Protein: 13g | Fat: 24g | Saturated Fat: 6g | Sodium: 1470mg | Potassium: 1001mg | Fiber: 7g | Sugar: 9g | Vitamin A: 759IU | Vitamin C: 36mg | Calcium: 201mg | Iron: 3mg

Abbey Sharp

Abbey Sharp is a Registered Dietitian (RD), regulated by the Ontario College of Dietitians. She is a mom, YouTuber, Blogger, award winning cookbook author, media coach specializing in food and nutrition influencers, and a frequent contributor to national publications like Healthline and on national broadcast TV shows.

www.abbeyskitchen.com/about-abbey/

Last Updated September 29, 2024. Published September 30, 2024 By Abbey Sharp 23 Comments

Signs of Peanut Allergy in Baby | Risk Reduction

I discuss the new recommendations and guidelines to reduce the risk of peanut allergy in babies and kids to prevent anaphylaxis and other reactions.

I discuss the signs of peanut allergy in baby, the new guidelines to reduce the risk of peanut allergies, and how to to prevent anaphylaxis and other reactions.

A stack of peanut butter banana chocolate cups.

Growing up, my mom was a Montessori teacher and would tell me horror stories about children’s seizures and using epi-pens to save kids’ lives. Back then, I just thought my mom was a hero (and she still totally is), but today, as a new momma-to-be, all I can think of is how terrified I would be letting my kids out of my sight with a peanut allergy. So, when I learned about the new guidelines to reduce the risk of peanut allergy in babies and kids, I breathed a sigh of relief. While a peanut allergy, like all allergies, can always still happen, it’s reassuring to know there are steps we can take to reduce the risk. I’ve already talked a lot about the role of the microbiome and food allergies, but let’s look specifically at the new guidelines for peanuts and signs of peanut allergy in baby.

Peanuts 101

First of all, a few thoughts on peanuts. Admittedly a misnomer, peanuts are actually not nuts, they’re in fact a type of legume (much like chickpeas, and lentils!) More than 85% of peanuts and peanut products consumed in Canada come from the United States, since our chilly climates aren’t conducive to their growth.

Peanut butter protein pancakes stack on a white plate topped with bananas and mini chocolate chips.

Nutrition-wise, peanuts actually have more protein than any other nut! They are also an excellent source of magnesium, manganese, niacin and Vitamin A through E! And of course, there’s that amazing fat- 85% of the fat in peanuts is the “good” unsaturated fat. So, there’s good reason to want our kids to be able to enjoy them. I know that personally, some of my favourite recipes include yummy peanuts (like these PB Rice Krispie Treats, PB Banana Vegan Protein Bars, and Peanut Cherry Energy Balls).

And apparently, I’m not alone in my love affair. Reports suggest that 97% of Canadian households consume peanuts at least every few months and 60% enjoy them at least once a week! And then there are people like me, who eat peanut butter right out of the jar- apparently this is the habit of about 1/3 of Canadians.

Guidelines to Reduce the Risk of Peanut Allergy

Okay, so since there’s so much goodness going on in the mighty peanut, and clearly people love them, how can we ensure our little ones can enjoy them, too? How do we look for the signs of peanut allergy in baby?

Baby lying in bed with a hat on.

There was a recent randomized control trial called the LEAP (Learning Early about Peanut Allergy) study conducted by the Immune Tolerant Network (ITN). Over 600 children between the ages of 4 to 11 months who were identified as being at high risk for peanut allergies based on an existing egg allergy or severe eczema were included in the study.

Their findings?

There were lower rates of peanut allergy in infants who ate peanuts early (3.2%) compared to those who avoided it (17.2%). This study found that eating peanuts early in life was safe for high-risk children, and their follow up study, LEAP-On, found that continuing to eat peanuts until they turn five years old didn’t increase the risk of a peanut allergy during their sixth year of life – even if they avoided peanuts!

Oatmeal in a glass bowl topped with chocolate and peanut butter.

So, what’s the big deal with these new guidelines to reduce the risk of peanut allergy and what are the signs of peanut allergy in baby?

Well, for second-time parents, or even kids who grew up with peanut allergy, you might notice that these recommendations are the opposite of what moms were told to do before. Older guidelines recommended avoiding peanut products until three years of age because the thought was that this time would allow the gut and immune system to mature and help prevent allergies. But this waiting period had a few notable impacts:

  • Peanut allergy rates increased about three-fold!!
  • Research was released linking delaying allergenic foods to an increase in the risk of food allergy.
  • Studies were suggesting that children with eczema who were exposed to certain foods in the atmosphere, but not actually consuming them, had increased allergies.

All things considered, I’m so grateful for the breakthroughs of the LEAP study in helping to shift our current guidelines to reduce the risk of peanut allergy.

When Can I Introduce Peanuts to Reduce the Risk of Peanut Allergy?

So for kiddos with no eczema or food allergy, it’s recommended that you introduce peanut-containing foods at any age according to family preferences, cultural preferences and general readiness for solids (more on this below!)

For those who are at high risk of peanut allergy (egg allergy or severe eczema), it’s recommended to introduce peanuts at four-to-six months after being evaluated by their doctor to rule out an existing peanut allergy.

Chicken satay stuffed sweet potato topped with peanuts and green onions on a colourful plate.

For those with mild to moderate eczema, it’s recommended that you introduce peanuts or peanut-containing foods around six months.

How Can I Introduce Peanuts to My Infant?

So, first, you need to determine that your baby is ready for complementary foods (that is, food that isn’t breastmilk or formula). This should be done in conversation with your pediatrician but you should be looking for some of the following signs:

  • Baby can hold its head up and has good neck control
  • Baby can sit with support
  • Baby appears curious and interested in other family member’s eating and foods
  • Baby is transitioning from sucking reflex to swallowing (for example, they don’t push a spoon out of their mouth with their tongue).

You’ll want to make sure to give peanuts to your baby for the first time at home, and not at a restaurant or their day care. You also want to make sure there is a trusted adult to watch baby while they eat and for about two hours afterwards to ensure no symptoms arise. You don’t have to go to the ER parking lot as a lot of mommy blogs suggest, since peanut butter is very safe for the vast majority of babies and not a choking hazard.

The easiest way to serve peanuts to your Baby is to take about 2 teaspoons of peanut butter and stir it well with 2-3 teaspoons of hot water. Once cool, baby can enjoy it on its own, or mixed with a few tablespoons of infant cereal, pureed fruit or veggies, or any other soft food like yogurt.

Two slices of a loaf with nut butter on top.

Once you give them a small amount (about what would fit on the tip of a spoon), wait 10 minutes to watch for any symptoms of peanut allergy. If things look in the clear, you can continue to serve peanut-containing foods at your baby’s natural eating pace.

Once you’ve introduced peanut products and no allergy seems to be apparent, you should aim to have about 6-7 grams of peanut protein over three or more feedings each week. So, the 2 teaspoons of peanut butter should be offered about three times each week to meet the guidelines to reduce the risk of peanut allergy.

While peanut butter is not a choking hazard, whole peanuts shouldn’t be given until about four years of age to avoid potential choking. Just stick with good old PB until then.

What Are the Signs of Peanut Allergy in Baby? How Do I Know If Baby Is Having an Allergic Reaction?

Women feeding her infant to discuss signs of peanut allergy in baby.

Obviously, it’s important to pay attention to your baby before introducing any new food to ensure there’s no adverse reactions. Signs of peanut allergy in baby include:

  • A new rash or hives around the mouth
  • Swelling of the lips, eyes, or face
  • Vomiting
  • Hives all over the body
  • Breathing issues with a repetitive cough, wheeze or challenges breathing
  • A change in skin colour to pale or blue
  • Sudden tiredness, lethargy or seeming limp

If you see any of these symptoms of an allergic reaction, call 911 and seek medical attention.

What If I (The Parent) Have a Peanut Allergy?

So, this is really a risk vs. benefit analysis that you can speak to your pediatrician about. The risk isn’t to the child, but rather, potentially to the parent with the allergy, whom depending on the severity, may be at risk of an allergic reaction if they’re handling peanut products. If possible, have designated eating areas for serving peanut products that are well sanitized, or have another caregiver offer the peanut products at a relative’s home or outdoors. And moms and dads with allergies, please be careful not to kiss babe on the mouth after he/she has had a peanut-y snack.

What About During Pregnancy? Is There Anything I Can Do Before Baby is Born to Reduce the Risk of Peanut Allergy?

Good news to my fellow pregnant mommas-to-be, your eating-the-PB-out-of-the-jar-with-a-spoon may actually be good for your babe! New research published in 2014 found that eating more peanuts and tree nuts during pregnancy was linked to a lower risk in peanut and tree nut allergies in their offspring. This is in direct opposition to older, lower-quality research that found no impact or even a higher risk of allergies in peanut-loving mommas. These new findings are much more aligned with the research and recommendations on early introduction of peanut products. So if you’re not allergic to peanuts, then feel free to whip up a big batch of my Homemade Peanut Butter Cups and face plant into them ASAP.

A baby sitting in front of a cupcake with a one year old candle.

So, mommas, dads and parents-to-be, I hope this article helped clear up some confusion about how to reduce the risk of peanut allergy with the new guidelines. Considering how healthy peanuts are for our kids, and how devastating an allergy can be, I’m sure it’s in all our best interest to make any effort we can to reduce our baby’s risk and to know the signs of peanut allergy in baby. If you’d like more information on early introduction, check out Food Allergy Canada’s Early Infant Feeding Guidelines FAQs.

I would love to hear from you, when did you introduce peanuts to your baby? Do you or anyone you know have a peanut allergy? How did your baby tolerate their first peanut snack?

Leave me a comment below with your thoughts!

MORE BLOG POSTS YOU MIGHT LIKE

If you liked this blog post discussing the signs of peanut allergy in baby, then you might also enjoy more blog posts on feeding infants and allergies:

  • Is Soy Formula Bad for Babies that are Vegan or Allergic to Dairy?
  • Why Are Food Allergies in Kids on the Rise? | Allergy Prevention Tips
  • Are Food Sensitivity Tests BS or Legit? A Dietitian’s Perspective
  • How and When to Introduce Food Allergens to Babies with Baby Led Weaning or Spoon-Feeding
  • Do Babies Need Cow’s Milk? | Is Raising an Infant Vegan Safe and Healthy?
Abbey Sharp

Abbey Sharp is a Registered Dietitian (RD), regulated by the Ontario College of Dietitians. She is a mom, YouTuber, Blogger, award winning cookbook author, media coach specializing in food and nutrition influencers, and a frequent contributor to national publications like Healthline and on national broadcast TV shows.

www.abbeyskitchen.com/about-abbey/

Last Updated November 19, 2020. Published September 23, 2024 By Abbey Sharp 32 Comments

Sweet Potato Bites Recipe with Cheese | Gluten Free Appetizer

This delicious sweet potato bites recipe with cheese is an easy gluten free appetizer that your guests, friends and family will totally love. Enjoy this fun twist on a classic grilled cheese.

Sweet potatoes bites stacked in a pile on a white plate.

I’ve told this story to anyone who will listen, but here I go telling it again. When I was a kid, a grilled cheese sandwich was pretty much one of the only foods I would eat. I mean, what kid wouldn’t get excited about buttery bread and cheese?! Well one day, my mom over-browned the bread in the pan and I got so upset about it, I asked her to “wash” the grilled cheese sandwich because it looked dirty to me. Now, of course today I know that brown = flavour and I will take as much brown as my pan will give me, but back then, that logic seemed strong.

Table of contents

  • Why This Recipe Works
  • Key Ingredients
  • How To Make This Recipe
  • Expert Tips
  • Recipe FAQs
  • More Recipes You May Like

Why This Recipe Works

While I still love bread (like, a lot), I have been experimenting with sweet potato toast so much that I thought it would be fun to swap sweet potatoes for bread in this sweet potato bites recipe. These are the best thing since sliced bread. I also love this recipe because it’s:

  • Gluten and bread free, perfect for those with dietary restrictions!
  • Perfect for entertaining guests AND kids also gobble them up
  • A great way to add an extra few servings of vegetables into your meals
  • A versatile recipe as well as you can use whatever cheeses you have on hand.

Key Ingredients

Overhead image of ingredients needed to make the recipe: sweet potatoes, aged white cheddar, bri cheese, olive oil, red pear, and butter.

Sweet Potatoes – Did you know that sweet potatoes are highly nutritious? Sweet potatoes are a great source of fibre, vitamins, and minerals and are a great additional to your daily meals.

Cheeses – In these amazing sweet potato bites, I decided to use my favourite cheese, St. Honor. This is a triple cream brie that is crazy soft, creamy, rich and buttery with a mild flavour perfect with sweet potatoes. You’ll also want another cheese that goes well with it, so I picked a nice aged white cheddar.

Red Pear – The red pears have a subtle fruity sweetness to it that goes so well with the cheeses and compliments the natural sweetness of the sweet potatoes.

How To Make This Recipe

Step by step photos showing how thin to slice sweet potatoes, how to grill them, and how to assemble.

Step 1: Thinly slice the sweet potatoes into 2 mm thick slices.

Step 2: Heat half of the olive oil and butter in a large nonstick skillet and add in the sweet potato rounds in batches. Brown on each side for about 2-3 minutes per side before transferring to a paper towel lined plate.

Step 3: Add a slice of brie cheese (about 1-2 mm thick) on top of half of the sweet potato rounds, top with a thin slice of pear, a good pinch of grated cheddar and the other sweet potato round.

Step 4: Heat the remaining butter and oil in the skillet and pan fry again until the cheese melts and the sweet potato bite is golden on the outside.

Expert Tips

Make sure you cut your sweet potatoes the same thickness. This ensures that everything cooks evenly at the same time and you don’t end up with an uncooked sweet potato bite!

If you’re having difficulties slicing the sweet potatoes, you can use a mandolin! It ensures everything is sliced to the same thickness. You can use the mandolin to slice the red pear as well.

Try to purchase sweet potatoes that are the same size as well. You don’t want them too thick in the middle and tapered at the end as you end up not using the whole thing as they’re not the same size.

You can use a nonstick pan or a cast iron for this sweet potato bites recipe. Just be sure it’s well oiled to prevent sticking.

Recipe FAQs

Do I have to use pear?

No, you can use any crisp fruit of your choice. Apples are a great alternative to pear.

Can this sweet potato bites recipe be made in advance?

While they taste best straight out of the pan, you can make them ahead by slicing and grilling the sweet potato slices ahead of time and storing it in the fridge in an airtight container for 2-3 days. Then when ready to serve, heat it up on the stovetop and add in the cheese and pear.

Do I have to peel the sweet potatoes?

If you prefer to not peel the sweet potatoes, be sure to scrub them as clean as you can.

Photo showing the cheese pull from a sweet potato bite.

More Recipes You May Like

Want more sweet potato recipes? Here are some of my favourites!

  • Vegan Guacamole Stuffed Sweet Potatoes
  • Hasselback Sweet Potatoes
  • High Protein Chicken Curry with Cauliflower and Sweet Potatoes
  • Vegan Stuffed Sweet Potatoes with PB&J

Have you tried this sweet potato bites recipe? Leave me a comment below letting me know how you liked them!

Overheat image of a plate with multiple sweet potatoes grilled cheese bites on a white plate.
Print Recipe
4.93 from 14 votes

Sweet Potato Bites Recipe with Cheese

These delicious sweet potato bites with cheese are an easy gluten free appetizer that your guests, friends and family will totally love. Enjoy this fun twist on a classic grilled cheese.
Prep Time5 minutes mins
Cook Time10 minutes mins
Total Time15 minutes mins
Course: Appetizer
Cuisine: American
Servings: 16 people
Calories: 99kcal
Author: Abbey Sharp

Ingredients

  • 1 tbsp extra virgin olive oil
  • 1 tbsp unsalted butter
  • 2 large long sweet potatoes peeled
  • 150 g Brie cheese
  • 1 cup Aged white cheddar finely grated
  • 1/2 red pear thinly sliced

Instructions

  • Thinly slice the sweet potatoes into 2 mm slices.
  • Heat half of the oil and butter in a large nonstick skillet and add in the sweet potato rounds in batches. Brown on each side for about 2-3 minutes per side before transferring to a paper towel lined plate.
  • Add a slice of brie cheese (about 1-2 mm thick) on top of half of the sweet potato rounds, top with a thin slice of pear, a good pinch of grated cheddar and the other sweet potato round.
  • Heat the remaining butter and oil in the skillet and pan fry again until the cheese melts and the grilled cheese is golden on the outside. Enjoy!

Video

Notes

Make sure you cut your sweet potatoes the same thickness. This ensures that everything cooks evenly at the same time and you don’t end up with an uncooked sweet potato grilled cheese bite!
If you’re having difficulties slicing the sweet potatoes, you can use a mandolin! It ensures everything is sliced to the same thickness. You can use the mandolin to slice the red pear as well.
Try to purchase sweet potatoes that are the same size as well. You don’t want them too thick in the middle and tapered at the end as you end up not using the whole thing as they’re not the same size.

Nutrition

Calories: 99kcal | Carbohydrates: 6g | Protein: 4g | Fat: 7g | Saturated Fat: 4g | Polyunsaturated Fat: 1g | Monounsaturated Fat: 2g | Trans Fat: 1g | Cholesterol: 18mg | Sodium: 121mg | Potassium: 116mg | Fiber: 1g | Sugar: 1g | Vitamin A: 4156IU | Vitamin C: 1mg | Calcium: 76mg | Iron: 1mg
Abbey Sharp

Abbey Sharp is a Registered Dietitian (RD), regulated by the Ontario College of Dietitians. She is a mom, YouTuber, Blogger, award winning cookbook author, media coach specializing in food and nutrition influencers, and a frequent contributor to national publications like Healthline and on national broadcast TV shows.

www.abbeyskitchen.com/about-abbey/

Last Updated September 15, 2024. Published September 16, 2024 By Abbey Sharp 18 Comments

Coconut Flour Chocolate Chip Cookies

These coconut flour chocolate chip cookies are not only soft and chewy, but they are super simple to make! They are also naturally gluten and dairy free making them perfect for people with dietary intolerances.

Person holding coconut flour cookie and dipping it into a glass of milk, with a baking rack with more cookies in the background.

You know that moment when you are in charge of bringing dessert to a holiday get together but you have to be mindful of every dietary intolerance and preference under the sun?

Yeah, welcome to my life. In my family, the main dietary tolerances I have to be mindful of during the holidays are gluten and dairy. So what is a dietitian food blogger to do? Answer: these coconut flour chocolate chip cookies.

Table of contents

  • Why This Recipe Works
  • Key Ingredients
  • How to Make This Recipe
  • Expert Tips
  • Recipe FAQs
  • More Recipes You Might Like

Why This Recipe Works

These coconut flour chocolate chip cookies not only help to accommodate gluten and dairy free dietary intolerances, but they are also so stinking good that you won’t even notice the difference. They are also a healthier alternative than most other cookie varieties because they are loaded with fibre and healthy fats. Win-win.

The trick to making these chocolate chip cookies gluten free is by using a combination of coconut and almond flour. I love using these flours because they also add a nutrition boost to baked goods, which this dietitian highly approves of. I also use vegan butter and chocolate chips to make this recipe totally dairy-free, as well.

Key Ingredients

Birds eye view of portioned ingredients to make coconut flour cookies including flour, butter, vanilla, brown sugar, chocolate chips, salt, baking soda, and an egg.

Flour – To make this recipe gluten free, I use a combination of almond and coconut flour. I love using almond flour because it adds a boost of healthy fats, while the coconut flour adds extra fibre. Keep in mind that coconut flour is very absorbant compared to other flours.

Dairy-free Butter – If you don’t need to make these dairy free, then you can use regular butter instead.

Chocolate Chips – Who doesn’t love a healthy dose of chocolate chips in their cookies? This recipe uses dark chocolate chips but you can also use semi-sweet or white chocolate if you prefer.

How to Make This Recipe

Image of the first three steps to making the batter for the coconut chocolate chip cookies.

Step 1: In a bowl, mix together the butter, brown sugar and vanilla. 

Step 2: Add the coconut flour, almond flour, and salt.

Step 3: Mix until combined. Allow the mixture to rest for 3-5 minutes so the coconut flour can absorb some of the moisture in the dough. Add the baking soda and egg, mix until combined. 

Image of the last three steps of the recipes including adding in the chocolate chips, and scooping batter with ice cream scoop and laying them on parchment paper.

Step 4: Fold in the chocolate chips. Place the dough in the refrigerator for 5 minutes or so to firm up slightly.

Step 5: Line a sheet pan with parchment paper. Use an ice cream scoop to scoop out 8 scoops of dough.

Step 6: Use the back of a spoon or the back of the ice cream scoop to flatten the cookies into discs. Bake the cookies for 12-14 minutes, or until they are slightly golden. Allow them to cool slightly before moving them to a cooling rack with a spatula.

Expert Tips

To make these coconut flour cookies, I used Bob’s Red Mill Coconut Flour for this recipe. Every type of coconut flour varies in absorbancy, so keep that in mind when making these cookies.

I also used 70% dark Enjoy Life chocolate chips. The cookie itself is fairly sweet so the dark chips provide a nice contrast in flavor.

I added about ⅛ of a teaspoon of salt, but you can taste the dough prior to adding the egg and add more salt if desired. The salt really makes the cookies a perfect blend of salty and sweet.

These coconut flour cookies will be fairly soft upon coming out of the oven, but firm up as they cool. Transfer them to a cooling rack for even cooling. 

If you are not dairy-free, you can use regular butter. Use unsalted butter and follow the recipe as written or use salted butter and omit the salt from the recipe.

Hand holding up a chocolate cookie that has been bitten into, with baking rack with more cookies in the background.

Recipe FAQs

Do these cookies freeze well?

Definitely. Once cooled, transfer cookies to a baking sheet in a freezer to solidify for 30 minutes. You can then transfer to a freezer bag for up to 4 months. When ready to eat, just pop them in the microwave for 15-20 seconds until thawed through.

Can I make these vegan?

While most other cookie recipes can be made vegan by using a flax egg, I wouldn’t recommend that for this recipe as you might end up with a really mushy cookie.

Is this recipe kid friendly?

If your kid loves chocolate and cookies, then the answer is capital YES! The only thing I would suggest you be mindful about is any nut allergies as this recipe contains almond flour.

Can I add any other flavourings besides chocolate chips?

Oh heck ya! There are no hard and fast rules when it comes to add-ins so do what feels right. If you want to keep with the chocolate chip theme, i’d also suggest throwing in some walnuts for extra crunch.

More Recipes You Might Like

Did you enjoy this recipe for coconut flour chocolate chip cookies and want more allergen-friendly dessert recipes? Try these ones linked down below!

  • Healthy Chickpea Cookie Dough (4 Ways!)
  • Candy Cane Double Chocolate Chip Oatmeal Cookies (Vegan)
  • Peanut Butter & Jelly Cookies (Vegan)
  • Salted Toffee Cookies (Vegan & Gluten Free)
  • Vegan Tahini Cookies
  • Vegan & Gluten Free Peanut Butter Cookies

Have you tried making cookies with coconut flour before? What are your favourite coconut flour cookie recipes?

Print Recipe
4.91 from 10 votes

Coconut Flour Chocolate Chip Cookies

These coconut flour chocolate chip cookies are not only super soft and chewy, but they are super simple to make! They are also naturally gluten and dairy free making them perfect for people with dietary intolerances.
Prep Time10 minutes mins
Cook Time15 minutes mins
Total Time25 minutes mins
Course: Dessert, snacks
Cuisine: American
Diet: Gluten Free
Servings: 8 Cookies
Calories: 230kcal
Author: Abbey Sharp

Ingredients

  • 1/4 cup very soft but not melted non-dairy butter (or unsalted butter)
  • 6 Tbsp. packed brown sugar
  • 1 tsp. vanilla extract
  • 6 Tbsp. coconut flour
  • 1/4 cup almond flour
  • 3/4 tsp. baking soda
  • 1/8 tsp. salt
  • 1 large egg
  • 1/2 cup dark chocolate chips

Instructions

  • Preheat your oven to 350 degrees Fahrenheit.
  • In a bowl, cream together the butter, brown sugar and vanilla.
  • Add the coconut flour, almond flour, and salt
  • and mix until combined. Allow the mixture to rest for 3-5 minutes so the coconut flour can absorb some of the moisture in the dough. Add the baking soda and mix until combined.
  • Add the egg and mix until combined. Fold in the chocolate chips. Place the dough in the refrigerator for 5 minutes or so to firm up slightly.
  • Line a sheet pan with parchment paper. Use an ice cream scoop to scoop out 8 scoops of dough. Use the back of a spoon or the back of the ice cream scoop to flatten the cookies into discs.
  • Bake the cookies for 12-14 minutes, or until they are slightly golden. Allow them to cool slightly before moving them to a cooling rack with a spatula. These cookies will firm up and become more chewy as they cool. Enjoy them as is or dip them into your favorite dairy-free milk!

Notes

  • I used Bob’s Red Mill Coconut Flour for this recipe. Every type of coconut flour varies in absorbancy, so keep that in mind when making these cookies.
  • I used 70% dark Enjoy Life chocolate chips. The cookie itself is fairly sweet so the dark chips provide a nice contrast in flavor.
  • ⅛ of a teaspoon of salt is listed, but you can taste the dough prior to adding the egg and add more salt if desired. The salt really makes the cookies a perfect blend of salty and sweet.
  • These cookies will be fairly soft upon coming out of the oven, but firm up as they cool. Transfer them to a cooling rack for even cooling. 
  • We devoured these right away so I can’t say for sure if they’d freeze well, but my guess is that they’d be fine as long as you wrapped them tightly.
  • If you are not dairy-free, you can use regular butter. Use unsalted butter and follow the recipe as written or use salted butter and omit the salt from the recipe.

Nutrition

Calories: 230kcal | Carbohydrates: 24g | Protein: 4g | Fat: 13g | Saturated Fat: 6g | Cholesterol: 21mg | Sodium: 270mg | Potassium: 94mg | Fiber: 5g | Sugar: 16g | Vitamin A: 283IU | Calcium: 56mg | Iron: 1mg

Did you enjoy these coconut flour cookies? Leave me a comment below with your thoughts!

Abbey Sharp

Abbey Sharp is a Registered Dietitian (RD), regulated by the Ontario College of Dietitians. She is a mom, YouTuber, Blogger, award winning cookbook author, media coach specializing in food and nutrition influencers, and a frequent contributor to national publications like Healthline and on national broadcast TV shows.

www.abbeyskitchen.com/about-abbey/

Last Updated September 8, 2024. Published September 9, 2024 By Abbey Sharp 32 Comments

Copycat Shake and Bake Chicken Recipe | Gluten Free

An overhead photo of a brown plate with shake and bake chicken breasts with broccoli florets and vegetable fries.

This Shake and Bake Chicken Recipe is a gluten free copycat version of the boxed seasoning mix that will help add tons of flavour to your chicken dinner in a flash!

An overhead photo of a brown plate with shake and bake chicken breasts with broccoli florets and vegetable fries.

When I was growing up, chicken was an absolute staple for my family. My mom didn’t like fish so that was out, and beef was an expensive Sunday roast indulgence, so chicken was on the table most nights of the week. From chicken nuggets, to strips, to roasts, to pulled sammies, my mom very quickly became a master at cooking poultry, and shake and bake chicken was one of our all-time favourites. So today I’m bringing it back to the main course with my own gluten free Shake and Bake chicken recipe – a fun take on my mom’s hectic weeknight staple.

Table of contents

  • Why This Recipe Works
  • Key Ingredients
  • How To Make This Recipe
  • Expert Tips
  • Recipe FAQs
  • More Recipes You Might Like

Why This Recipe Works

When my sister was told to trial a gluten free diet after months of trialing with various FODMAPs and potential intolerance triggers, that meant that regular boxed shake and bake is now a no-no, and we needed something a little healthier in its place. My Gluten Free Shake and Bake Chicken recipe uses a combination of high fiber gluten free oats (pulsed until they reach a powder) and coconut flour plus a ton of yummy spices. I also love this recipe because it’s:

  • Easy to pair with various side dishes
  • Family-friendly for all ages
  • Ready in 35 minutes or less — perfect for busy nights!

Key Ingredients

Gluten Free Oats- To keep this recipe 100% gluten-free, it’s important to find certified gluten-free oats! If you’re not gluten-free, regular rolled oats work as well.

Coconut Flour- I used coconut flour in this recipe vs. regular flour to keep it gluten-free. Almond flour is another great gluten-free flour option to test out, though I haven’t personally tried it for this recipe. Also, just like the oats, if you’re not following a gluten-free lifestyle, feel free to use regular flour.

Boneless Chicken Breast- As mentioned above, chicken is one of the cheapest protein options, which is why I love it when trying to prep food for my family during the week. Chicken breasts are packed with 31 grams of protein for only 3.5 ounces!

Spices – The number one key to turning chicken from boring to mouthwatering is a delicious spice combo, and this shake and bake chicken recipe does not cut any corners. So to make this recipe extra flavourful, we combine paprika, brown sugar, poultry seasoning, onion powder, garlic powder, oregano, parsley, salt and pepper.

An close up photo of a brown plate with shake and bake chicken breasts.

How To Make This Recipe

Step 1: Preheat your oven to 400 F & make sure to place a baking sheet into the oven to pre-heat with the oven. In the meantime, mix the shake and bake mixture together in an airtight container.

Step 2: Add the chicken breasts to a resealable bag and add 1/2 cup of the shake and bake mixture. Shake until fully coated.

Step 3: Lay the chicken breasts onto the heated baking sheet and spray the chicken breasts with olive oil in the atomizer.

Step 4: Bake for about 20-30 minutes (depending on the thickness of the breasts), or until a meat thermometer inserted into the centre reaches 165 F.

Expert Tips

I like making a huge batch of the gluten free shake and bake mixture and then just pulling out a 1/2 cup portion per pound of meat every time I need to add a little flavour boost to an otherwise monotone meal.

If you don’t have a food processor at home, you can also use a blender to blend the oats to a finer texture.

A hand holding up a ziploc bag of chicken coating.

Recipe FAQs

How do I store this shake and bake recipe?

I personally recommend making a big batch of the shake and bake itself and storing it in an airtight container in a cool place for up to 2 months. That way you can just pull from the container whenever you need it!

What else can I use this shake and bake recipe with?

This homemade gluten free shake and bake is not only great on chicken, but I love it on pork chops and turkey breast as well!

What sides pair well with this shake and bake chicken recipe?

Something I love about this recipe is that the options are limitless and you can totally customize each meal to your family’s preference. I personally like to pair mine with a side of homemade sweet potato fries and whatever veggie I have on hand.

3 shake and bake chicken breasts on a brown plate with sweet potato fries, broccoli, and a lemon wedge.

More Recipes You Might Like

If you’re looking for other family friendly staples to add into your weekly meal rotation like this shake and bake chicken recipe, check out some of these recipes below:

  • BEST TUNA MELT RECIPE WITH TOMATO AND AVOCADO
  • CHICKEN BACON RANCH CASSEROLE
  • SHEET PAN STIR FRY WITH SHRIMP & VEGGIES

What were your family’s favourite recipes growing up? Do you still make them today? Leave me a comment below!

An overhead photo of a brown plate with shake and bake chicken breasts with broccoli florets and vegetable fries.
Print Recipe
4.75 from 8 votes

Copycat Shake and Bake Chicken Recipe (Gluten Free)

This Gluten Free Shake and Bake Chicken Recipe is a healthy copycat version of the boxed seasoning mix that will help add tons of flavour to your chicken dinner in a flash!
Prep Time5 minutes mins
Cook Time30 minutes mins
Total Time35 minutes mins
Course: Main Dish
Cuisine: American
Servings: 4 people
Calories: 293kcal
Author: Abbey Sharp

Ingredients

Shake and Bake Mix (Makes Extra):

  • 1 cup gluten free oats processed in a food processor until it becomes a fine powder
  • 1/2 cup coconut flour
  • 2 1/2 tsp smoked sweet paprika
  • 2 tsp brown sugar
  • 2 tsp dried oregano
  • 2 tsp salt
  • 2 1/2 tsp dried parsley
  • 1 tsp poultry seasoning
  • 2 tsp pepper
  • 1 1/2 tsp onion powder
  • 1 tsp garlic powder

Chicken:

  • 1 lb skinless boneless chicken breasts
  • Extra virgin olive oil in an atomizer

Instructions

  • Preheat your oven to 400 F. Place a baking sheet into the oven to pre-heat with the oven.
  • Mix the shake and bake mixture together in an airtight container.
  • Add the chicken breasts to a resealable bag and add 1/2 cup of the shake and bake mixture. Shake until fully coated.
  • Lay the chicken breasts onto the heated baking sheet and spray the chicken breasts with olive oil in the atomizer.
  • Bake for about 20-30 minutes (depending on the thickness of the breasts), or until a meat thermometer inserted into the centre reaches 165 F.
  • Store the shake and bake mixture in an airtight container in a cool place for up to 2 months.

Nutrition

Serving: 1piece | Calories: 293kcal | Carbohydrates: 28g | Protein: 30g | Fat: 7g | Saturated Fat: 3g | Polyunsaturated Fat: 1g | Monounsaturated Fat: 1g | Trans Fat: 1g | Cholesterol: 73mg | Sodium: 1330mg | Potassium: 572mg | Fiber: 9g | Sugar: 3g | Vitamin A: 687IU | Vitamin C: 2mg | Calcium: 51mg | Iron: 3mg
Abbey Sharp

Abbey Sharp is a Registered Dietitian (RD), regulated by the Ontario College of Dietitians. She is a mom, YouTuber, Blogger, award winning cookbook author, media coach specializing in food and nutrition influencers, and a frequent contributor to national publications like Healthline and on national broadcast TV shows.

www.abbeyskitchen.com/about-abbey/

Last Updated September 2, 2024. Published September 2, 2024 By Abbey Sharp 18 Comments

Oatmeal Bar Recipe with Berries | Vegan

These Gluten Free Vegan Patriotic Oatmeal Breakfast Bars are the perfect way to celebrate the 4th of July and Canada Day with red, white and blue or red and white colours!

This homemade Oatmeal Bar Recipewith Berries are so easy to make. Made within an hour, all you need are some pantry staples and you can have this healthy treat in no time.

oat bars with berries stacked on a white plate with a strawberry on the side.

You will be so excited for breakfast when you make a batch of these easy and delicious oatmeal bar recipe. They are the perfect on-the-go breakfast or healthy snack! Despite being called a “breakfast” bar, I like to make a batch to have on hand to snack on throughout the week

Table of contents

  • Why This Recipe Works
  • Key Ingredients
  • How to Make This Recipe
  • Expert Tips
  • Recipe FAQs
  • More Recipes You Might Like

Why This Recipe Works

Who doesn’t want a simple healthy breakfast recipe? This oatmeal bar recipe really checks all the boxes!

  • Vegan friendly
  • Gluten free
  • Kid friendly
  • Freezer friendly
  • Super customizable

Key Ingredients

Ingredients needed to make oatmeal breakfast bars.

Rolled oats – Rolled oats are packed with fibre and are a great way to start the day off with. While oats are naturally gluten-free, I would recommend making sure it’s certified gluten-free if you’re making this for someone who is sensitive to gluten. I do not recommend swapping steel cut oats.

Flour – To keep this gluten-free, we use a combination of almond flour and oat flour. These flours are great alternatives as almond flour is rich in vitamin E and other antioxidants and oat flour have the same health benefits as oatmeals.

Berries – Take your pick on what type of berries you want to use for this oatmeal bar recipe. Strawberries and blueberries are a great option!

Flax Seed – Ground flax has a slightly mild, nutty flavour to it and isn’t very noticeable. It is a great source of omega-3 essential fatty acids as well as fibre so it’s a healthy great addition to a sweet treat.

How to Make This Recipe

Set of two photos showing the bar ingredients mixed in a bowl then pressed in a pan, topped with strawberries.

Step 1: In a bowl, mix the oats, almond flour, oat flour, maple, salt, cinnamon, coconut oil, and almond butter. Press into the bottom of a lined 8-inch pan.

Step 2: Sprinkle the berries on top, then top with a sprinkle of the cornstarch, lemon and sugar.

Set of two ingredients showing the streusel being mixed and the glaze mixed.

Step 3: In a bowl, mix together the streusel topping and scatter that on top. Bake for 35-45 minutes in a 375F oven until the oatmeal breakfast bars are golden brown. Cool completely.

Step 4: In a bowl, whisk together the powdered sugar, vanilla and almond milk and drizzle it on top. Cut into bars and enjoy.

Expert Tips

Feel free to swap the almonds for other nuts and seeds such as chopped walnuts, pumpkin seeds, sunflower seeds, or cashew seeds.

Almond butter can also be swapped for another nut butter of your choice.

If you’re making this in advance, you can reheat the breakfast oatmeal bars by microwaving them or baking them in the oven for a couple of minutes until warmed through.

Recipe FAQs

What other fruit can I add?

If you don’t have any berries on hand its no biggie! You can use any fruit you have on hand for this recipe. Try using kiwi, cherries, raspberries, or red apples. 

Can I freeze these oatmeal breakfast bars?

You sure can. I would suggest individually wrapping them in plastic wrap and putting a bunch in a freezer bag to make individual portions. When you are in the mood for the bars later on, they take about an hour or so to thaw. 

Are these kid/toddler friendly?

My toddler has never met a sweet treat he didn’t like so my answer is YES. 

How do I store this?

If you are making this for the week, be sure to place them in an airtight container in the fridge. This will keep them fresh all week!

birds eye view of berry oatmeal bake in a white baking pan

More Recipes You Might Like

Want more delicious bars like my breakfast oatmeal bars with berries? Try these ones as well:

  • No Bake Granola Bars with Peanut Butter and Apricot 
  • No Bake Cheerios Bars 
  • Protein Bars 3 Ways 
  • Cinnamon Bun Granola Bars 

Now friends, tell me what you plan to make for breakfast this week? Leave me a comment below!

These Gluten Free Vegan Patriotic Oatmeal Breakfast Bars are the perfect way to celebrate the 4th of July and Canada Day with red, white and blue or red and white colours!
Print Recipe
5 from 6 votes

Oatmeal Bar Recipe with Berries (Vegan)

These homemade Oatmeal Breakfast Bars with Berries are so easy to make. Made within an hour, all you need are some pantry staples and you can have this healthy treat in no time.
Prep Time15 minutes mins
Cook Time45 minutes mins
Total Time1 hour hr
Course: Breakfast
Cuisine: American
Servings: 12 bars
Calories: 454kcal
Author: Abbey Sharp

Ingredients

Base:

  • 2 cups gluten free rolled oats
  • 1 cup almond flour
  • 1 cup oat flour
  • 2/3 cup maple syrup
  • 1/2 tsp salt
  • 1 teaspoon ground cinnamon
  • 1/2 cup melted coconut oil
  • 1/2 cup almond butter

Berries:

  • 1 cup berries strawberries for Canada Day and strawberries and blueberries for 4th of July
  • 1 tsp cornstarch
  • 1 tbsp lemon juice
  • 1 tbsp white sugar

Streusel:

  • 1/2 cup gluten free rolled oats
  • 1/4 cup almond flour
  • 1/4 cup oat flour
  • 3 tbsp maple syrup
  • Pinch salt
  • 1/4 tsp ground cinnamon
  • 2 tbsp melted coconut oil
  • 1/4 cup sliced almonds
  • 1 tbsp ground flax seed

Glaze:

  • 1/2 cup powdered sugar sifted
  • 1/2 tsp pure vanilla extract
  • 1 tbsp almond milk

Instructions

  • Preheat oven to 375 degrees F. Line an 8 inch square baking pan with parchment paper so it hangs in either direction.
  • In a bowl, mix the oats, almond flour, oat flour, maple, salt, cinnamon, coconut oil, and almond butter. Press into the bottom of the pan.
  • Sprinkle the berries on top, then top with a sprinkle of the cornstarch, lemon and sugar.
  • In a bowl, mix together the streusel topping and scatter that on top.
  • Bake for 35-45 minutes until golden brown. Cool completely.
  • In a bowl, whisk together the powdered sugar, vanilla and almond milk and drizzle it on top. Cut into bars and enjoy.

Video

Notes

  • Feel free to swap the almonds for other nuts and seeds such as chopped walnuts, pumpkin seeds, sunflower seeds, or cashew seeds.
  • Almond butter can also be swapped for another nut butter of your choice.
  • If you're making this in advance, you can reheat the breakfast oatmeal bars by microwaving them or baking them in the oven for a couple of minutes until warmed through.

Nutrition

Calories: 454kcal | Carbohydrates: 48g | Protein: 9g | Fat: 27g | Saturated Fat: 11g | Sodium: 106mg | Potassium: 266mg | Fiber: 6g | Sugar: 22g | Vitamin A: 5IU | Vitamin C: 0.8mg | Calcium: 113mg | Iron: 2.2mg

Abbey Sharp

Abbey Sharp is a Registered Dietitian (RD), regulated by the Ontario College of Dietitians. She is a mom, YouTuber, Blogger, award winning cookbook author, media coach specializing in food and nutrition influencers, and a frequent contributor to national publications like Healthline and on national broadcast TV shows.

www.abbeyskitchen.com/about-abbey/
  • Previous Page
  • Go to page 1
  • Go to page 2
  • Go to page 3
  • Go to page 4
  • Go to page 5
  • Interim pages omitted …
  • Go to page 89
  • Next Page

Get started with

Eight Free Recipe Books

From the co-founder of Neue Theory and creator of the Hunger Crushing Combo

Sign me up!
Abbey smiling at table
Abbey Sharp

“Foods may never be nutritionally equal. But we can make them morally equal by recognizing that our worth is never determined by what's on our plate.”

— Abbey Sharp, RD About Abbey ◥

Books

  • HCC™
  • Mindful Glow
  • Free E-Books

Blog

  • Nutrition
  • Recipes
  • Motherhood
  • Life

Explore

  • Neue Theory™
  • Bite Back
  • YouTube

Abbey

  • About
  • Coaching
YouTube TikTok Instagram Facebook X Pinterest
Abbey Sharp - The No BS Dietitian From Abbeys Kitchen

© Abbey's Kitchen 2026  All Rights Reserved •  ACCESSIBILITY STATEMENT •  Privacy Policy

This site uses cookies. By continuing to browse the site, you are agreeing to the use of cookies Accept Privacy Policy
Privacy & Cookies Policy

Privacy Overview

This website uses cookies to improve your experience while you navigate through the website. Out of these, the cookies that are categorized as necessary are stored on your browser as they are essential for the working of basic functionalities of the website. We also use third-party cookies that help us analyze and understand how you use this website. These cookies will be stored in your browser only with your consent. You also have the option to opt-out of these cookies. But opting out of some of these cookies may affect your browsing experience.
Necessary
Always Enabled
Necessary cookies are absolutely essential for the website to function properly. This category only includes cookies that ensures basic functionalities and security features of the website. These cookies do not store any personal information.
Non-necessary
Any cookies that may not be particularly necessary for the website to function and is used specifically to collect user personal data via analytics, ads, other embedded contents are termed as non-necessary cookies. It is mandatory to procure user consent prior to running these cookies on your website.
SAVE & ACCEPT

Rate This Recipe

Your vote:


A rating is required
A name is required
An email is required